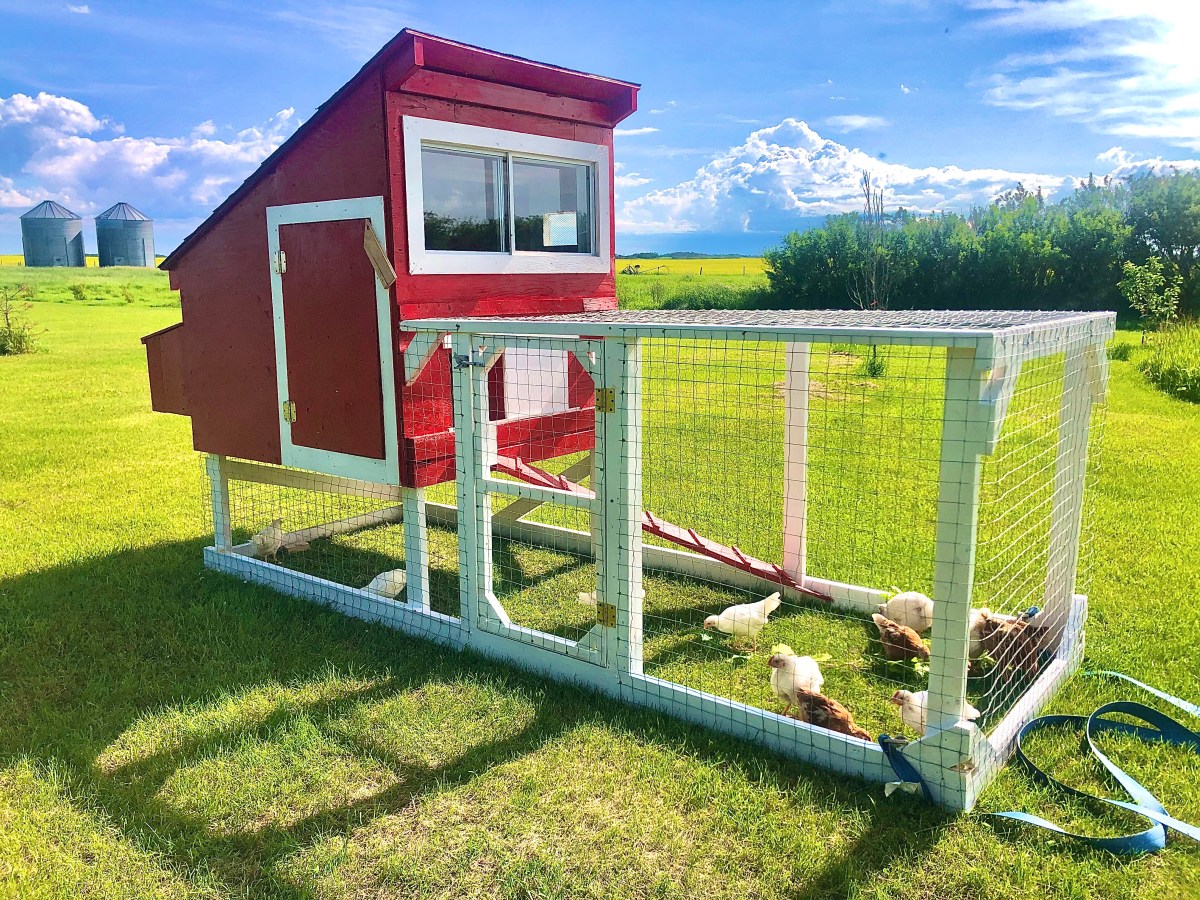
A luxury chicken tractor on a budget?!!
I know, those two words don’t seem to go together. “Budget” and “luxury” aren’t usually something you can combine, right?
My husband would certainly agree!
While this project turned out to be more time invested that he had banked on (and turned out much nicer than many chicken tractors we have seen on YouTube or Pinterest), it still WAS a budget chicken tractor!
So what makes it “luxury” AND “budget” at the same time?!
Well, the fact that we repurposed so many materials to create this “tiny house” for chickens is a big factor for the budget argument.
The luxury part? How many chickens have such a sharp looking condo…
… opening windows, a spacious interior, and fresh greens to chow down on daily?
Yep! For chickens that is as close to luxury as it gets!
Let me back this train up a bit and explain why we are even working on this project in the first place.
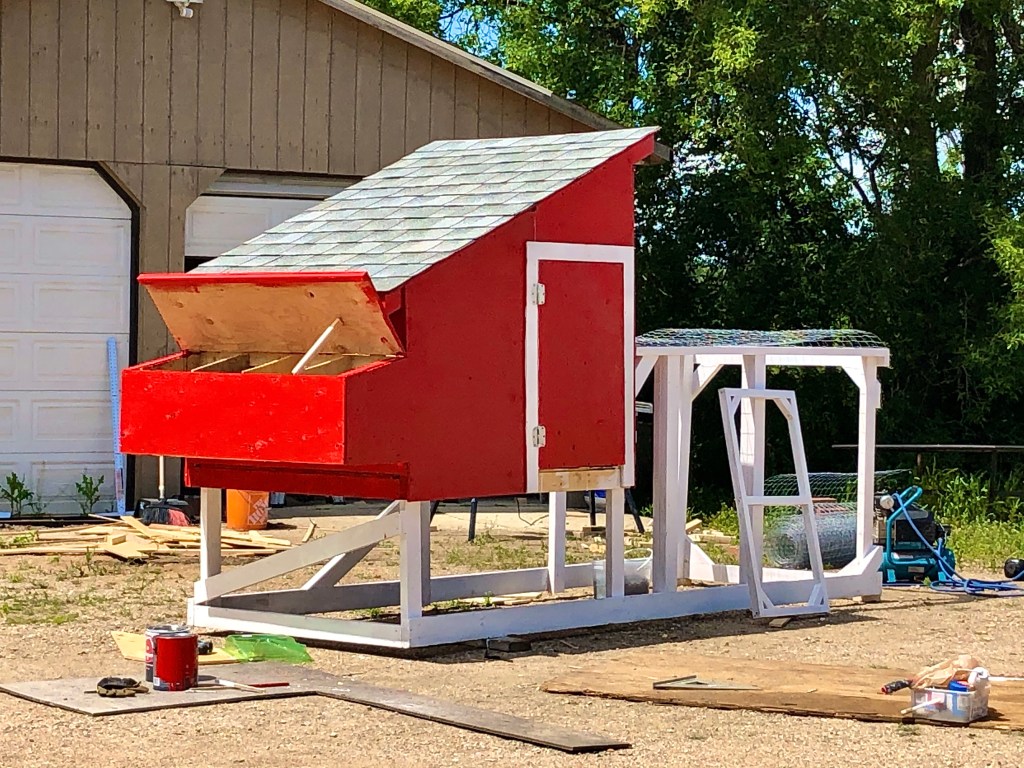
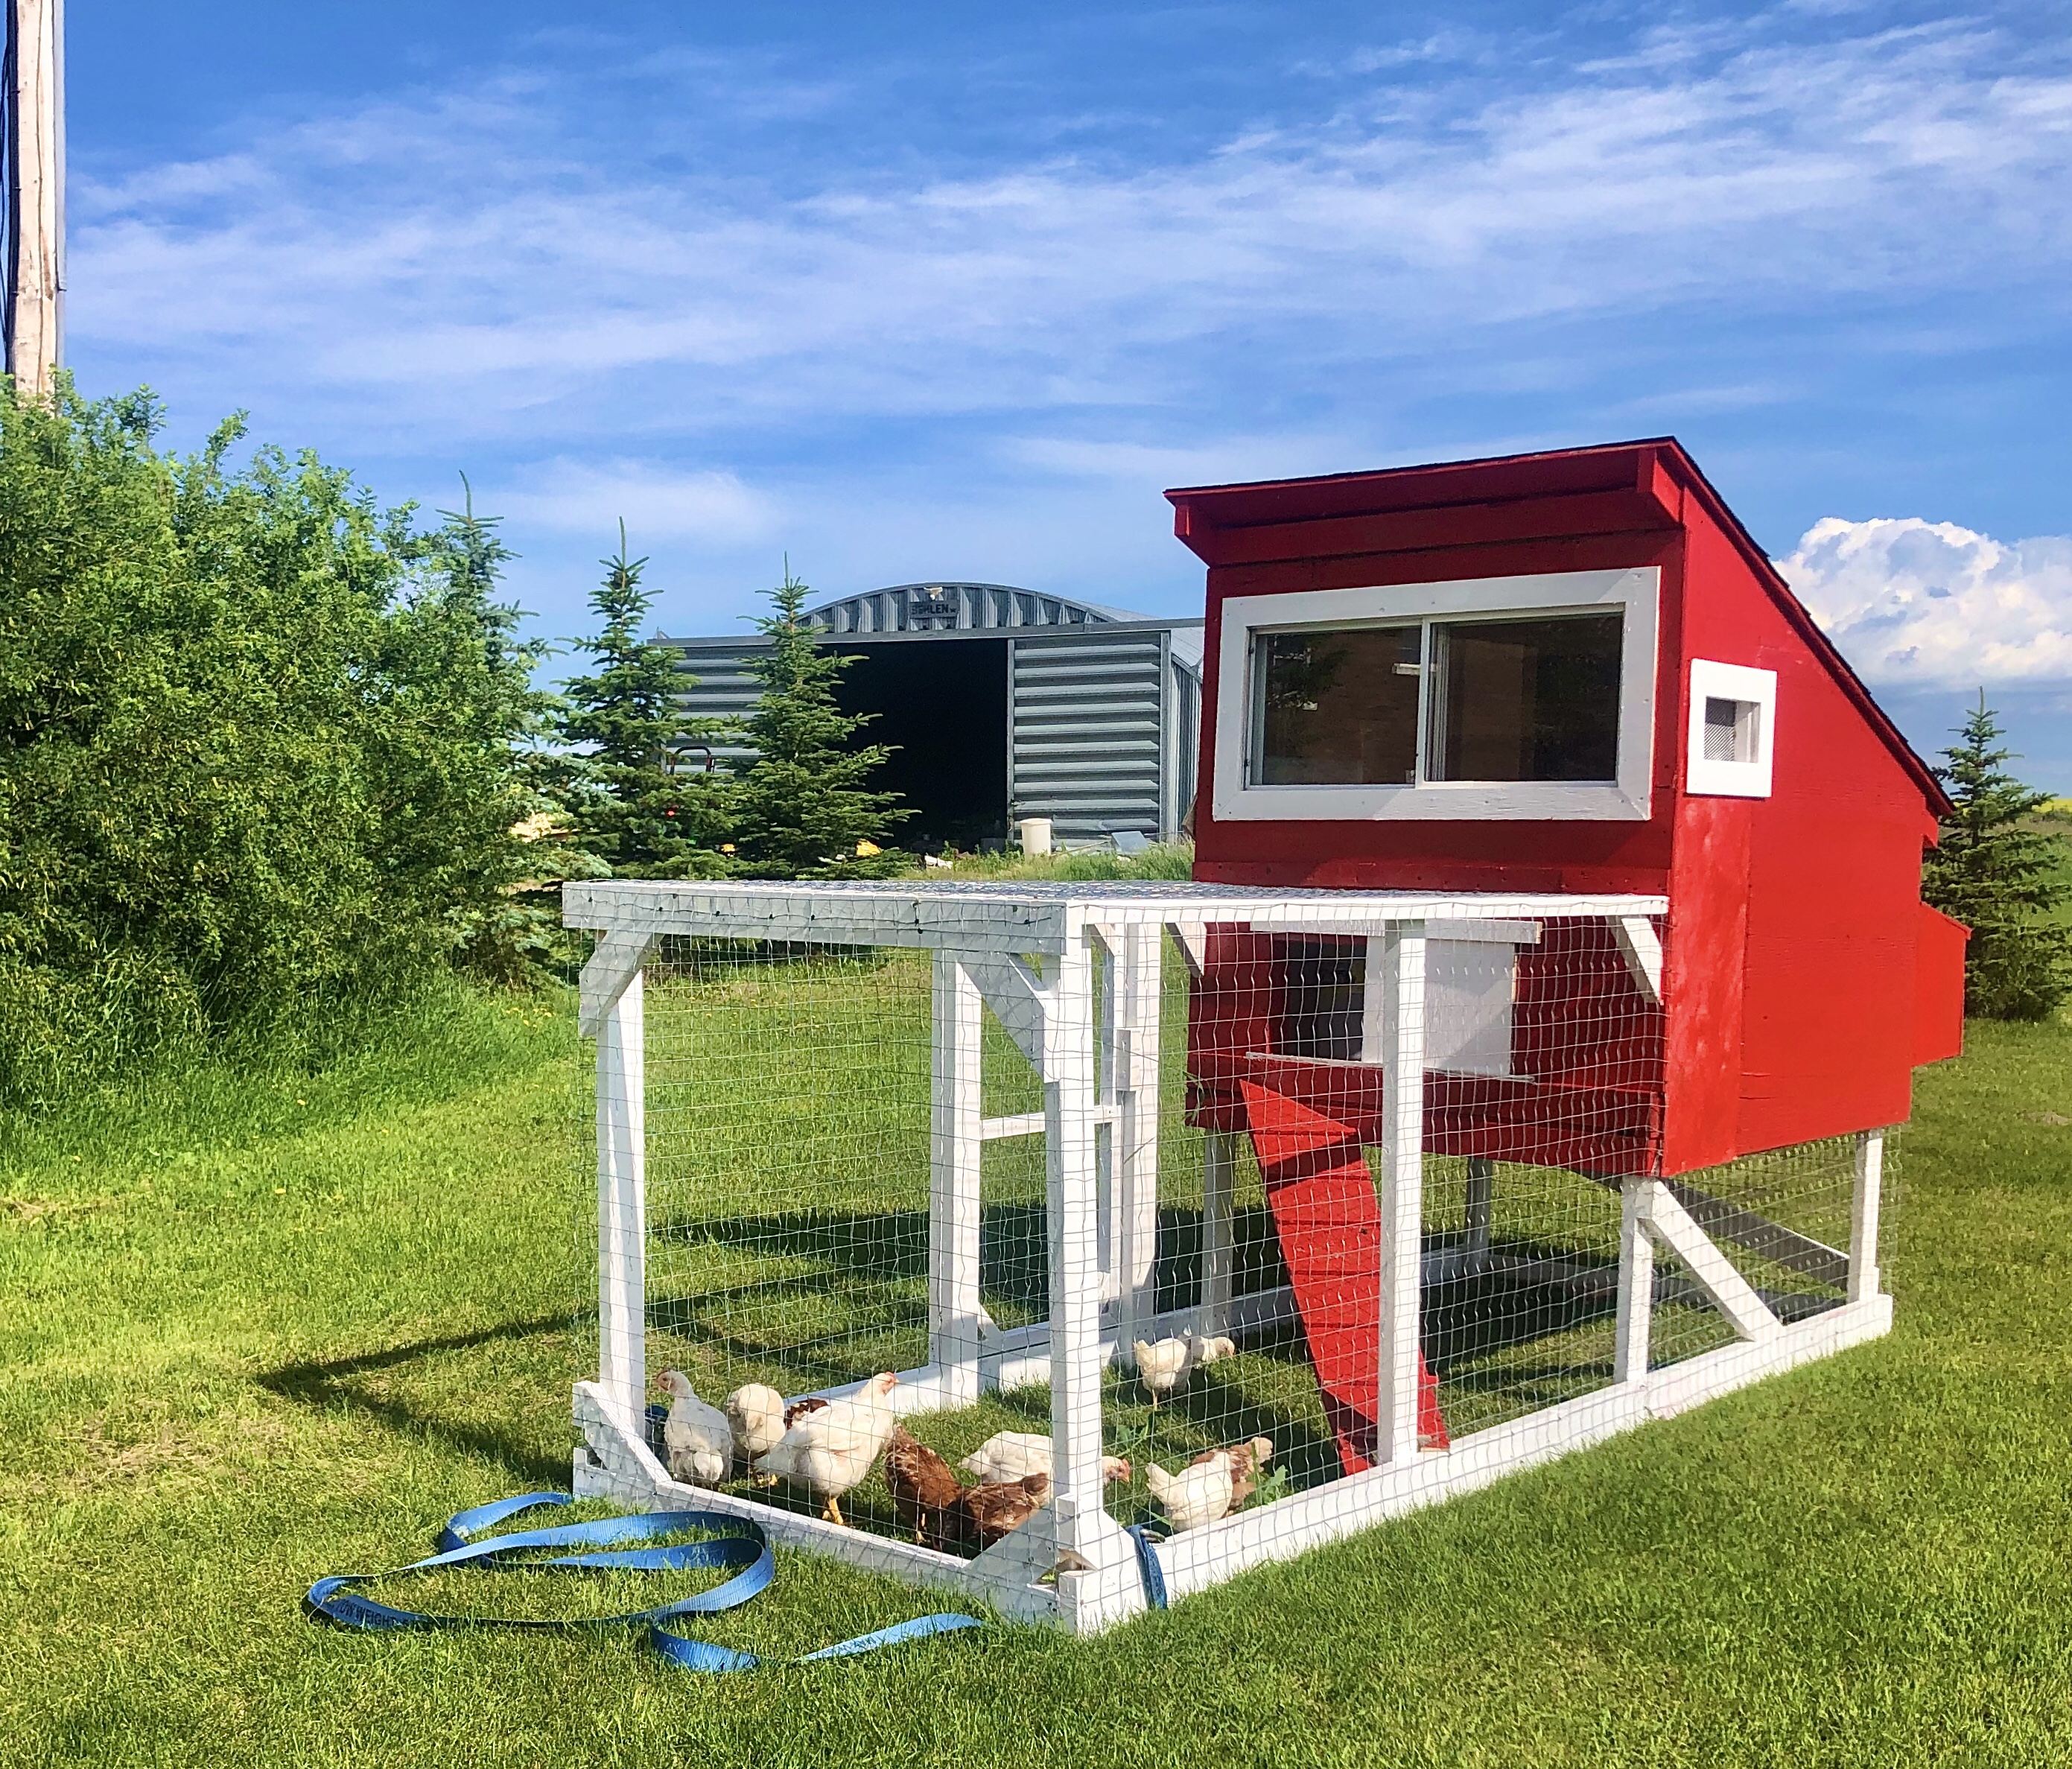
Chicken Tractor Dimensions
Run: 12′ long x 4′ wide
2′ tall under the coop
4′ tall for the main part of the run
Coop: 5′ long x 4′ wide
Roof height starts at 5′ high and slopes down to 3′ high
Nesting Boxes: 12″ deep x 12″ wide per box
4 nesting boxes = total width of 4′ on the chicken tractor
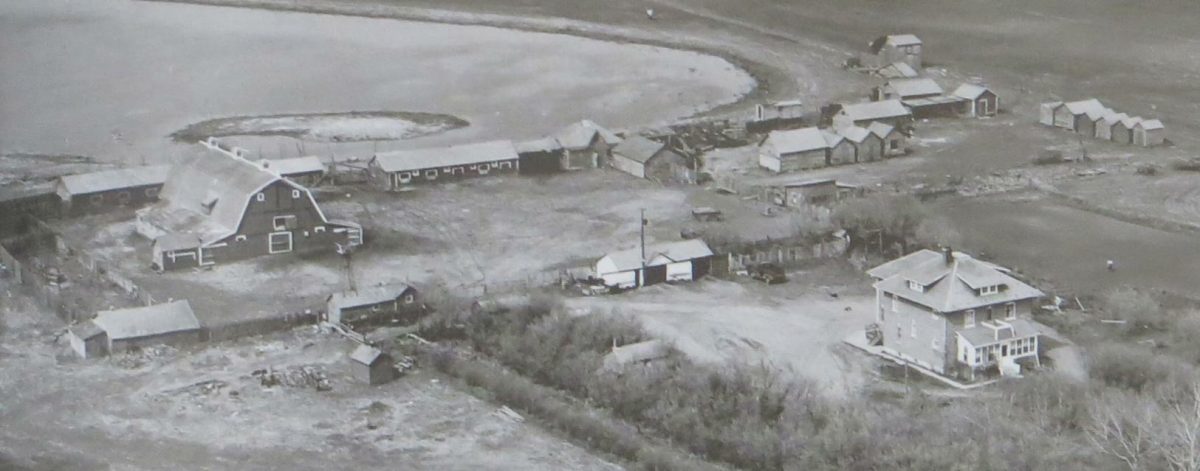
The year is 2020… Enough said!
Just kidding… We had actually talked about getting chickens well before COVID-19 was ever a factor (that being said, trying to buy eggs and the store being sold out at one point early in the pandemic confirmed our decision was a good choice!)
I grew up with chickens – I must have been so young when we first got them that I can’t remember a time in my childhood without chickens and fresh eggs.
Sure, the hens weren’t always laying consistently during the winter months, but we still had some fresh eggs even then…
We had Barred Rock hens that were nicknamed the “Hornet Sisters” because they dug up and killed an entire wasp colony – after I got stung multiple times when I accidentally stepped on their nest!
As children, we also had one pet bantam hen per kid that would come when we called and sit on our shoulder for treats (yes, sometimes they would poop on us… But not that often).
And YES! We named them; mine was named Henny Penny.
But we also learned to respect and appreciate where meat comes from at a young age.
And of course, the work that goes into keeping animals was a lesson learned first-hand.
Now, fast-forward back to 2020
My husband, Jake, and I have been working hard on our acreage to become more independent and have a healthy lifestyle – so fresh, free-range eggs fit right into that plan.
BUT the big debate was where the chickens would live; would we go super cheap and fab a freezer or fridge for them to live in?
No!
So would we sink money into the full-on chicken coop and run that I drew up plans for – that would cost us about $4,000?!!
Also, no!
So what was the middle ground that wouldn’t cost an arm and a leg, but still get the job done?
When we settled on the idea of a chicken tractor, we didn’t plan on it to turn out quite so… well… fancy.
It was supposed to be a quick, easy project to get the “cheeps” (as they have been nicknamed – aka “cheep-cheeps” or “cheepos”) outside to eat grass.
The push to make the build happen
Let me tell you – when chicks are 1 day old they are so cute!
They are fluffy and tiny and just adorable…
2 or 3 week old chickens in the house – well– they SMELL! Yuck!
We needed to decide on our plan for these cheeps – FAST!
So we went with the chicken tractor.
Personally, I think the plan turned out quite well…
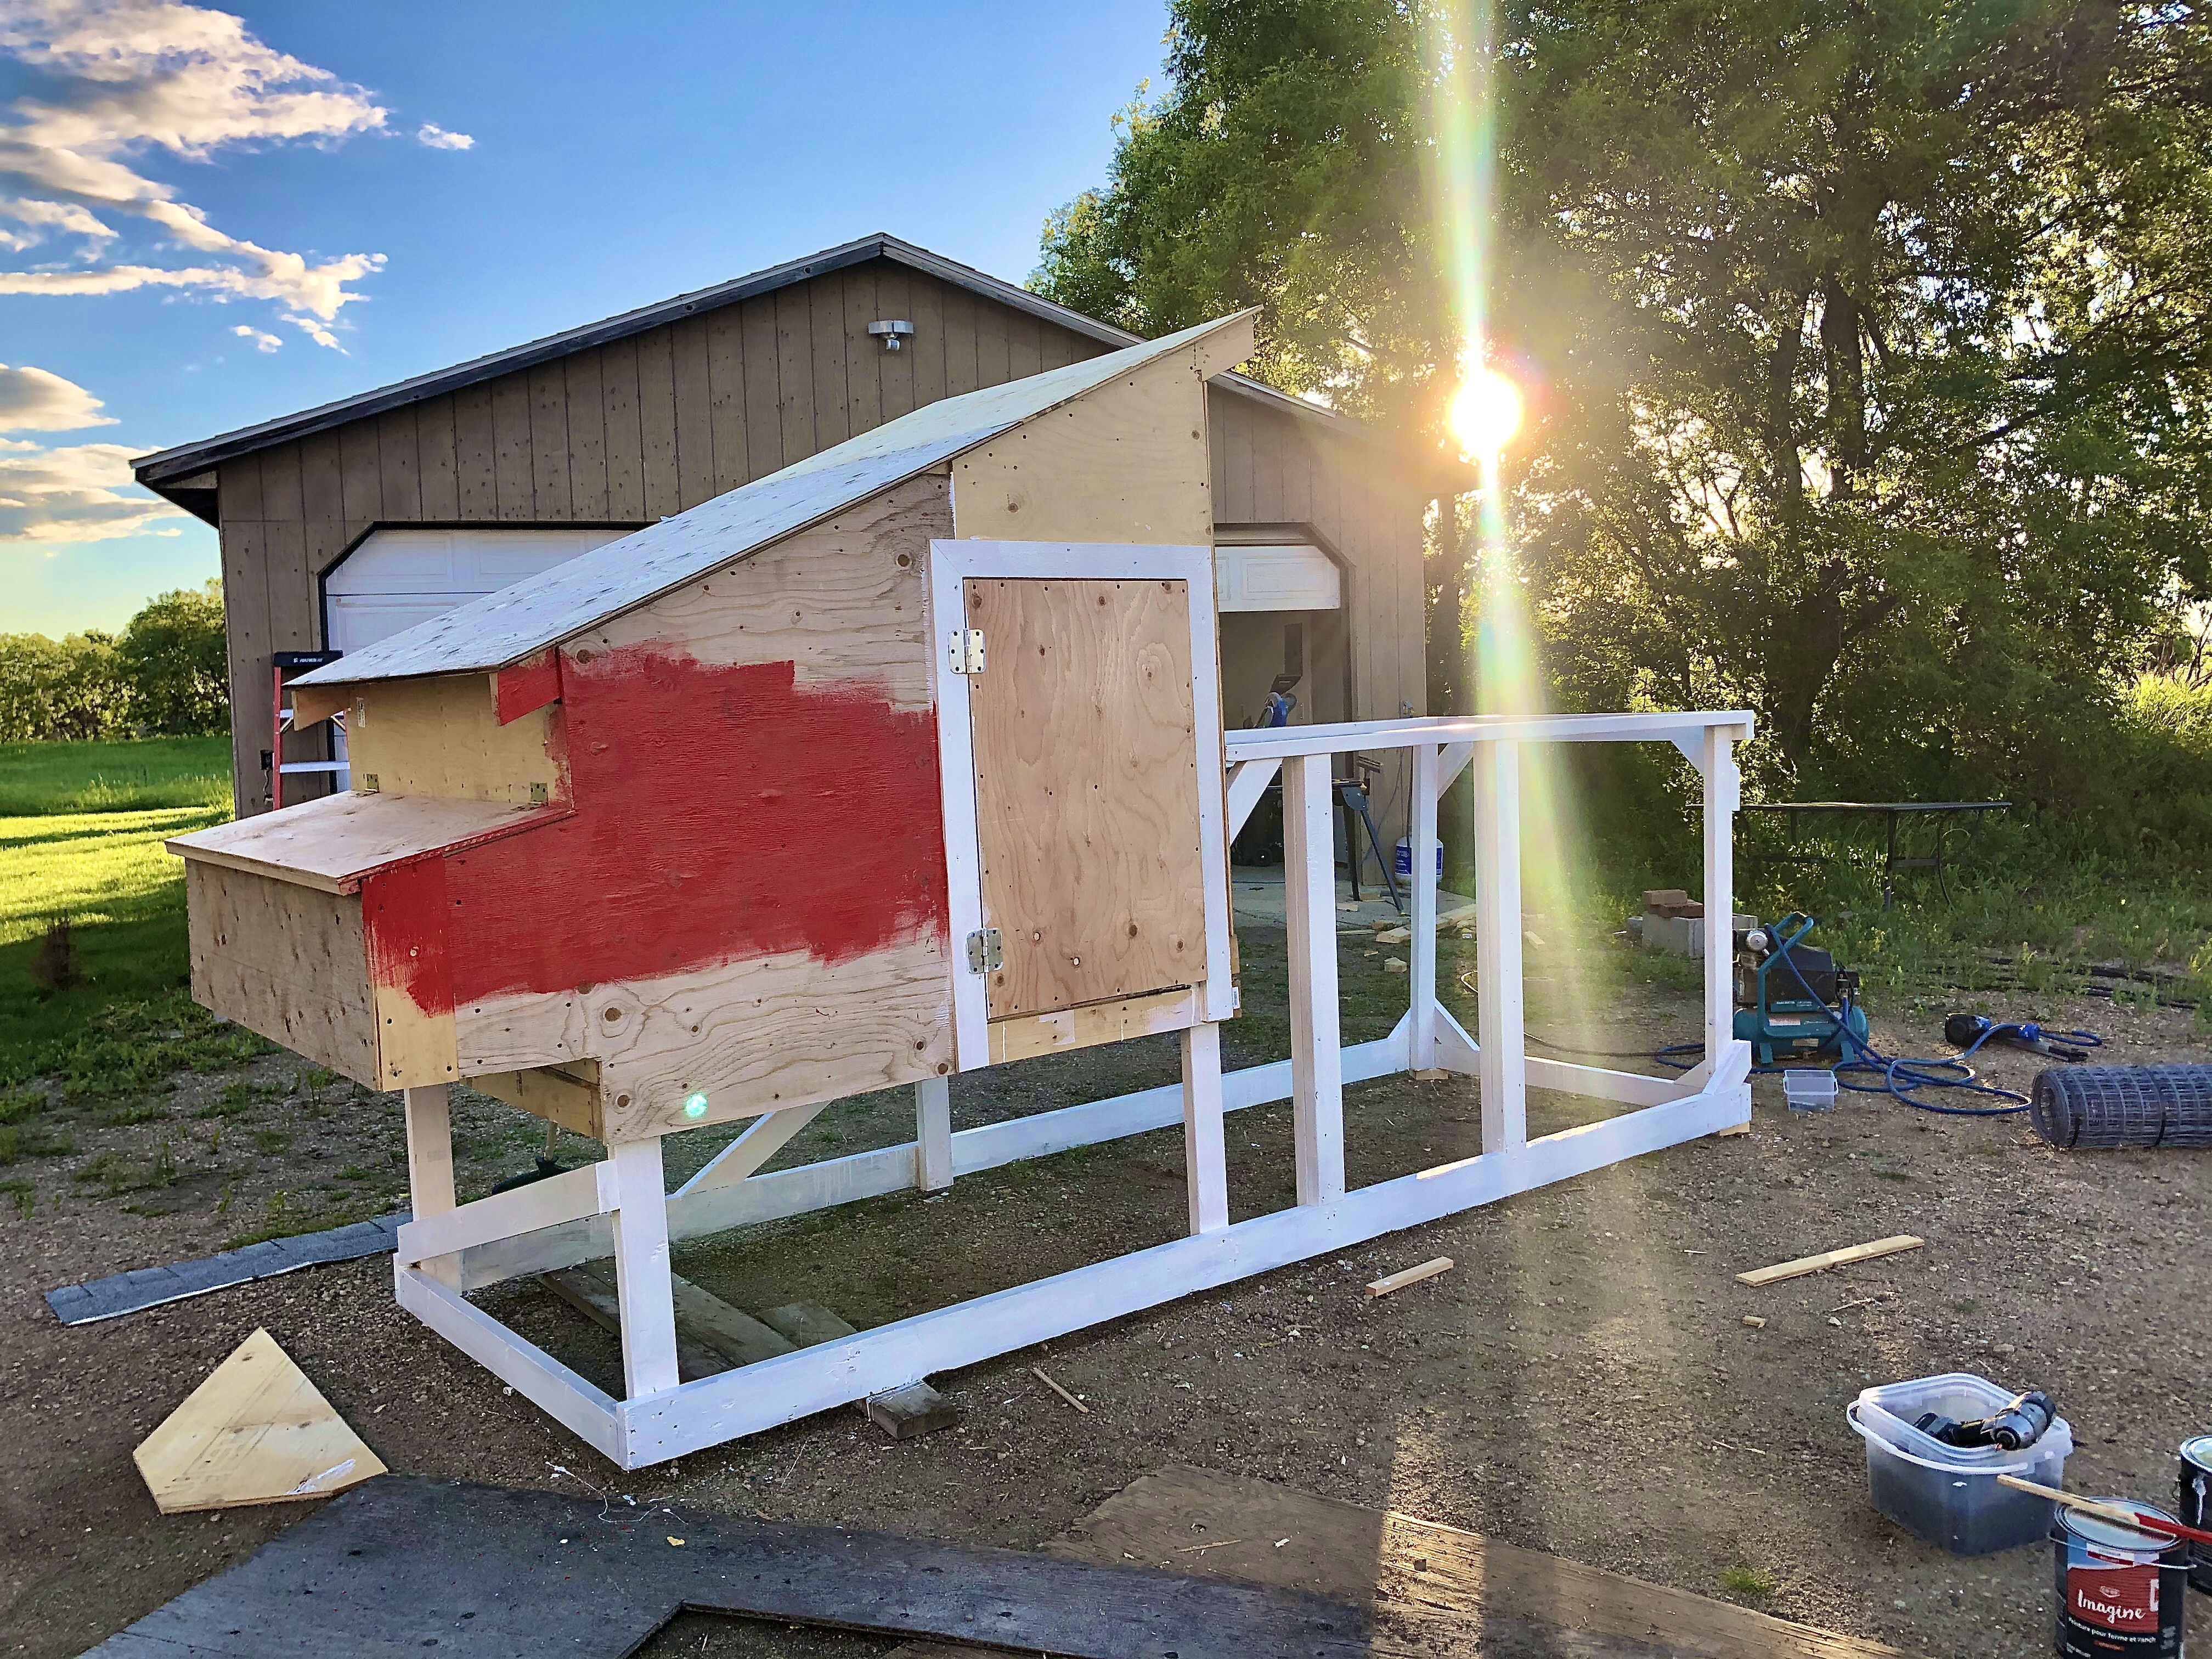
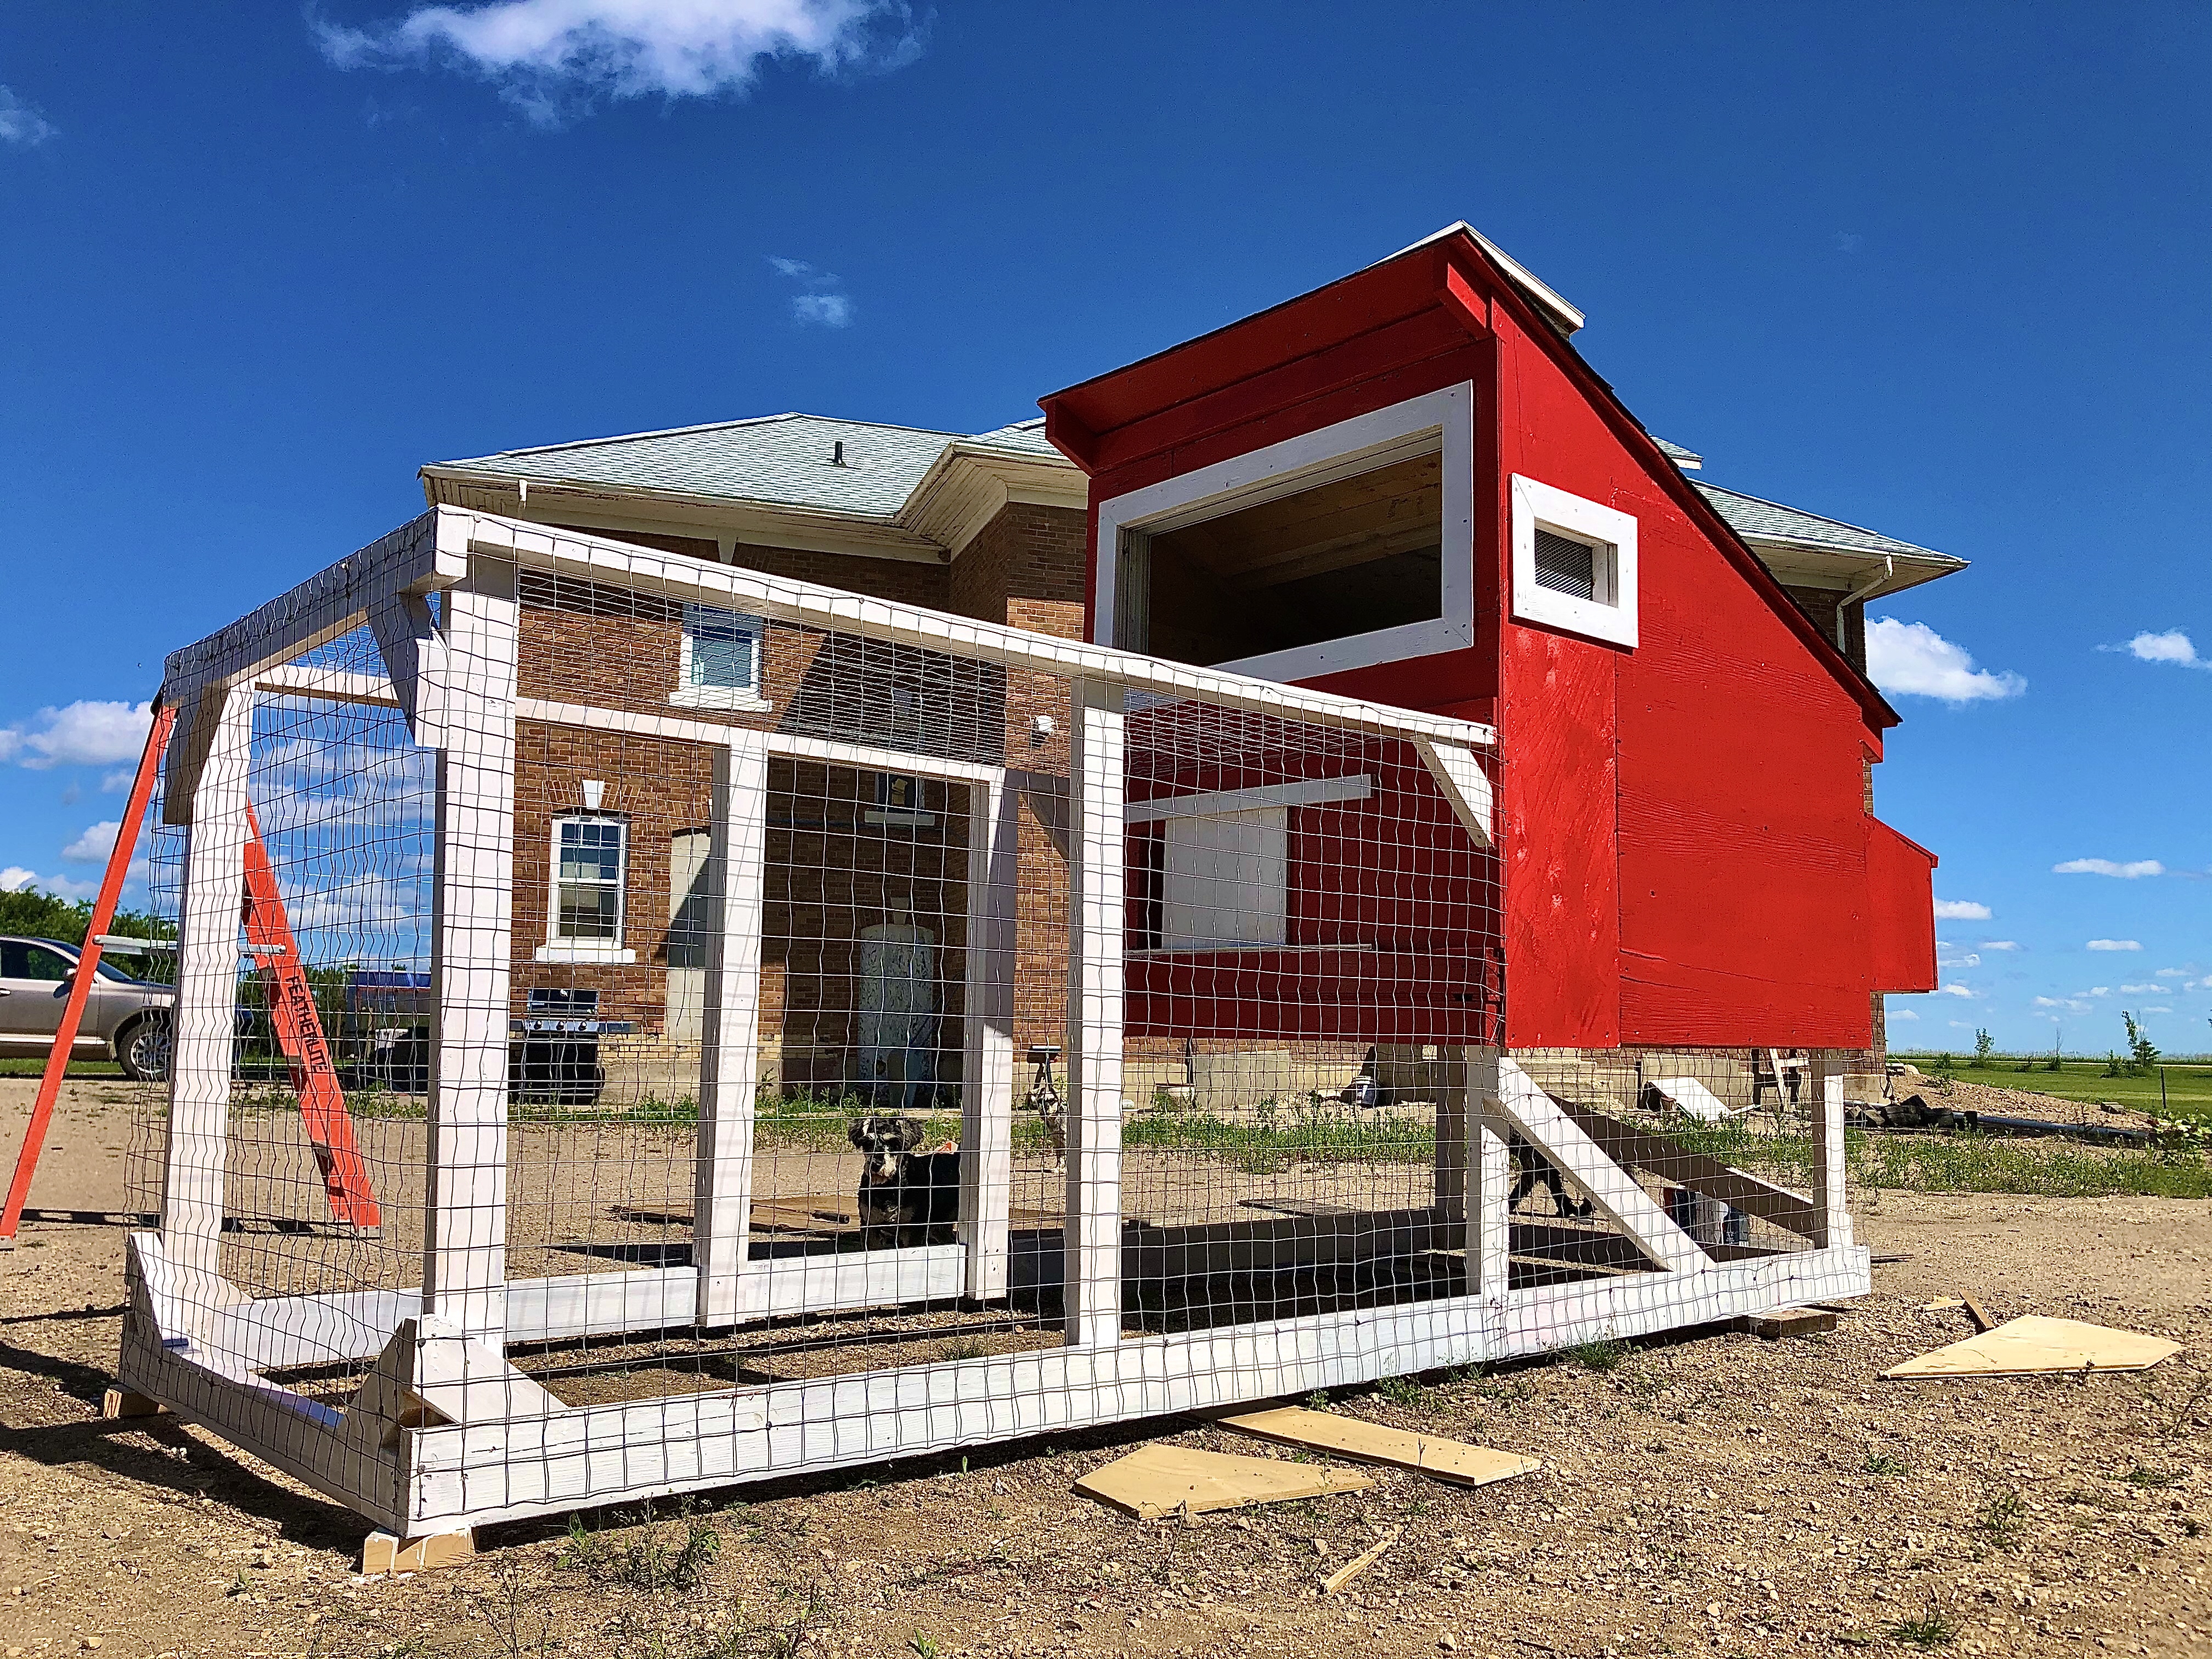
The design is top notch, the color scheme is vintage barn red with white trim, and the cheeps love to stretch their little wings flying up and down their little yard space.
One of the biggest differences we made compared to many of the chicken tractors you will find on YouTube or Pinterest is the fact that we built their ramp on an angle and attached the bottom of the ramp to the frame of the run.

Why is this an innovative idea?
Most chicken tractors have the ramp sitting on the ground and have to have the ramp lifted before transporting the chicken tractor to the next part of the acreage for new grass…
… Moving parts make for more work and more chance of breaking!
(Plus extra hardware costs more money)
Having the ramp on an angle means that we do not have to worry about moving it up and down each time we move the chicken tractor.
One concern that was brought up was whether or not the chickens would fall off the ramp or if they would be able to figure out how to use it properly…
Well! Let me tell ya, they only use the ramp half the time at this young age.
At this point, they are flying down from their coop door – and flying back up again!
Once they are fully grown we will see if they still do this, but for now I am happily amused by watching them try to fly.
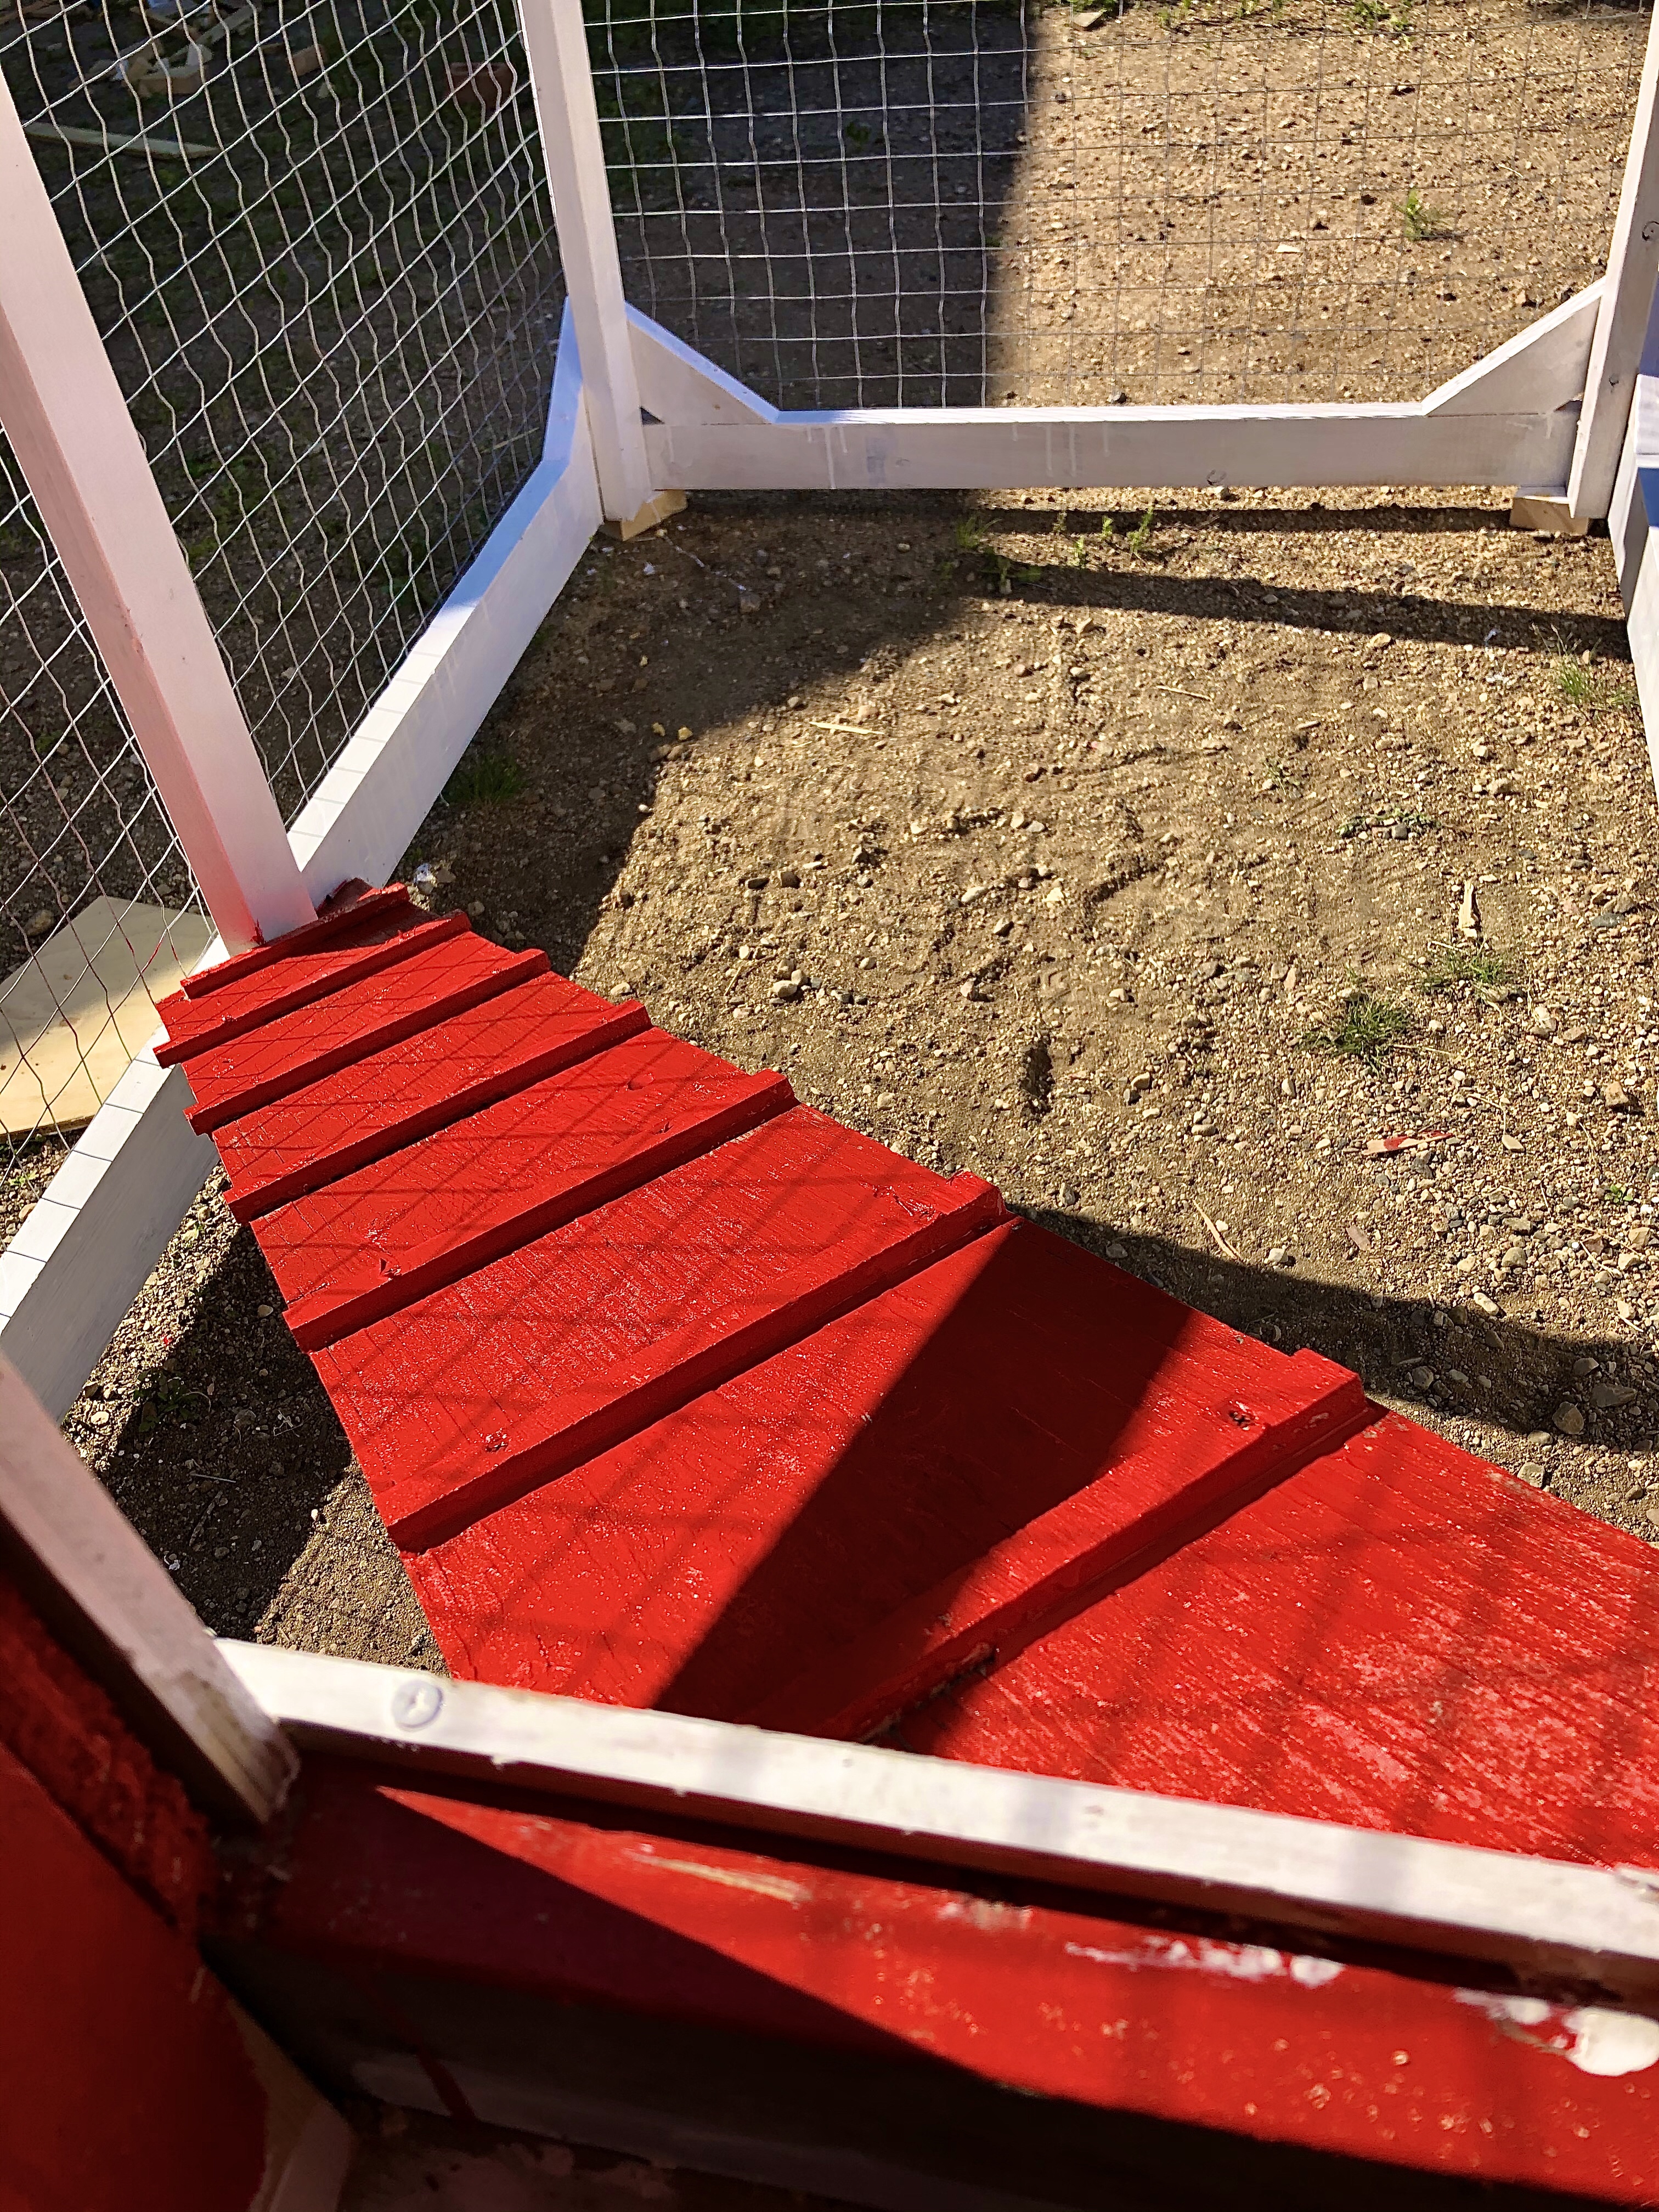
We installed treads along the ramp to make sure the chicks wouldn’t slip off when they were coming up or going down.
The features
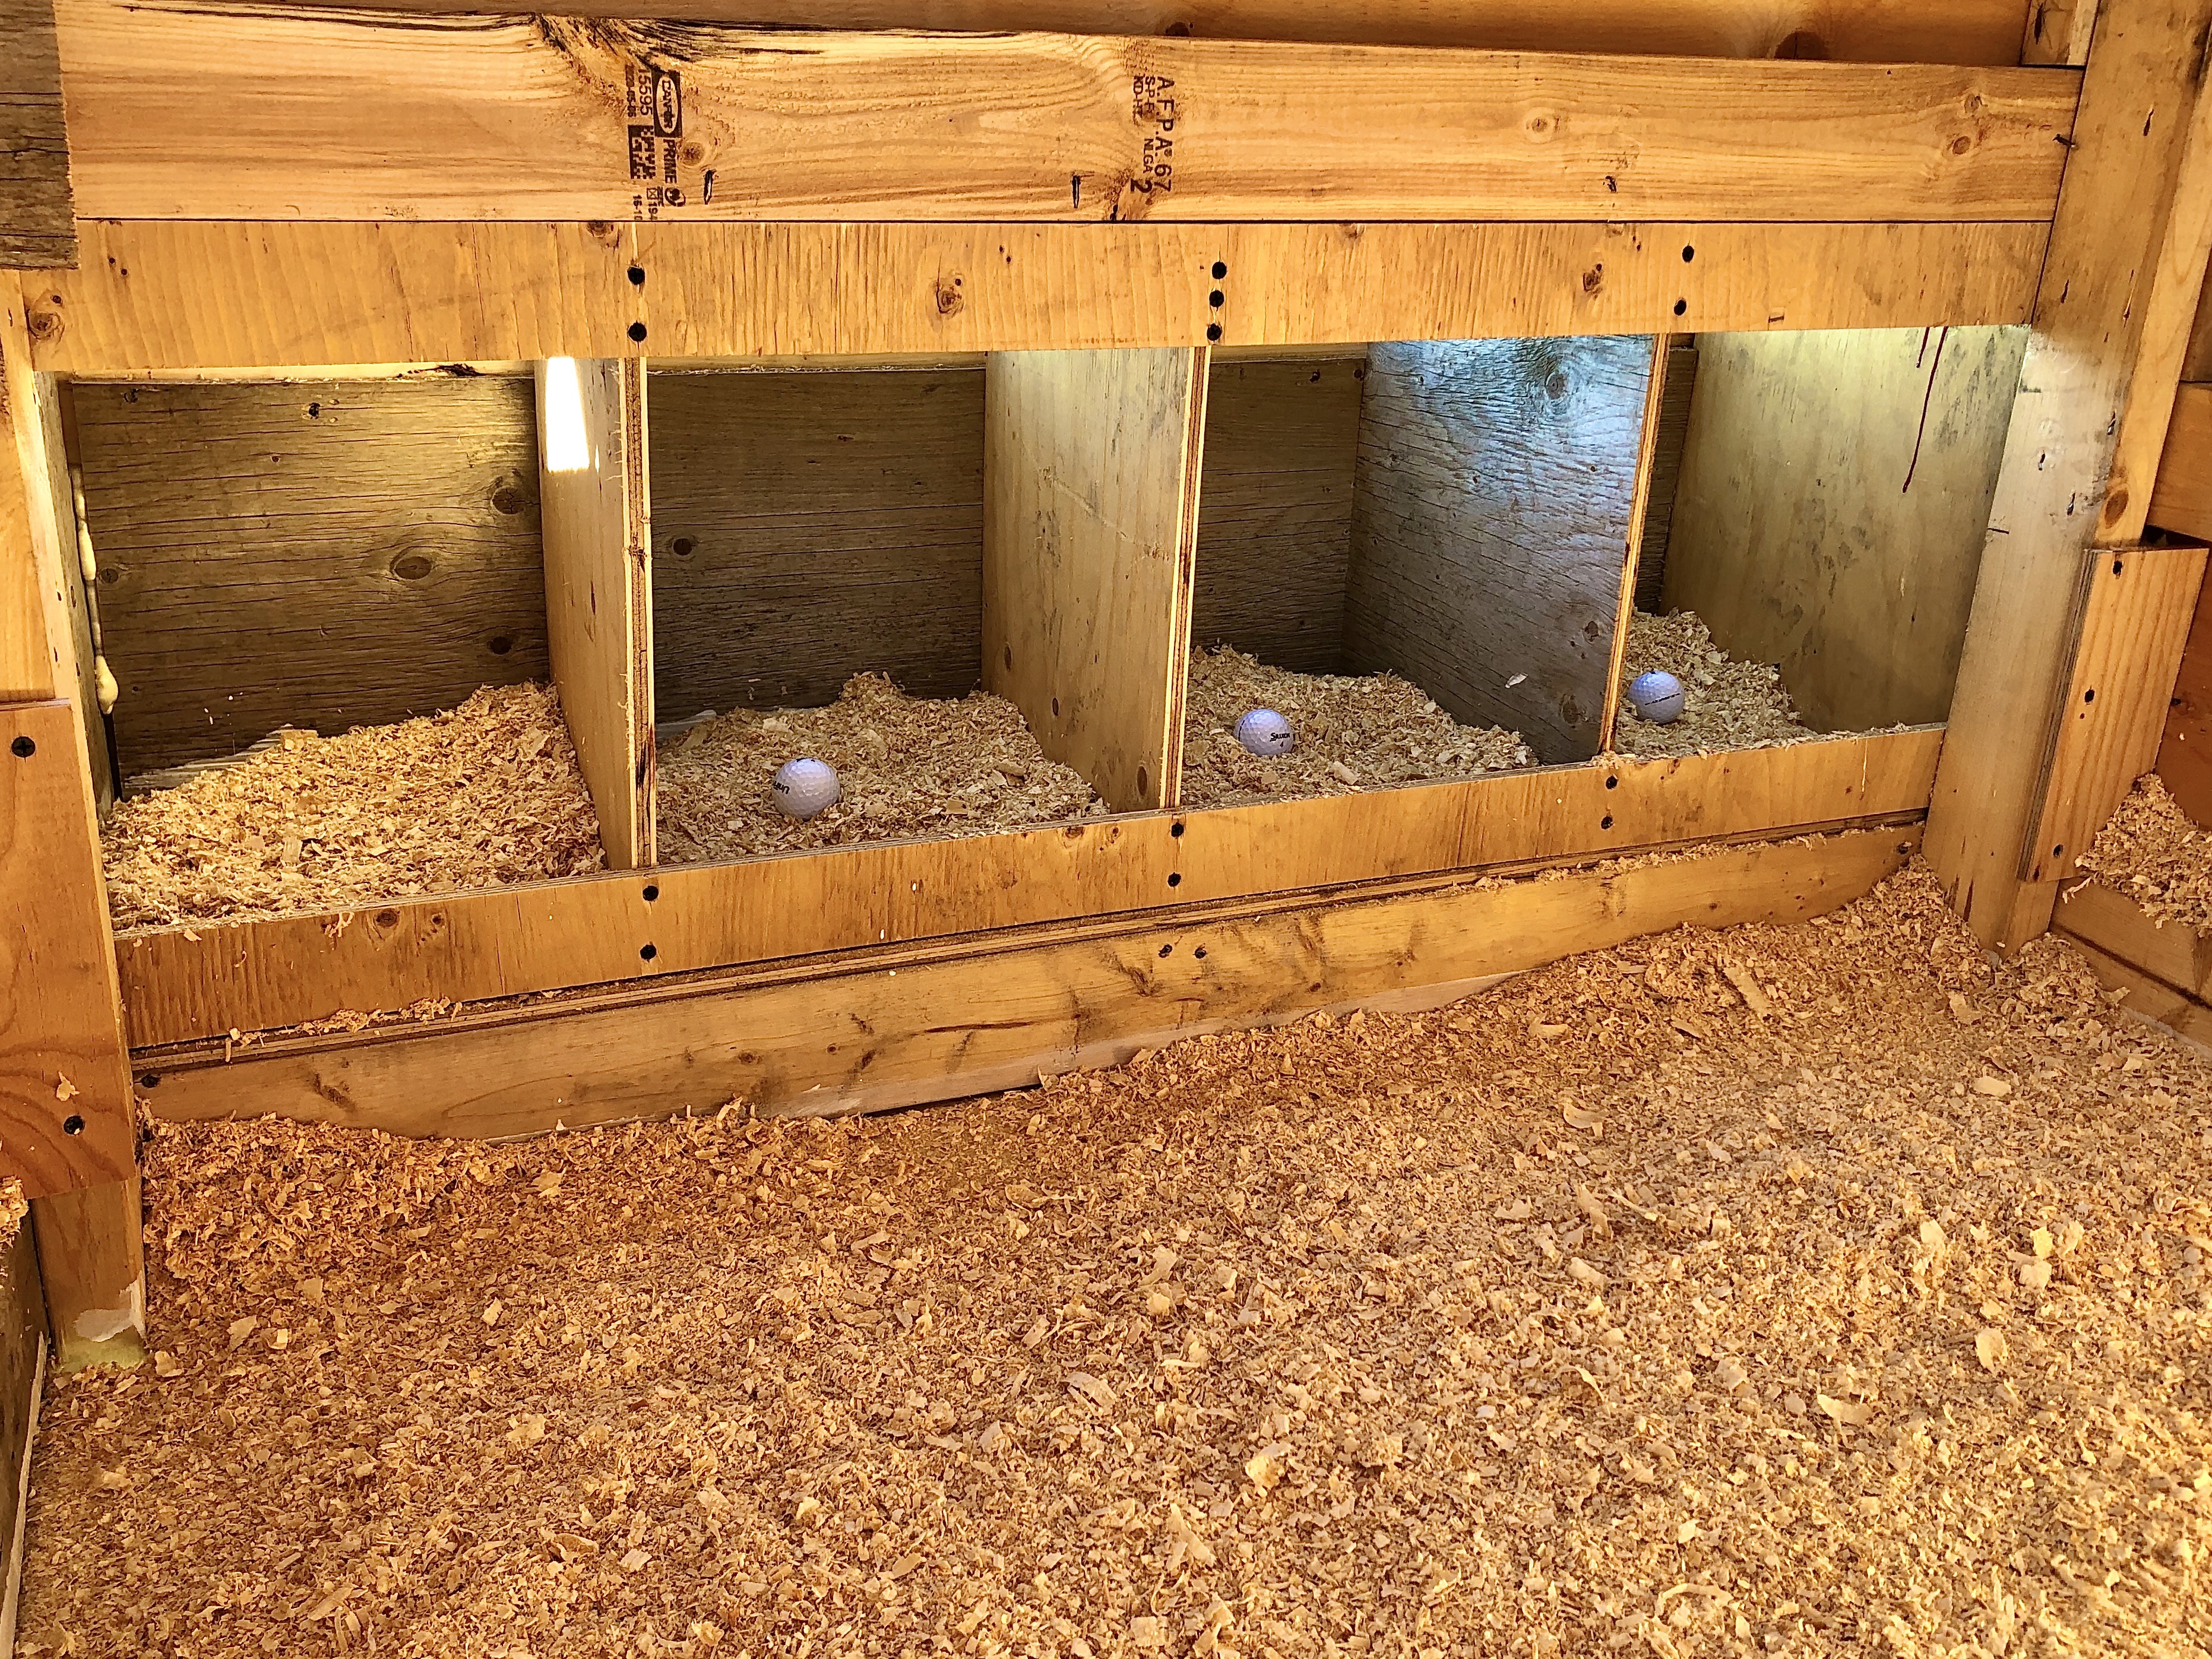
Laying Nests
The next highlight of this luxury chicken tractor (on a budget) is the laying nest setup.
As with many chicken tractors, the laying boxes open from the top on the outside so I can easily collect eggs.
If any of you have ever had to walk through a dusty chicken coop (or worse yet – one that needs to be mucked out) to collect eggs, you will know how nice it is to not have to step foot inside!
Some of you are looking at the photo below thinking that we have a few eggs to pick… while others of you are wondering why on earth there are GOLF BALLS in the nesting boxes?!
Yep. Golf balls.
WHY?
They are there to help teach the hens where to lay. Weird, I know, but it works.
Also, if there are “egg breakers” in the flock, this will help cure them of the habit.
Easy Cleaning
Another nice feature is the fact that there is no lip on the coop door opening, so I can simply scoop or sweep the dirty wood shavings directly into the wheel barrow below.
Easy coop cleaning is a must!
Roosts
Chickens love to roost, especially at night!
This is an addition we still need to make at the moment, but once we do, they will have that much more space inside their coop to hang out comfortably.
We will be going with natural wood from small trees around the acreage for both the “budget” factor as well as the fact that it is supposed to be easier on the feet for the cheeps as opposed to a square shaped roost.
Chicken Door
Obviously a sliding door to close them in at night is a good security feature…
Most nights they put themselves to bed around nightfall and are ready to simply have the door closed.
The first day we let the chicks into the chicken tractor, we put them directly into the run so they could enjoy the grass and figure out the ramp from down below (rather than fall out of the coop from above).
That first night we had to catch them and put them into the coop, but since then they have gotten their new home all figured out!
Some people will even go as far as upgrading from a manual chicken door to one set on a timer to open and close at dawn and dusk!
But remember, we are doing a BUDGET chicken tractor here, right?!
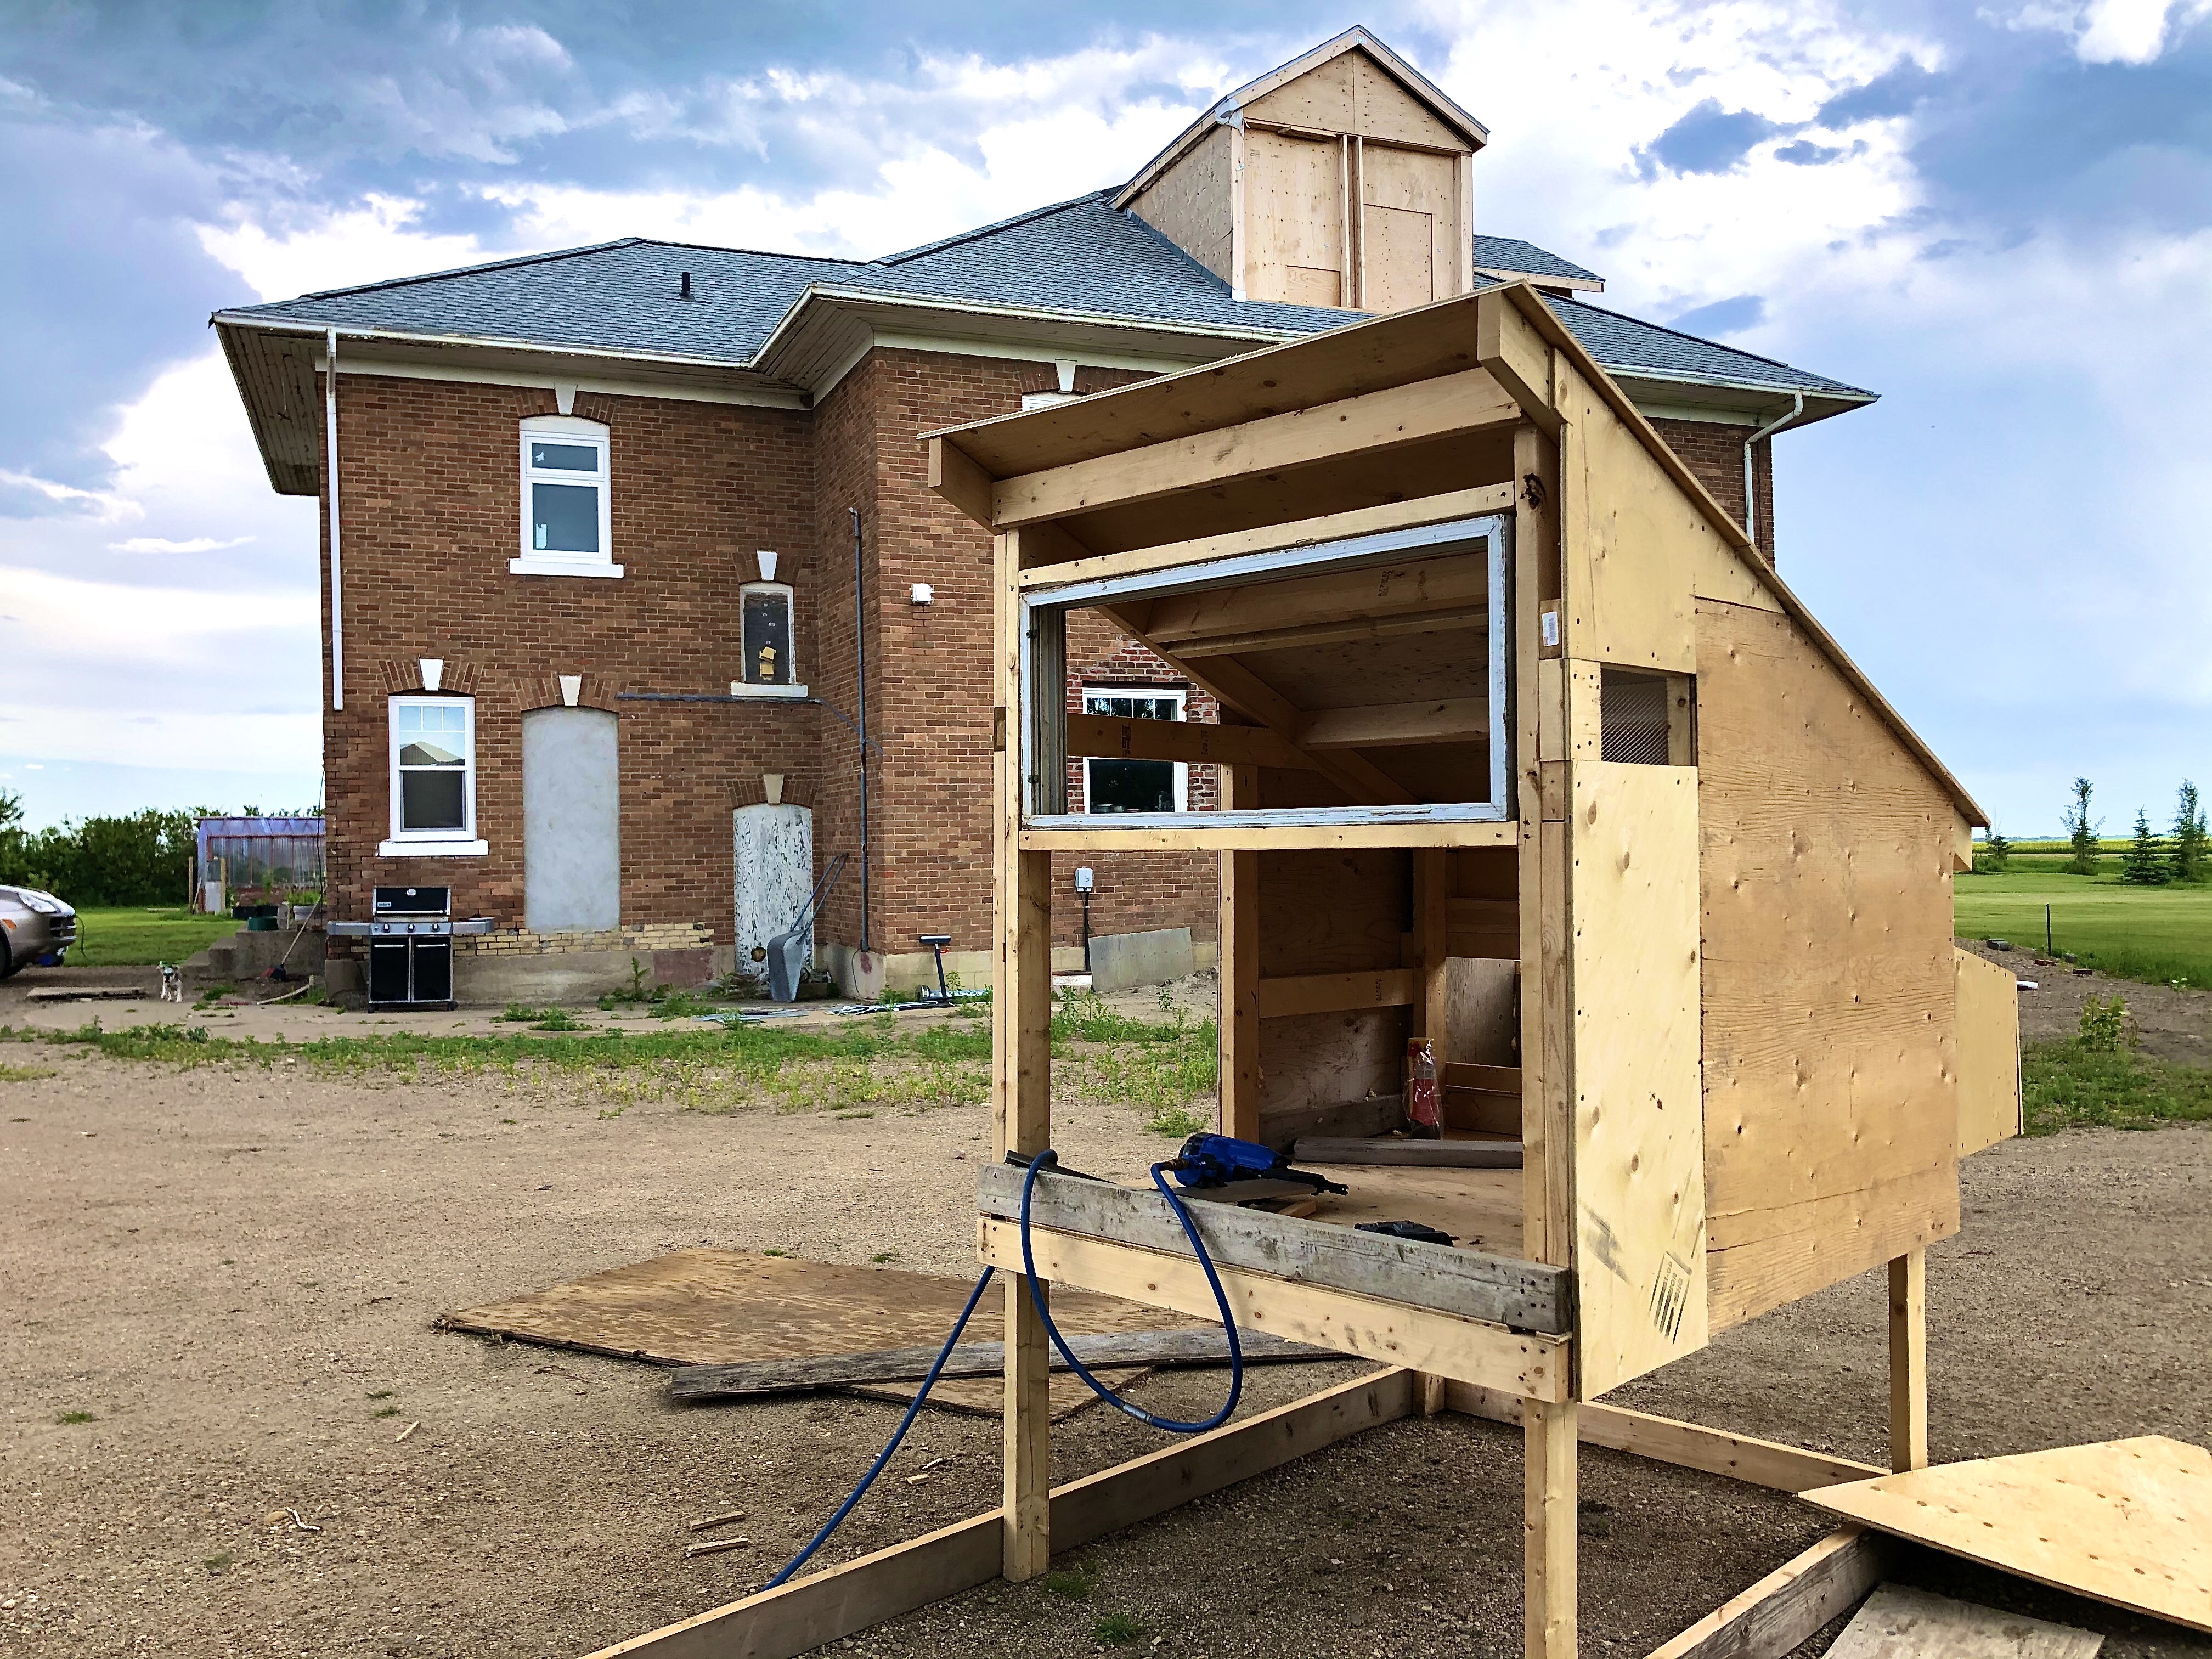
The window & vent
Chickens need natural light to lay well (about 14 hours worth, if I’m not mistaken).
During the darker months, they often will not lay as consistently if they lack light.
While we could add a light to mimic sunlight, at least having a window to give them natural daylight helps a lot.
The vent is needed to keep fresh, clean air circulating in their coop.
Even during cool months, chickens need sufficient circulation to keep them healthy; if it gets too damp and musky in the coop it will cause problems!
Height
The height of the coop is a HUGE benefit!
The chicken tractor is designed to allow the chickens to eat and play underneath the coop and is an easy height for me to clean out (remember the wheel barrow fitting right under the door for cleaning?)
It also allows easy access so I can reach in to fill their feeder, check their water, and open the nest box without having to bend down.
Flooring
The flooring is a sturdy, plywood floor.
We painted it to help with the ease of cleaning.
Some people choose to use off-sale laminate or linoleum flooring; this makes the dirty wood shavings sweep out of the coop that much easier. We didn’t have any on hand, so we didn’t fork out the extra cash to go that route.
You remember how I said this was a “budget” project?
Let me get into that part!
We used a window we had removed from the 3rd story when we ditched the old windows and replaced them with high-efficiency ones.
It would have ended up in a landfill if it had not been repurposed, therefore it is not only cost effective for us, but also more environmentally responsible.
(Don’t get me wrong; I’m not one of those people worried about cow farts contributing to “climate change,” but I HATE people littering and I hate to waste resources)
Some other ways this was a “budget build” is the fact that we used a lot of scrap wood we had left over from other house projects.
LIKE A LOT!
We used so many small pieces of boards that would have been useless on most other projects, plywood, and even used shingles we had left over from roofing our house last fall (yes, they were still good strips that could be used to patch the roof later, but the point is – we had extras on hand)!
What did we spend money on?
Wire
This was likely the largest cost for this project; quality wire is not cheap!
What they call “chicken wire” is okay for keeping chickens inside an enclosure, however if you need to worry about keeping critters out (foxes, dogs, etc) you need something much hardier!
Also, adding wire to the top of the chicken tractor was necessary to keep the chickens inside – AND keep the hawks and eagles OUT!
I have seen large birds of prey take out a few chickens over the years, so this was a big concern of mine…
Lumber
With the scrap lumber on hand, we still did have to buy some 2×4’s and plywood to finish the project.
Paint
Paint was something that we did not have on hand – at least not in the exterior variety that would hold up to our harsh weather.
Insulation
We live in a very cold climate and needed to have the coop insulated for the winter months. We purchased a few small spray foam bottles to seal up the corners that would make the coop drafty and then used old bats of fibreglass insulation for the rest of the coop. (NOTE: chickens will eat insulation, so you need to make sure you have it covered so they can’t munch on it!)
Hardware
We had old hinges on hand from other projects, however had to purchase latches for the run and coop doors.
Wheels
Well, as you can see from these photos we haven’t installed wheels yet… That is a purchase we still need to make at this point, but it will be a cost when all is said and done.
Feeder & Waterer
You would not believe how hard it can be to find some of the basic items needed to raise chickens during prime-time in the spring!
I searched everywhere for a feeder and waterer when we were getting the chicks – only to find a feeder, but NOT a waterer that the tiny chicks would be able to drink out of!
I ended up making a homemade waterer using a Tupperware and a flaxseed oil bottle to mimic the “self-watering” capabilities of a store-bought waterer… And it worked!
However, when the chicks were large enough, they got to start using a proper waterer.

All in all, having a mobile chicken tractor to move around the yard has been a great choice!
Yes, it took time and thought to build, but we don’t have any dead patches of earth where the chickens have demolished their run (the way they do in a stationary chicken run) and I personally like the idea of fresh eggs that are truly “free range” quality without the worry of a chicken mysteriously disappearing due to a hungry animal!
Now all I need to grab is a good ol’ fashioned metal egg basket for when our chickens start laying and I’m set!
I can’t wait to make my first batch of devilled eggs or potato salad with fresh, home-raised eggs!

Are you raising chickens for the first time? Drop a comment below if this post has been helpful for you!

interested to know, what was te total cost?
LikeLiked by 1 person
All in all, we spent somewhere between $200-$300 in the supplies we had to buy – and we still have at least half the roll of wire left over to use on future projects.
The fact that we had scrap/leftover materials on hand really helped.
Oh, I should mention that this is in CAD and during the huge spike in lumber prices during the pandemic, which makes a difference in our overall spend.
LikeLike