I love a good savoury jalapeño cheddar loaf during the cold winter months, so I decided to turn my recipe into super pretty dinner rolls!
Advertisements
It looks so fancy doing these as knots, but it is actually very easy to make. Why not get the “wow factor” with just a minute or two of extra effort?
I have a bread maker and use it quite a bit; some of my recipes I will do by hand, but this one I just pop into the bread maker on the “dough” setting and it kneads and rises until the dough is ready for me to roll out and finish.
Advertisements
And NO! I am not going to give you some big, long story before getting down to the nitty gritty of h0w to make this recipe (YOU’RE WELCOME! haha)
First, add all the ingredients to your bread maker. Start with the lukewarm water, then salt, butter (or oil works if you don’t have butter), powdered milk, flour, and then the yeast.
Advertisements
Then, add the diced jalapeños and cayenne powder on top. I typically use pickled jalapeños because I almost always have them on hand, but fresh jalapeños work too!
Now hit that dough setting and carry on with your day! Mine runs for about an hour and a half before the dough is ready to be rolled out and cut.
If you are in the middle of something and the dough sits a bit after the bread maker beeps (signalling it is ready), that’s fine. Just make sure it doesn’t sit sooo long that it gets dried out or falls. This means you have 30-60 minutes grace period.
Advertisements
When your dough is ready, roll it out on a floured surface so it is long and wide, as pictured below.
Next, drizzle some melted butter over the bottom two-thirds of the dough and spread it so you have an even coating.
Then, sprinkle your shredded cheddar cheese over that same area. You can add more or less cheese, depending on your taste, but keep in mind that if you add too much it will melt out and make a mess in the bottom of your oven!
After you’ve added the cheese, fold the dough over by one third and then one more time (as pictured below).
Advertisements
Advertisements
Gently press the roll so it sticks together well.
Now you are ready to start on the fun part!
Find the middle of the roll and cut it in half (I typically just fold it in half to find the middle, but some people actually get out a ruler to measure). Then cut each of the sides in half again, then cut each section into three pieces.
This will give you 12 sections total, which is a perfect dozen to fit in your muffin tins!
Optional: before cutting into sections, you can trim the ends so all your sections will have even sides and filling. I hate wasting, so I don’t trim the ends.
Advertisements
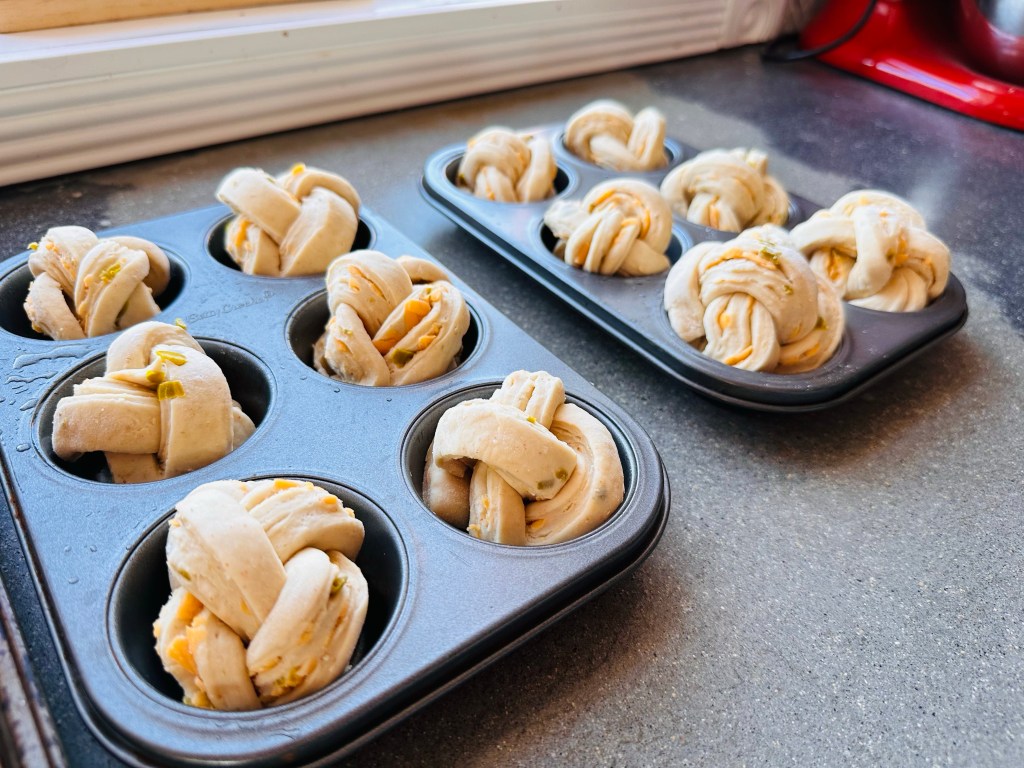
Once you have 12 sections, make two slices in each section, leaving just a little dough connecting it at the top (pictured below). This will give you three strands of dough to braid.
Do a simple braid, as pictured below.
Then, tuck the ends underneath the jalapeño cheddar knot into a muffin tin that has been brushed with oil (or better yet, butter!)
They should look like the examples in the photo below.
Once you have repeated this step with all 12 sections, cover the jalapeño cheddar knots with a damp tea towel and allow them to rise in a warm location for about an hour.
Advertisements
Advertisements
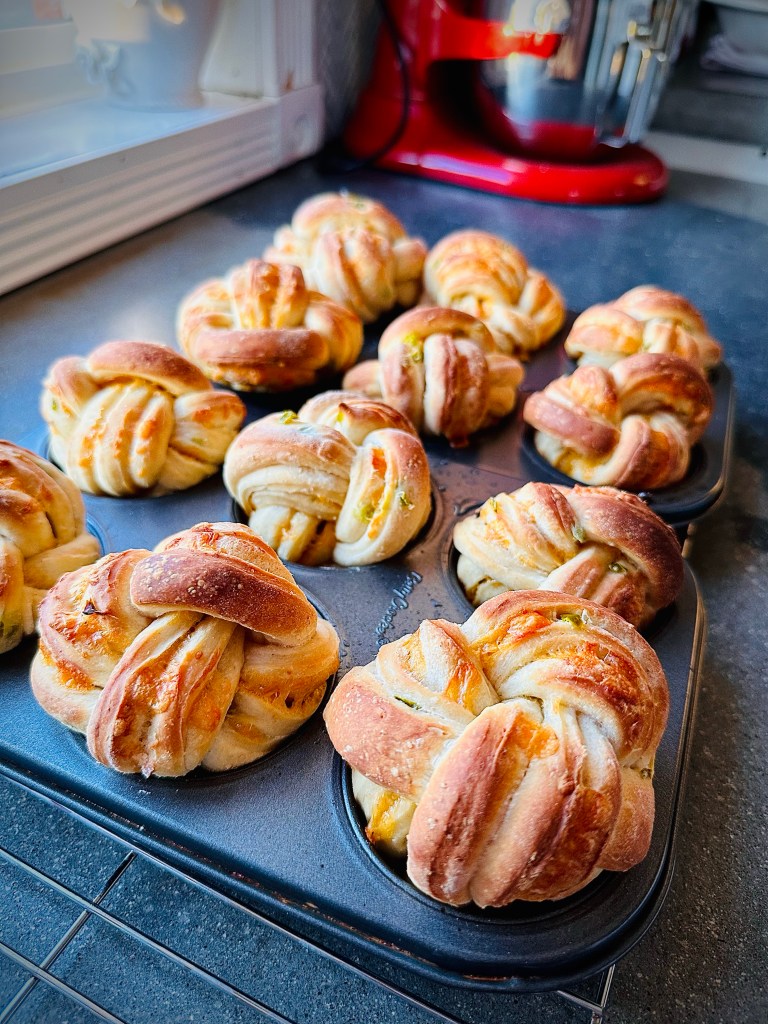
Once your knots have risen, pre-heat the oven to 480°
Place the jalapeño cheddar knots in the oven and immediately turn it down to 450° – this method may sound odd, but it gives the perfect golden finish with a nicely baked (and fluffy) inside.
Bake for 13-15 minutes, depending on how golden you would like the knots to be.
Advertisements
Advertisements
Optional: before baking, you can brush your jalapeño cheddar knots with butter or egg wash to change the final look. I did not do this for the photos included and it is just a matter of personal preference.
You can also brush the knots with melted butter after they have finished baking for an extra soft, delicious finish. Once again, I did not do this in the example photos and it is a matter of personal preference and if you want to spend a little extra effort doing this.
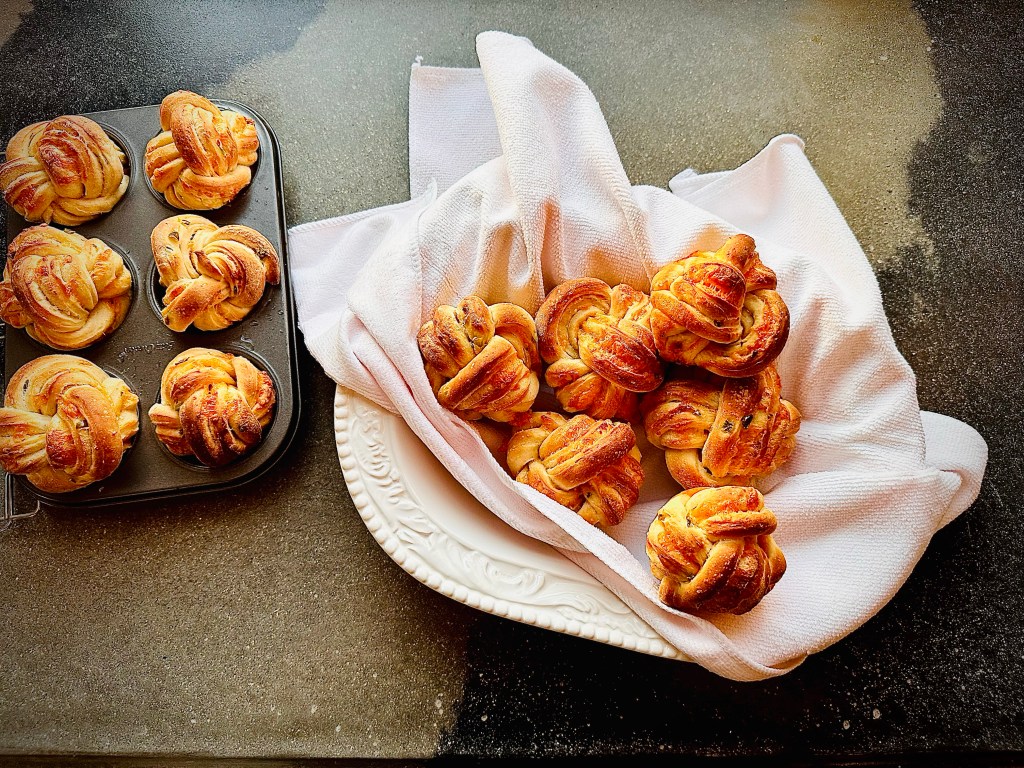
Allow the jalapeño cheddar knots to cool just enough that they won’t burn you before you dig in! Haha
Advertisements
Advertisements
One of my favourite parts of making the jalapeño cheddar knots like this versus a traditional dinner roll is #1 – they look so pretty and #2 – they pull apart in tender little pieces that are fun to eat.
For the extra couple steps it takes to braid these, I feel like it elevates the look of a simple, homemade dinner roll to a high-end, luxurious experience. So why not?? (or should I say “KNOT?” lol)
Advertisements
Advertisements
I hope you have enjoyed my recipe! If you did, please be sure to share it with your friends and leave a comment below with a photo of how yours turned out!
Ingredients
1 cup lukewarm water
1 1/2 teaspoons salt
1 1/2 Tablespoons butter (room temperature)
1/4 cup powdered milk
1/4 cup diced jalapeños (fresh or pickled)
1/4 teaspoon cayenne powder (OPTIONAL)
3 cups all-purpose flour
1 1/2 teaspoons yeast
3 Tablespoons butter, melted
1/4 cup cheddar cheese, shredded
Advertisements
Advertisements
Instructions
Combine all ingredients in your bread maker with the paddle facing upward.
Select “dough” setting and start.
Once the dough cycle has finished, roll the dough out on a floured surface into a long, wide strip as pictured above.
Next, brush the dough with melted butter.
Sprinkle shredded cheddar cheese over the bottom 2/3 of the long portion of the dough (refer to picture above, if needed).
Then, fold the dough over into thirds, longwise (refer to picture above, if needed).
Cut into 12 strips, then slice each piece twice, leaving a small amount at the top of each piece to connect them (refer to picture above, if needed)
Do a simple braid for each piece, then tuck the ends underneath and place in a greased or buttered muffin tin.
Allow to rise for 1 hour in a warm location, covered with a damp tea towel.
Pre-heat oven to 480º
Place muffin tin in the oven and immediately turn the oven down to 450º
Bake for 13-15 minutes (depending on the desired goldenness).
Remove muffin tins from oven and place on cooling rack; cover with a tea towel and allow to cool.
Advertisements
Advertisements
Optional Finishing Touches
Brush the Jalapeño cheddar knots with egg wash prior to baking
Brush with melted butter after removing from the oven
Serves 12
… The End… And they lived happily ever after. 😉
If you like short, to-the-point recipes, check out my other posts!
I almost always make eggs of some kind for breakfast; fried, scrambled, poached… you name it, I’ve probably made it!
But, from time to time, it is nice to change things up with something different.
For me, biscuits and gravy are a treat because I don’t make it often.
Don’t ask me why!
Maybe I just get into a rut of making the same things over and over again…
Or maybe I make eggs so much because our chickens have been such prolific producers!
Either way, this biscuits & gravy recipe is always a hit.
Advertisements
Advertisements
The Biscuits
Start by mixing the flour, baking powder, and salt in a large mixing bowl.
Then cut in cold butter using a pastry blender.
Depending on how flakey you would like your biscuits, you can add anywhere from 1 – 3 tablespoons of butter. The more butter, the flakier the biscuits.
Pro Tip: Using cold butter helps make the biscuits fluffier and flakier.
Next, add the milk and gently mix until the flour is fully incorporated.
Make sure not to overwork the dough.
Then roll the dough out on a floured surface and cut into biscuits.
This recipe makes 6 – 2 1/2 inch biscuits, which I find is a perfect serving size.
I use my biscuit cutters from Amazon to get perfectly shaped biscuits with pretty scalloped edges.
Advertisements
Advertisements
Pre-heat your oven to 400º and bake your biscuits on a baking sheet for 20 minutes or until golden brown.
I personally like to line my baking sheet with parchment paper so I have as little clean-up as possible.
You can cover the biscuits and allow them to cool or serve them hot!
The Gravy
Mom always used Jimmy Dean Italian sausage, however I recently discovered that a local business carries Mild Italian beef sausage – AND delivers to our acreage!
For those of you who have never lived in a rural location, you likely don’t understand the excitement of actually being able to get delivery…
Where we live, we can’t even get the mail delivered to our house – so this is a big deal.
Oh! And the beef is also high quality and ethically raised.
Advertisements
Advertisements
While the biscuits bake, start the gravy by frying the sausage until fully cooked, breaking it into small chucks as it cooks.
Salt & pepper to taste (I like to season my meat now and then add more to the gravy later; this gives the meat great taste without the gravy getting too salty).
If you are using pork sausage, you will have plenty of drippings to mix the flour into, however if you are using a lean meat, you may need to add 1 tablespoon of butter.
Once the meat is fully cooked, sprinkle the flour on top of the meat and mix it in.
Allow it to brown slightly, string occasionally on medium heat (this step is the key to good gravy; browning the flour before adding the milk gives it a rich flavour).
Advertisements
Advertisements
Add 1/3 cup of milk and stir until the mixture has thickened.
Add the remaining cup of milk and 1 teaspoon of beef stock; stir until it is combined and starts to simmer.
Salt & pepper to taste.
Remove from heat once it has reached the desired thickness.
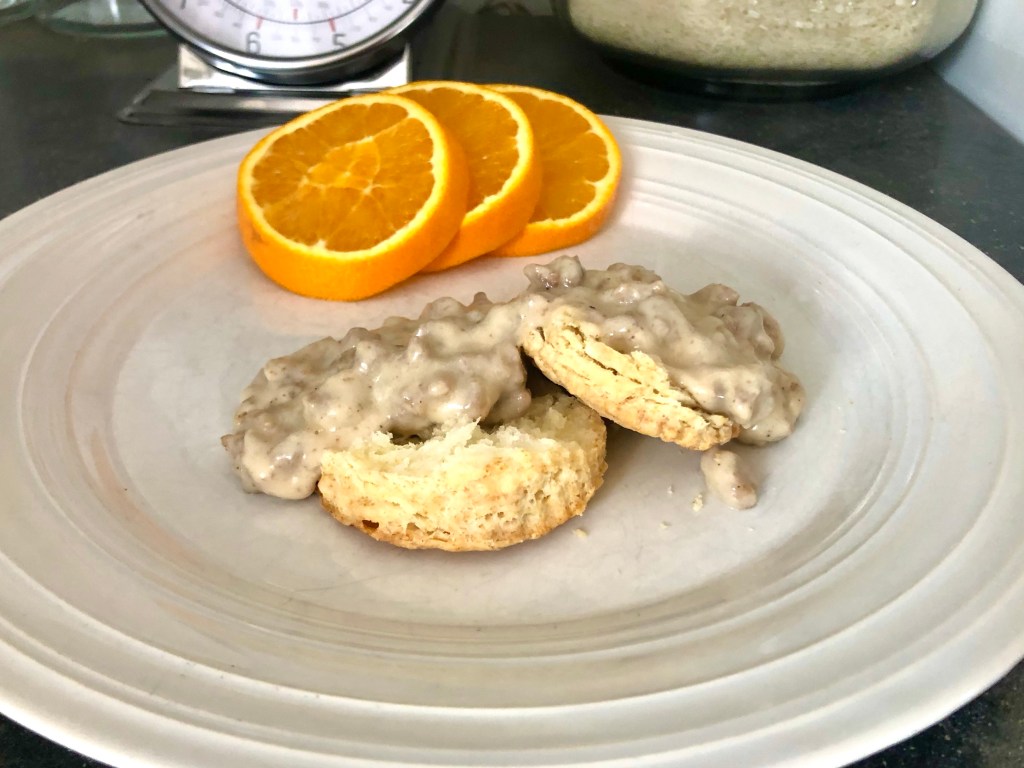
Cut your fresh biscuits in half and scoop the gravy over both halves.
Enjoy!
Advertisements
Advertisements
Biscuit Recipe
1 cup flour
1 teaspoon baking powder
1 tablespoon cold butter (up to 3 tablespoons)
1/4 teaspoon salt
1/3 cup milk
Directions
Mix dry ingredients, then cut in cold butter.
Stir in milk and incorporate ingredients (do not overwork dough).
Roll out dough on floured surface.
Cut & bake at 400º for 20 minutes or until golden brown.
Enjoy!
Makes 6 – 2 1/2 inch biscuits
Advertisements
Advertisements
Gravy Recipe
1 pound mild Italian sausage
1 teaspoon butter (optional)
2 tablespoons flour
1 1/3 cup whole milk
Salt & pepper to taste
Directions
Fry the sausage in a large pan, breaking it into chunks as you stir.
Salt & pepper to taste.
Stir in flour and allow to brown slightly (add melted butter if you are using a lean meat that does not have drippings).
Add 1/3 cup milk and stir until thickened.
Add remaining cup of milk and the beef stock.
Stir until thickened to desired consistency.
Salt & pepper to taste.
Scoop onto biscuits & enjoy!
Advertisements
Be sure to join my mailing list to get new recipes as I publish them!
Processing…
Success! You're on the list.
Whoops! There was an error and we couldn't process your subscription. Please reload the page and try again.
What is your favourite breakfast food? Drop a comment below!
This is a recipe I grew up on and still love making to this day!
These tasty biscuits are great with butter, hot out of the oven.
Or you can add fresh, homemade jam…
… or you can make biscuits and gravy…
… ooor, you can use the dough to make Pigs in a Blanket!
This recipe is the foundation for so many yummy options.
Advertisements
Advertisements
Start by mixing the flour, baking powder, and salt in a large mixing bowl.
Then cut in cold butter using a pastry blender.
Depending on how flakey you would like your biscuits, you can add anywhere from 1 – 3 tablespoons of butter. The more butter, the flakier the biscuits.
Pro Tip: Using cold butter helps make the biscuits fluffier and flakier.
Next, add the milk and gently mix until the flour is fully incorporated.
Make sure not to overwork the dough.
Then roll the dough out on a floured surface and cut into biscuits.
This recipe makes 6 – 2 1/2 inch biscuits, which I find is a perfect serving size.
I use my biscuit cutters to get perfectly shaped biscuits with pretty scalloped edges.
Advertisements
Advertisements
Pre-heat your oven to 400º and bake your biscuits on a baking sheet for 20 minutes or until golden brown.
I personally like to line my baking sheet with parchment paper so I have as little clean-up as possible.
You can cover the biscuits and allow them to cool or serve them hot!
Advertisements
Advertisements
Recipe
1 cup flour
1 teaspoon baking powder
1 tablespoon cold butter (up to 3 tablespoons)
1/4 teaspoon salt
1/3 cup milk
Directions
Mix dry ingredients, then cut in cold butter.
Stir in milk and incorporate ingredients (do not overwork dough).
Roll out dough on floured surface.
Cut & bake at 400º for 20 minutes or until golden brown.
Enjoy!
Makes 6 – 2 1/2 inch biscuits
Advertisements
Advertisements
Be sure to join my mailing list to get my recipe for the gravy I make for biscuits and gravy as soon as I publish it!
Processing…
Success! You're on the list.
Whoops! There was an error and we couldn't process your subscription. Please reload the page and try again.
What is your favourite way to eat biscuits? Drop a comment below!
The smell of baking bread filling the house is one of my favourite scents!
On cold winter days, fresh bread with a hardy stew really hits the spot.
This no knead recipe turns out perfectly every time – the main challenge is the patience it takes!
In order to ditch kneading the bread, extra rise time is required.
18-24 hours of rise time, to be more specific.
Advertisements
Advertisements
I will usually start a batch Saturday morning so we have fresh bread for lunch on Sunday.
Aside from the rise time, this recipe requires very little of your time to prep and bake.
Oh! And did I mention that it only has 4 ingredients?!
Advertisements
Advertisements
Start with a large glass bowl and add 1 1/2 cups of lukewarm water, then sprinkle 1/2 teaspoon of yeast on top.
Allow the yeast to develop for about 5 minutes before adding 1 1/2 teaspoons of salt and 3 cups of flour (if you are in a rush, you can skip the 5 minutes and the loaf will still turn out fine).
Mix everything together until the flour is all incorporated; you shouldn’t have to work too hard and can add a bit more water if you find you still have dry flour.
Cover the bowl with plastic wrap and place on the counter to rise for the next 18-24 hours.
Advertisements
Advertisements
Unlike many bread recipes, this loaf does not need to be in a particularly warm spot; during the winter months, my concrete counters can be quite cool and we usually keep the heat in the house fairly low.
The extra rise time is to thank again!
Fast-forward 24 hours… Now the dough is ready to bake!
Pre-heat the oven to 450º with your dutch oven inside the, um, “real” oven.
I have an old-school cast iron dutch oven that I scored at a garage sale years ago and it works great!
If you don’t have a dutch oven, you should seriously consider getting one. Some even have an enamel coating that helps eliminate seasoning the cast iron and makes cleanup much easier.
Advertisements
Advertisements
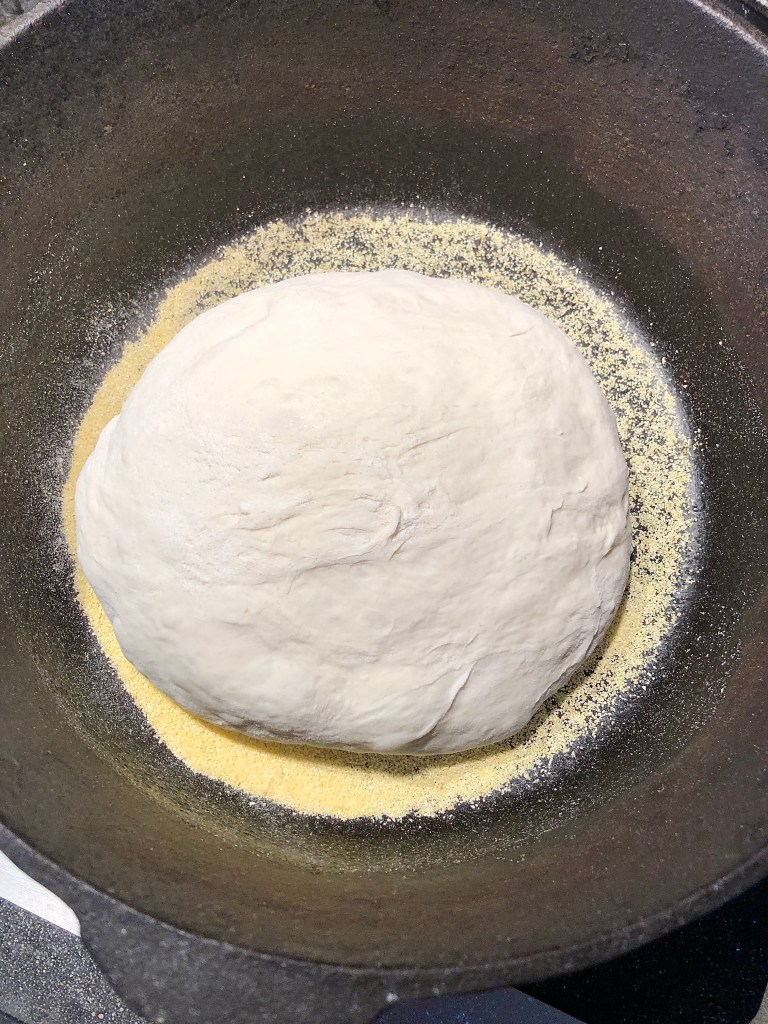
Once the oven and dutch oven are pre-heated, sprinkle some cornmeal in the bottom of the dutch oven to keep the dough from sticking to the bottom.
The cornmeal also gives the loaf a rustic, artisan feel.
Next, gently scoop the dough from the bowl onto a floured surface.
The dough will be quite sticky at this point, which is exactly what we want.
Try to disturb the dough as little as possible; this helps keep that nice, fluffy rise that we just waited 24 hours for.
Gently fold the dough from the right side into the middle, then from the left side into the middle. Repeat with the other 2 sides.
Advertisements
Advertisements
This helps shape the loaf into a nicely rounded ball.
Once you have shaped the loaf (remember, do not over-work the dough!), place it seam-side down in the dutch oven.
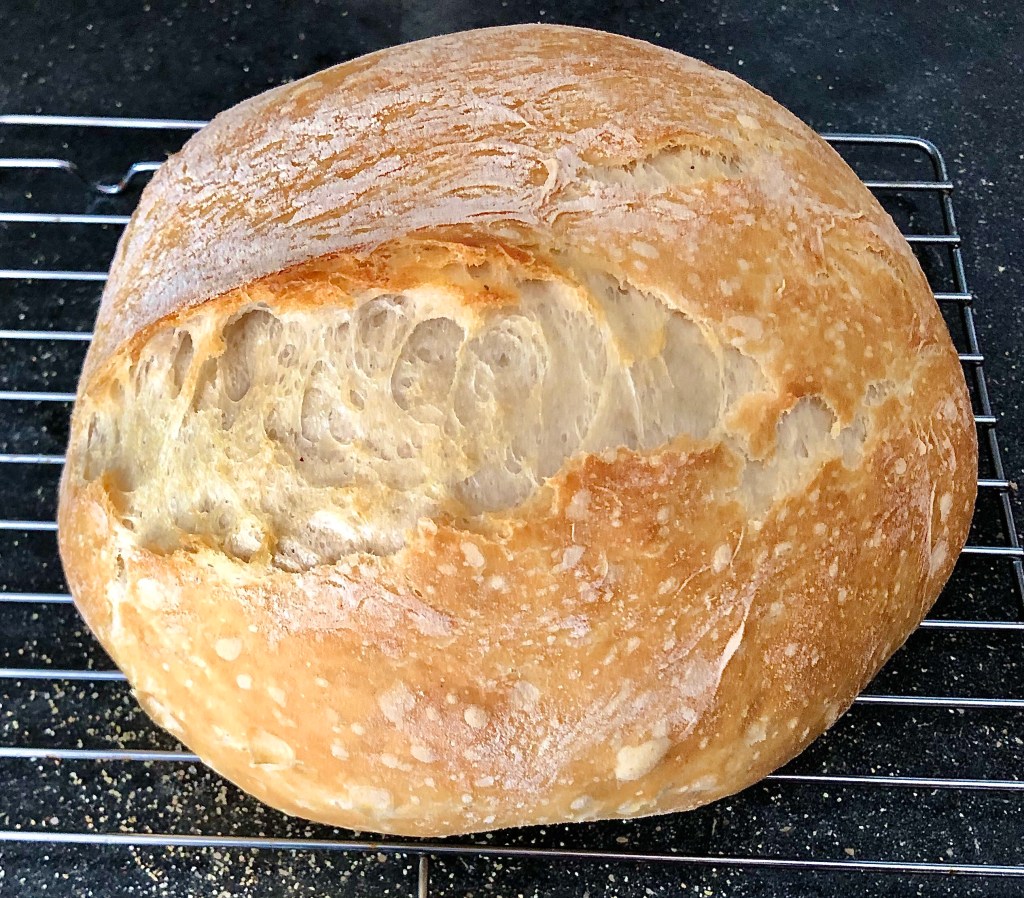
Bake with the lid on for 30 minutes. The moisture the lid holds in helps give the loaf the soft, chewy inside and the crusty, artisan exterior.
Remove the lid and bake for another 15-20 minutes so the loaf gets that nice, golden finish.
Once it has finished baking, remove your loaf from the dutch oven and place on a cooling rack; cover it with a towel to allow it to cool at a slow enough rate that it doesn’t get dried out.
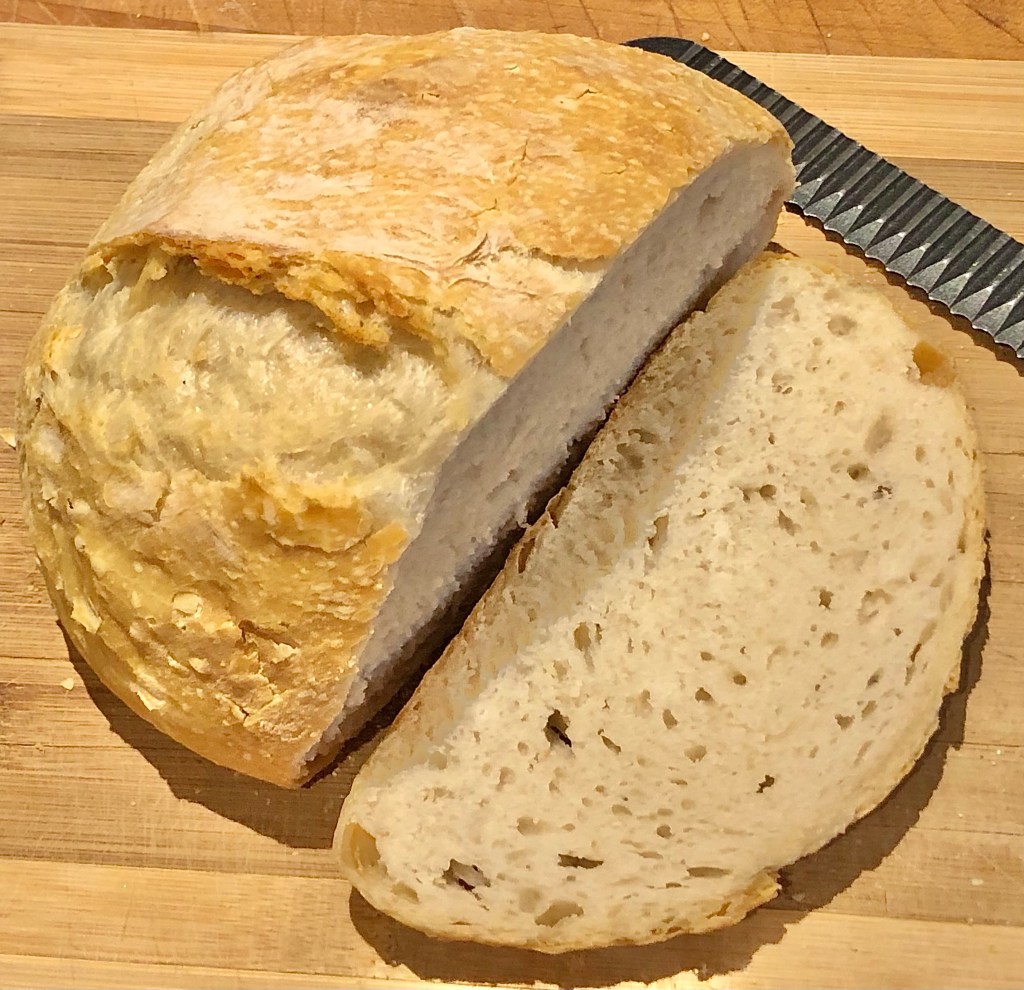
When you cut into your fresh loaf of bread, the crust should be fairly hard and the inside should be moist and chewy with large air pockets.
Be sure that your bread knife is sharp so it cuts the loaf well, rather than crushing the bread before it cuts through.
This is by far my favourite one-loaf recipe because of how quick and easy it is! At least “quick” in the sense that I only spend about 5-10 minutes of my time total making it.
And, it turns out perfectly every time!
Advertisements
Advertisements
You can add different finishes to your crust; this is just the most basic, easiest method to get you started.
Some people will brush the crust with melted butter or an egg wash (before baking) for different effects.
You can also get creative with the ingredients; do you want jalapeño cheddar loaf? Just throw some diced jalapeños, shredded cheddar cheese, and some cayenne powder in when you mix up the dough!
Want a garlic rosemary loaf? Add some fresh rosemary leaves and a dash of garlic powder!
You get the idea… This is the building block for all kinds of different options.
Advertisements
Advertisements
Recipe
1 1/2 cups lukewarm water
1/2 teaspoon yeast
1 1/2 teaspoons salt
3 cups flour
Advertisements
Advertisements
Directions
Sprinkle yeast into lukewarm water in a large, glass bowl.
Allow to develop for 5 minutes.
Add salt and flour.
Stir until incorporated.
Cover with plastic wrap and set on counter to rise for 18-24 hours.
Pre-heat oven & dutch oven to 450º
Sprinkle corn meal into bottom of dutch oven.
Scoop dough onto floured surface and fold all 4 sides into the middle to shape loaf. (DO NOT OVERWORK DOUGH)
Place loaf into dutch oven, seam-side down.
Bake for 30 minutes with the lid on, then another 15-20 minutes without the lid.
Place loaf on a cooling rack and cover with a towel.
Allow to cool, then enjoy!
Processing…
Success! You're on the list.
Whoops! There was an error and we couldn't process your subscription. Please reload the page and try again.