If you’re anything like us, you’ll been firing up that grill all summer long!
On a hot summer day, there is nothing better than the smell of the BBQ wafting through the yard… except for the tasty food that comes off the grill!
Baked potatoes make a great side for steak or chicken, so why not try this loaded version that takes it to the next level?
Advertisements
Advertisements
The creamy inside is packed with flavour, the crispy bacon adding that “WOW” factor, and the gooey cheese topping it all off… YUM!
As with most of my recipes, this is easy to make and bound to impress next time you host dinner on your patio.
Baked potatoes typically take about an hour to cook fully, so you will have to plan ahead a bit.
Advertisements
Advertisements
Advertisements
Advertisements
First things first: choosing the right potato!
Russet potatoes are my first choice to use for baking because of their thick skin and starchy insides.
I have used Yukon Gold potatoes for baking as well, but the skin isn’t quite as thick and doesn’t get as crispy, which is part of the beauty of a baked potato.
I start by poking several holes in the potato in a few spots to help keep it from exploding while it cooks and allows steam to escape the skin.
Advertisements
Advertisements
Grill on medium heat (or bake at 375º) on the top rack for about an hour.
Some people say to wrap them in tin foil, however I just pop the potatoes in by themselves; this helps with that crunchy skin.
Check the “done-ness” by stabbing a fork or knife through the centre; it should slide easily into the potato with no hard parts left inside.
Advertisements
Advertisements
Once the potatoes are fully cooked, cut them in half long-wise and scoop out the insides (making sure not to damage the skins).
Next, whip the insides with cream cheese, garlic (you can use Garlic Plus or, as I prefer, roasted garlic), and crispy bacon (or bacon bits).
Salt and pepper to taste, then fill the skins with the mix.
You can top with your cheese of choice – I use cheddar as it browns so beautifully!
Place the potato halves on the top shelf of the grill again and allow the cheese to bubble into a nice golden-brown.
Advertisements
Advertisements
Once you remove the potatoes from the heat, garnish with green onions and/or fresh parsley for an extra-fancy presentation.
Pro tip: These also freeze well to be pre-made and thawed before hosting dinner; just allow enough time so they are fully thawed and place on the grill long enough to heat them thoroughly and finish browning the cheese.
Advertisements
Advertisements
Advertisements
Advertisements
Recipe
2 large Russet potatoes
1/4 cup cream cheese
2 slices of bacon
2 roasted garlic cloves *or* 1/2 teaspoon Garlic Plus
1/2 cup cheddar cheese
Salt & pepper to taste
Green onions (garnish)
Parsley (garnish)
Advertisements
Advertisements
Directions
Pierce potatoes with fork or knife in several places, then place on pre-heated grill at medium heat (or in oven at 375º) on top rack for 1 hour or until tender in the centre.
Cut potatoes in half long-wise and remove insides, making sure to leave skins intact.
Mix insides well with cream cheese, bacon, salt & pepper.
Spoon mix back into the skins and top with cheddar cheese.
Place back on grill (or in oven) until the cheese has turned golden-brown.
Remove from heat and garnish with green onions and parsley.
Enjoy!
Advertisements
Advertisements
Makes 4 halves
Advertisements
Processing…
Success! You're on the list.
Whoops! There was an error and we couldn't process your subscription. Please reload the page and try again.
Did you know that rain water is much better for plants than tap water?
It contains nitrogen, which actually feeds the plants!
That is why things seem to grow like crazy right after a good rain (of course the thorough watering helps, too).
Advertisements
Advertisements
Plus, rain water doesn’t contain chlorine and the tepid temperature is far easier on your plants than frigid water from the house.
And then there is the water bill. Yuck. Who needs more bills in their lives?!
Living in the country with well water, we don’t have to worry about a water bill – however a lot of people do have to take that expense into consideration.
Advertisements
Advertisements
And I can’t tell you how many times I have seen notices in the city for “odd/even” watering schedules, which cuts down on how much water folks can use to keep everything green.
With all these factors in favour of a bit more self-sufficiency, rain barrels have become increasingly popular.
(Yes, I am aware that there is controversy in some States trying to regulate people collecting rain water – but thankfully that is not the case up here where I live)
Advertisements
Advertisements
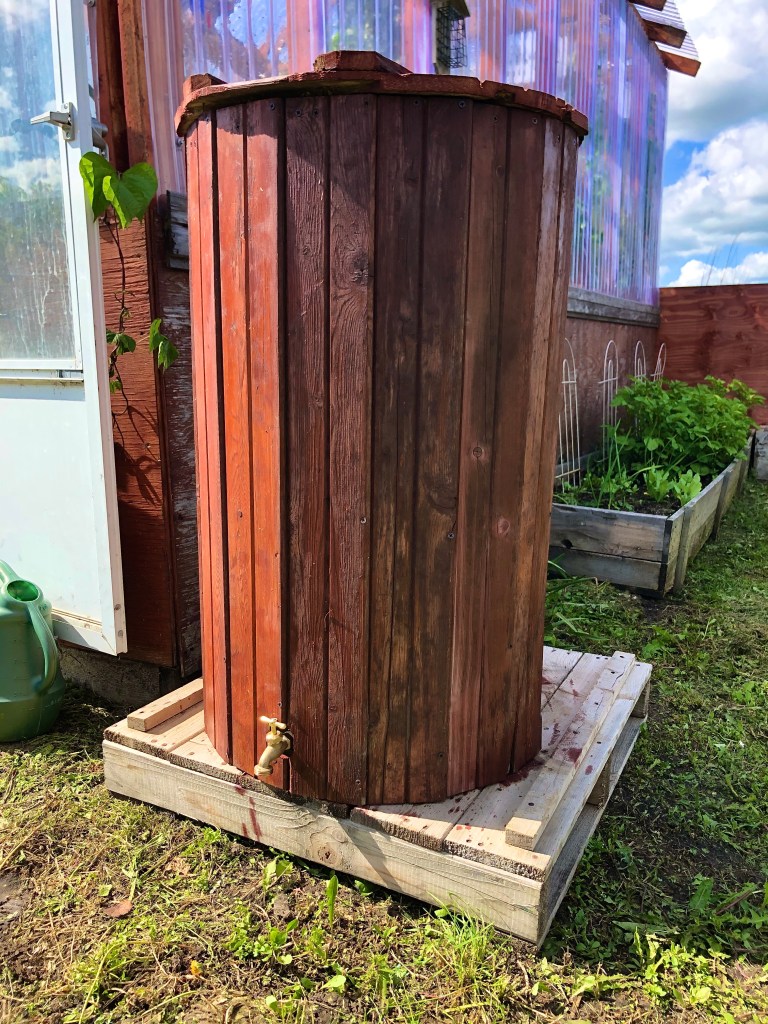
Did you say this DIY rain barrel was almost FREE?
Yep. You read that right.
We repurposed an old water softener barrel, weathered wood planking, leftover stain, and only had to buy some hardware for the tap!
The repurposed materials were things we already had on the acreage, however they wouldn’t be difficult to get for free (or cheap) for someone who doesn’t have these items sitting around their yard.
Advertisements
Advertisements
Obviously this project required tools, which were not free, but with all the renovations we have been doing on our huge house we have accumulated many tools that will last us a lifetime.
Once you have collected a barrel, some wood planking, and hardware for the tap – and perhaps some rope as a decorative accent, you can get started!
Some people use an adhesive like PL Premium to “glue” the boards to the barrel, while others will use that rope as more than a decorative accent and have it tie everything together – literally.
For our rain barrel, we used drywall screws (once again, supplies we already had on hand from other projects) to secure the tongue-in-groove planking together at the top and bottom (making sure not to puncture the barrel).
We drilled a hole near the bottom of the barrel for the tap.
Installing the tap, the hardware had to have a good seal on the inside of the barrel so it didn’t end up losing water with a leak.
Advertisements
Advertisements
And wood stain finished the look nicely; we used stain left over from the greenhouse, which makes the rain barrel look like a perfect accent piece in the garden.
The hole in the top of the rain barrel should only be large enough for the waterspout and protected with a fine screen to keep debris from getting into the rain barrel and clogging the tap.
Advertisements
Advertisements
Once the rain barrel is in place and get your first good rain, you’re set!
No more relying on a mandated watering schedule and extra cost on your water bill!
And of course, enjoy the added benefit of water perfect for feeding your plants!
Advertisements
Advertisements
Advertisements
Advertisements
Do you already have a rain barrel or want to get one? Drop a comment below!
Advertisements
Processing…
Success! You're on the list.
Whoops! There was an error and we couldn't process your subscription. Please reload the page and try again.
I know, those two words don’t seem to go together. “Budget” and “luxury” aren’t usually something you can combine, right?
Advertisements
Advertisements
My husband would certainly agree!
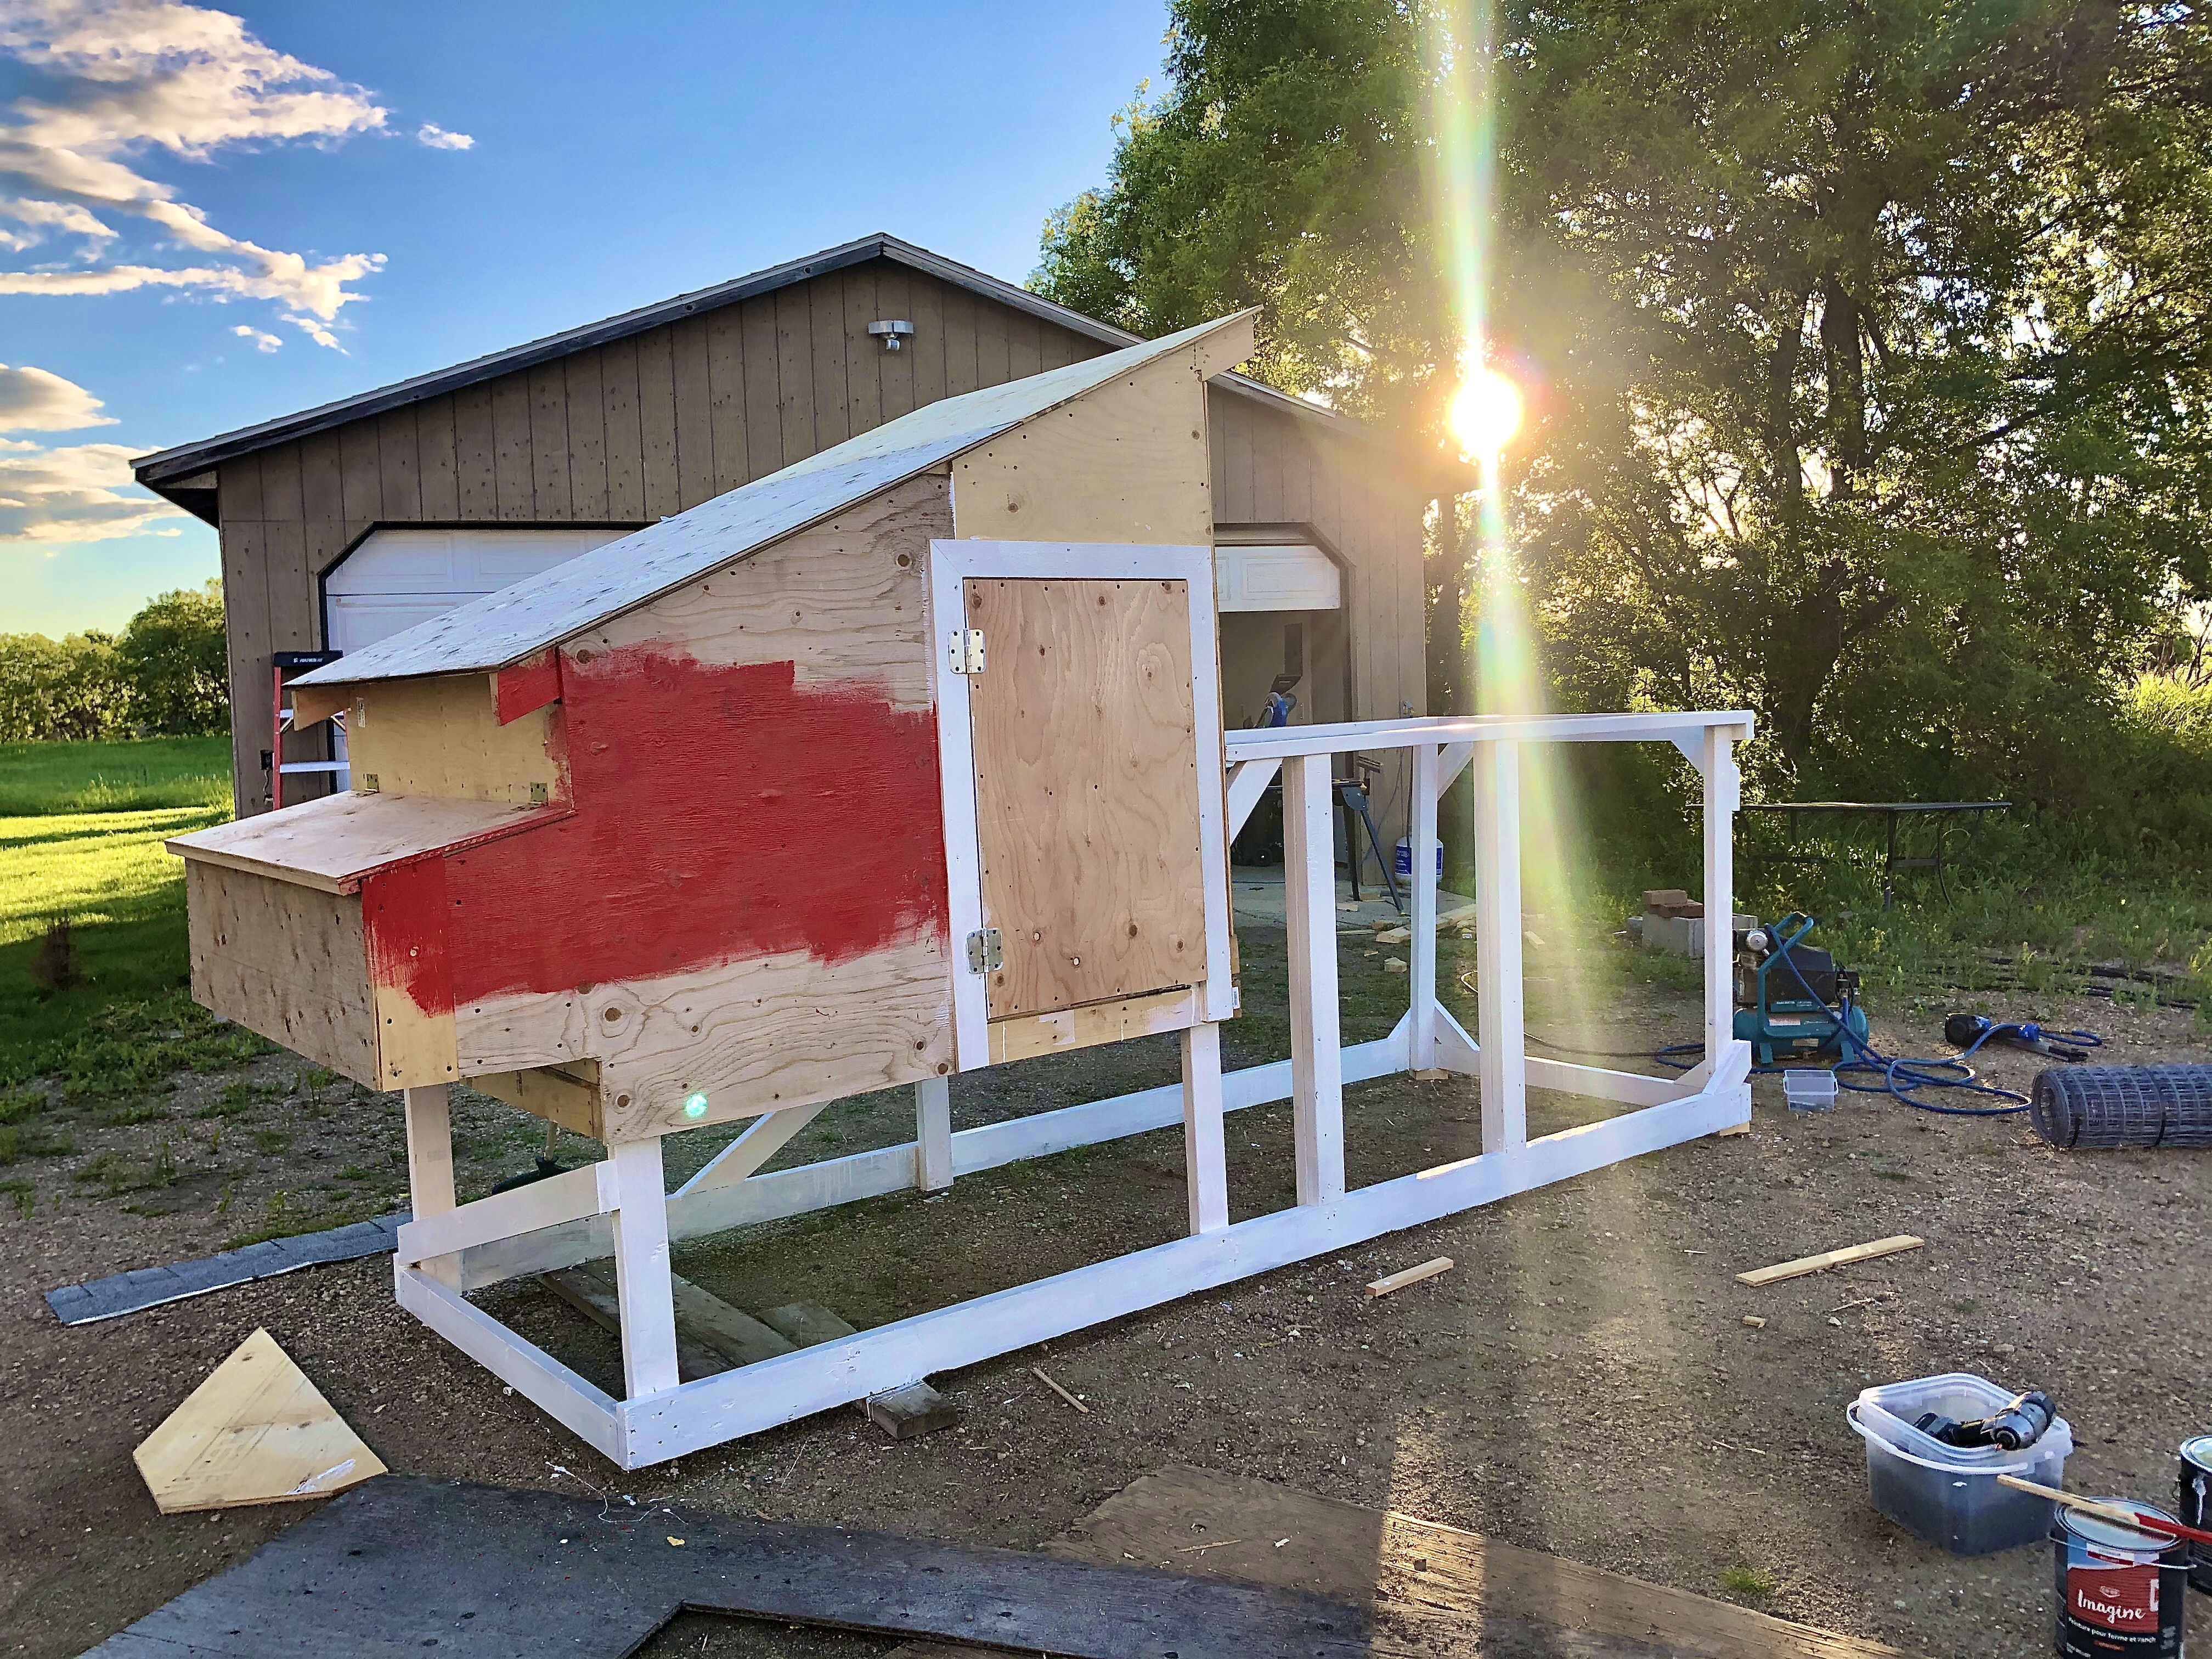
While this project turned out to be more time invested that he had banked on (and turned out much nicer than many chicken tractors we have seen on YouTube or Pinterest), it still WAS a budget chicken tractor!
Advertisements
Advertisements
So what makes it “luxury” AND “budget” at the same time?!
Well, the fact that we repurposed so many materials to create this “tiny house” for chickens is a big factor for the budget argument.
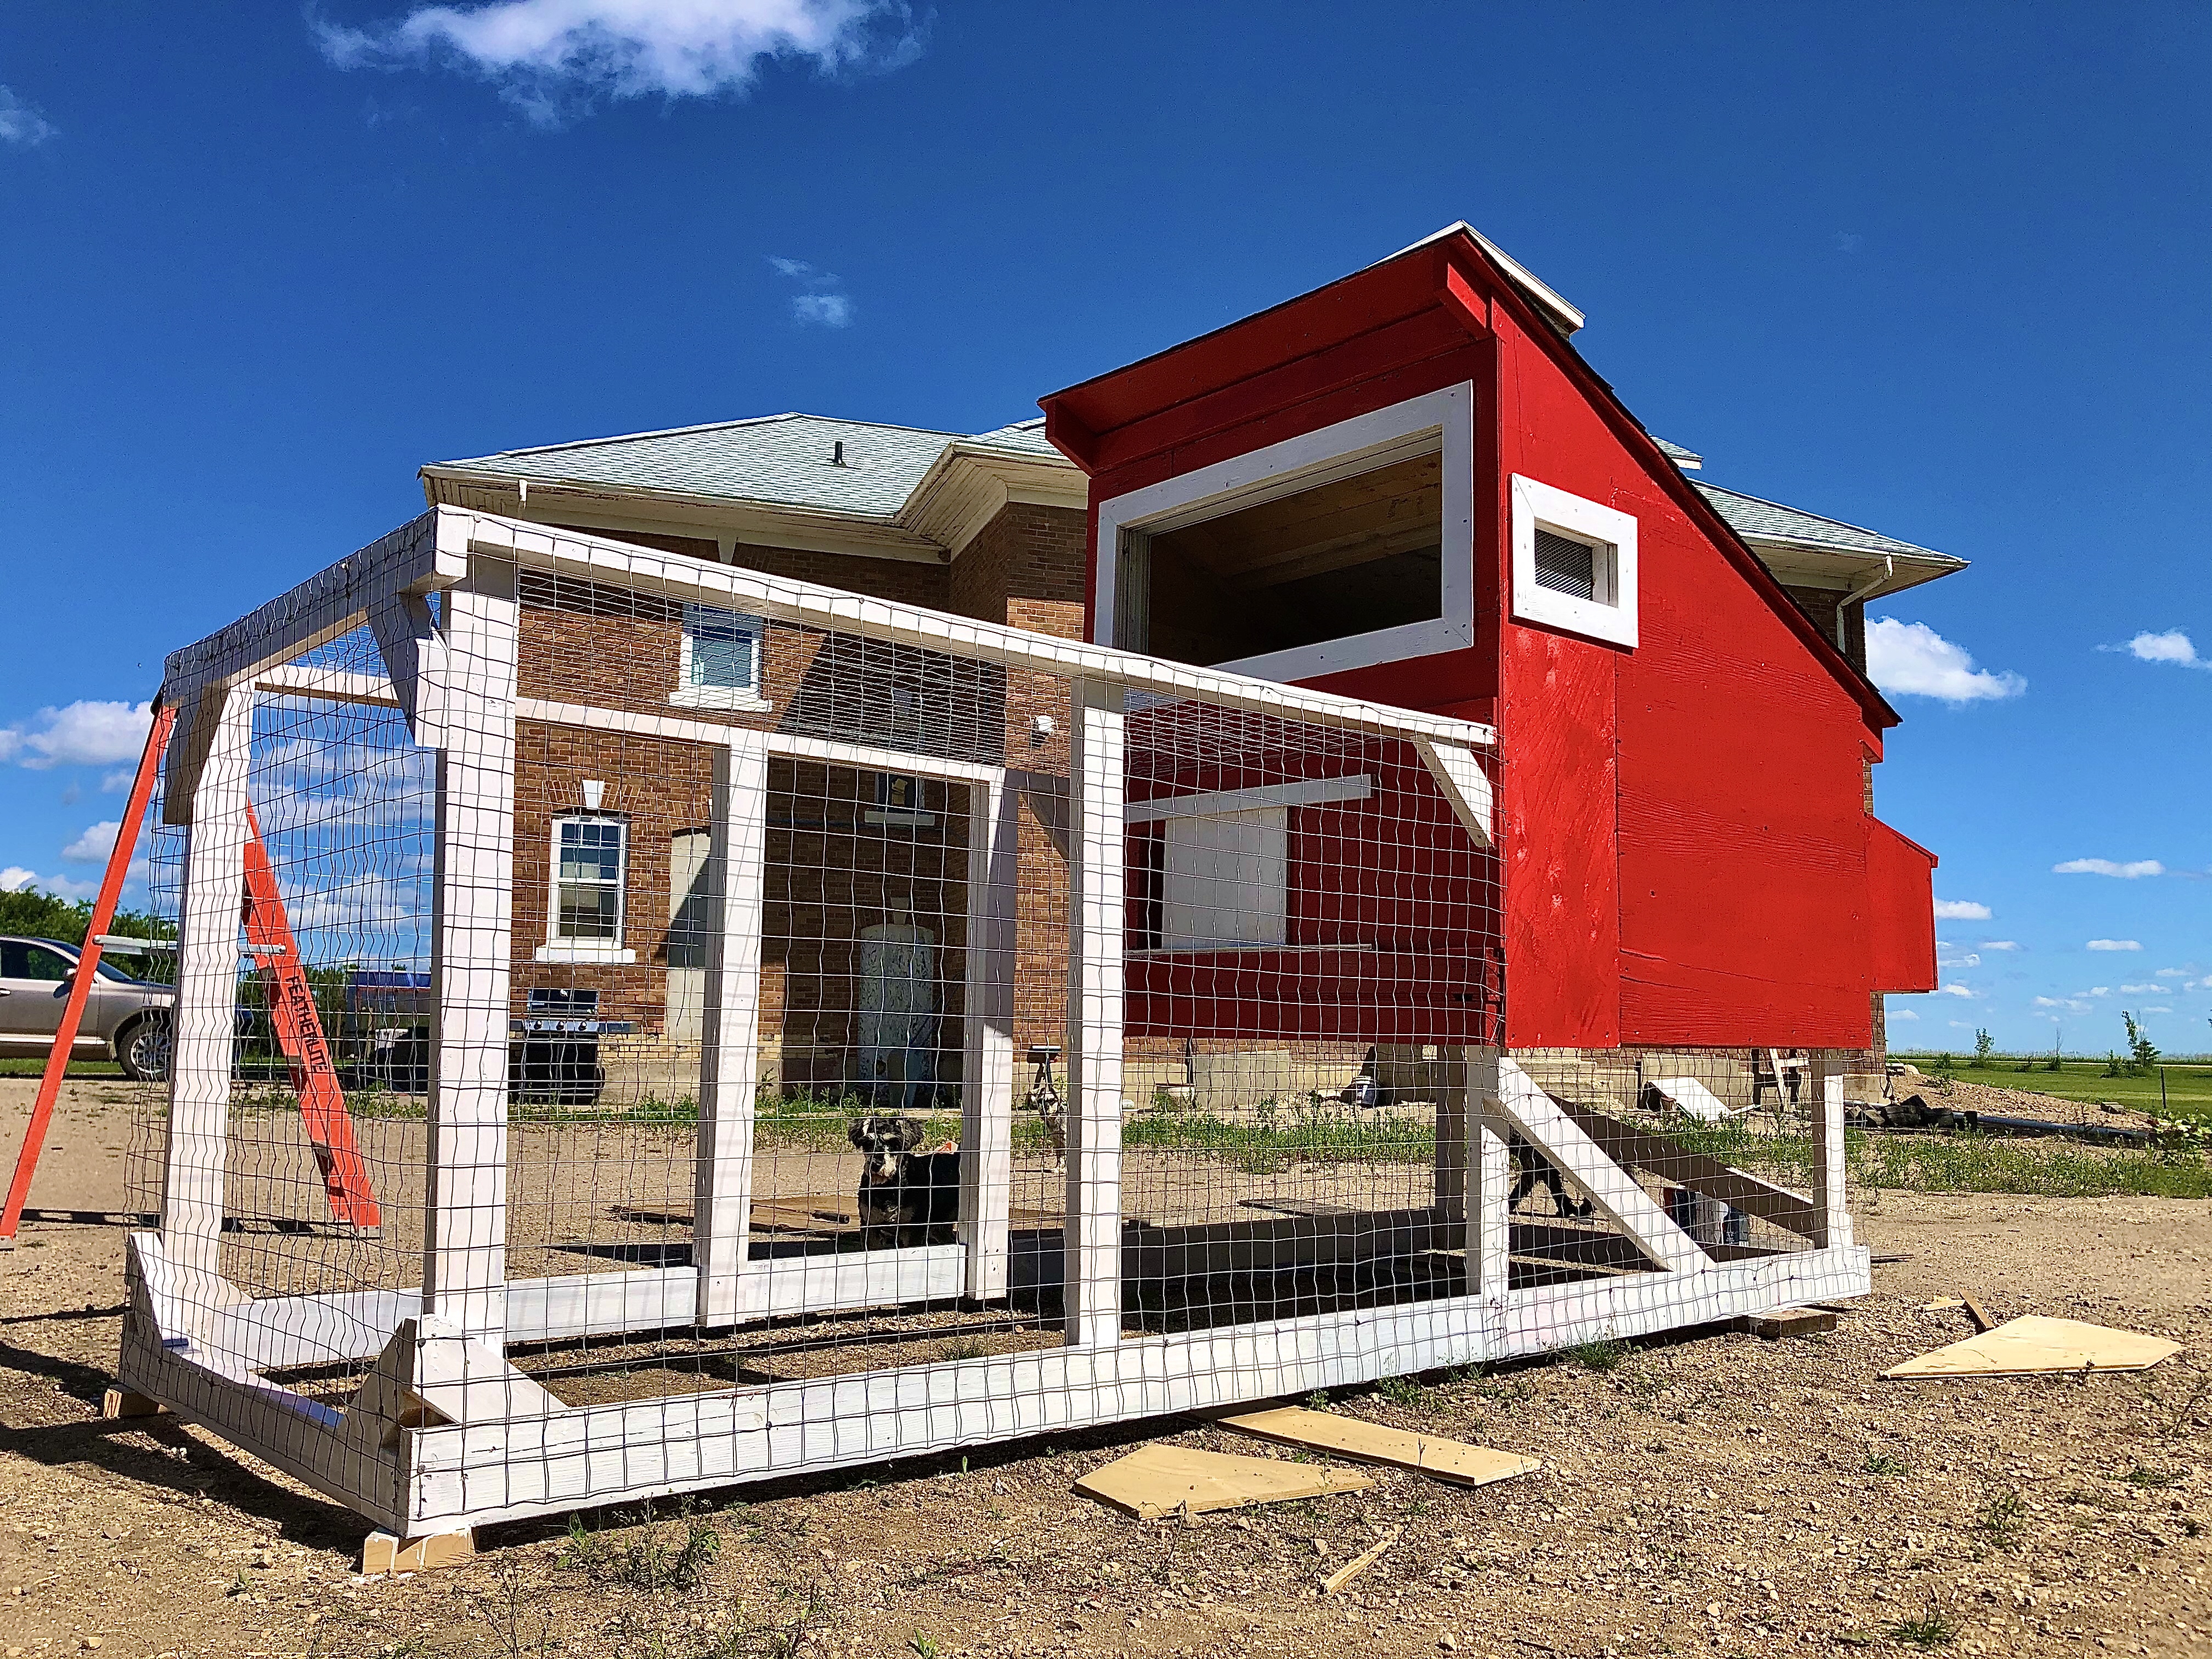
The luxury part? How many chickens have such a sharp looking condo…
… opening windows, a spacious interior, and fresh greens to chow down on daily?
Yep! For chickens that is as close to luxury as it gets!
Let me back this train up a bit and explain why we are even working on this project in the first place.
Advertisements
Advertisements
Chicken Tractor Dimensions
Run: 12′ long x 4′ wide 2′ tall under the coop 4′ tall for the main part of the run
Coop: 5′ long x 4′ wide Roof height starts at 5′ high and slopes down to 3′ high
Nesting Boxes: 12″ deep x 12″ wide per box 4 nesting boxes = total width of 4′ on the chicken tractor
Advertisements
Advertisements
The year is 2020… Enough said!
Just kidding…We had actually talked about getting chickens well before COVID-19 was ever a factor (that being said, trying to buy eggs and the store being sold out at one point early in the pandemic confirmed our decision was a good choice!)
I grew up with chickens – I must have been so young when we first got them that I can’t remember a time in my childhood without chickens and fresh eggs.
Sure, the hens weren’t always laying consistently during the winter months, but we still had some fresh eggs even then…
We had Barred Rock hens that were nicknamed the “Hornet Sisters” because they dug up and killed an entire wasp colony – after I got stung multiple times when I accidentally stepped on their nest!
As children, we also had one pet bantam hen per kid that would come when we called and sit on our shoulder for treats (yes, sometimes they would poop on us… But not that often).
Advertisements
Advertisements
And YES! We named them; mine was named Henny Penny.
But we also learned to respect and appreciate where meat comes from at a young age.
And of course, the work that goes into keeping animals was a lesson learned first-hand.
Advertisements
Advertisements
Advertisements
Advertisements
Now, fast-forward back to 2020
My husband, Jake, and I have been working hard on our acreage to become more independent and have a healthy lifestyle – so fresh, free-range eggs fit right into that plan.
BUT the big debate was where the chickens would live; would we go super cheap and fab a freezer or fridge for them to live in?
No!
So would we sink money into the full-on chicken coop and run that I drew up plans for – that would cost us about $4,000?!!
Also, no!
So what was the middle ground that wouldn’t cost an arm and a leg, but still get the job done?
Advertisements
Advertisements
When we settled on the idea of a chicken tractor, we didn’t plan on it to turn out quite so… well… fancy.
It was supposed to be a quick, easy project to get the “cheeps” (as they have been nicknamed – aka “cheep-cheeps” or “cheepos”) outside to eat grass.
Advertisements
Advertisements
Advertisements
Advertisements
The push to make the build happen
Let me tell you – when chicks are 1 day old they are so cute!
They are fluffy and tiny and just adorable…
2 or 3 week old chickens in the house – well– they SMELL! Yuck!
We needed to decide on our plan for these cheeps – FAST!
So we went with the chicken tractor.
Advertisements
Advertisements
Advertisements
Advertisements
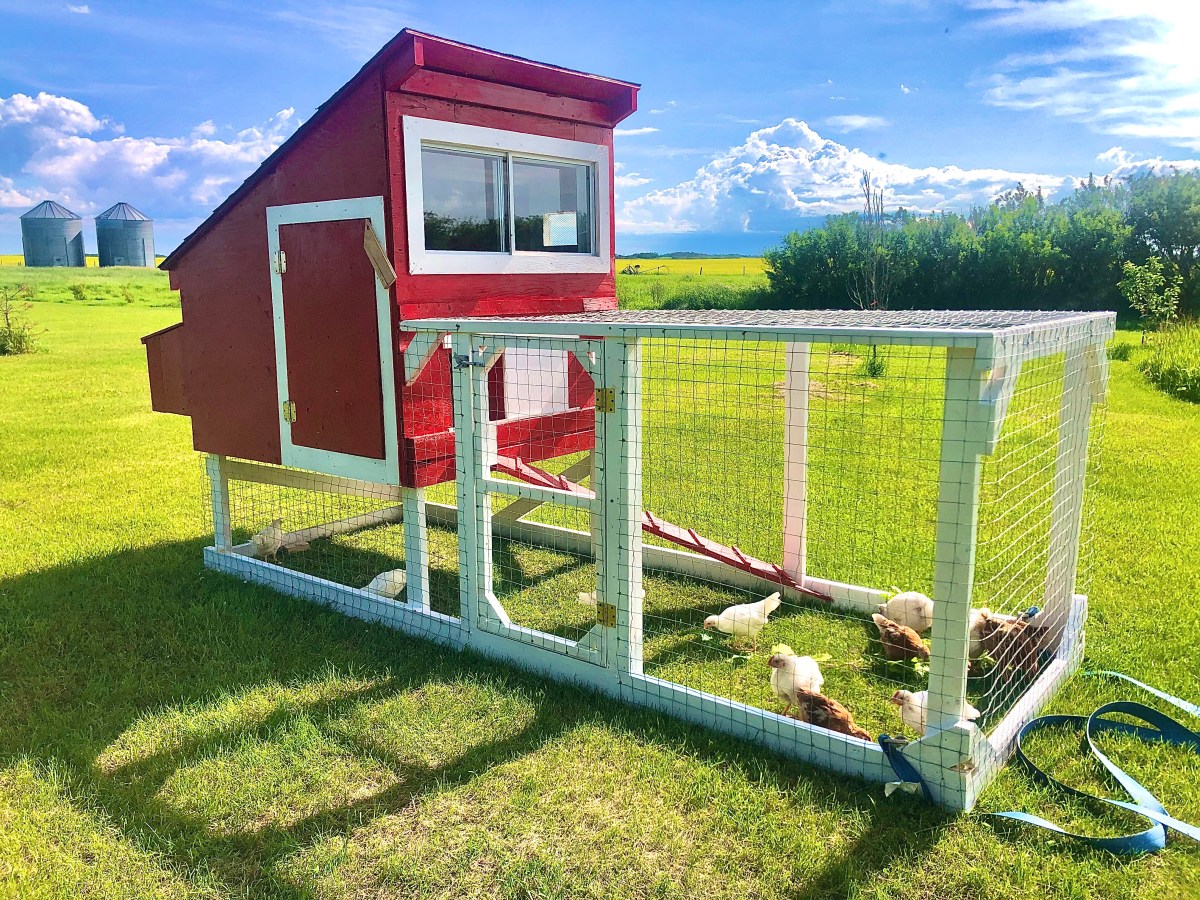
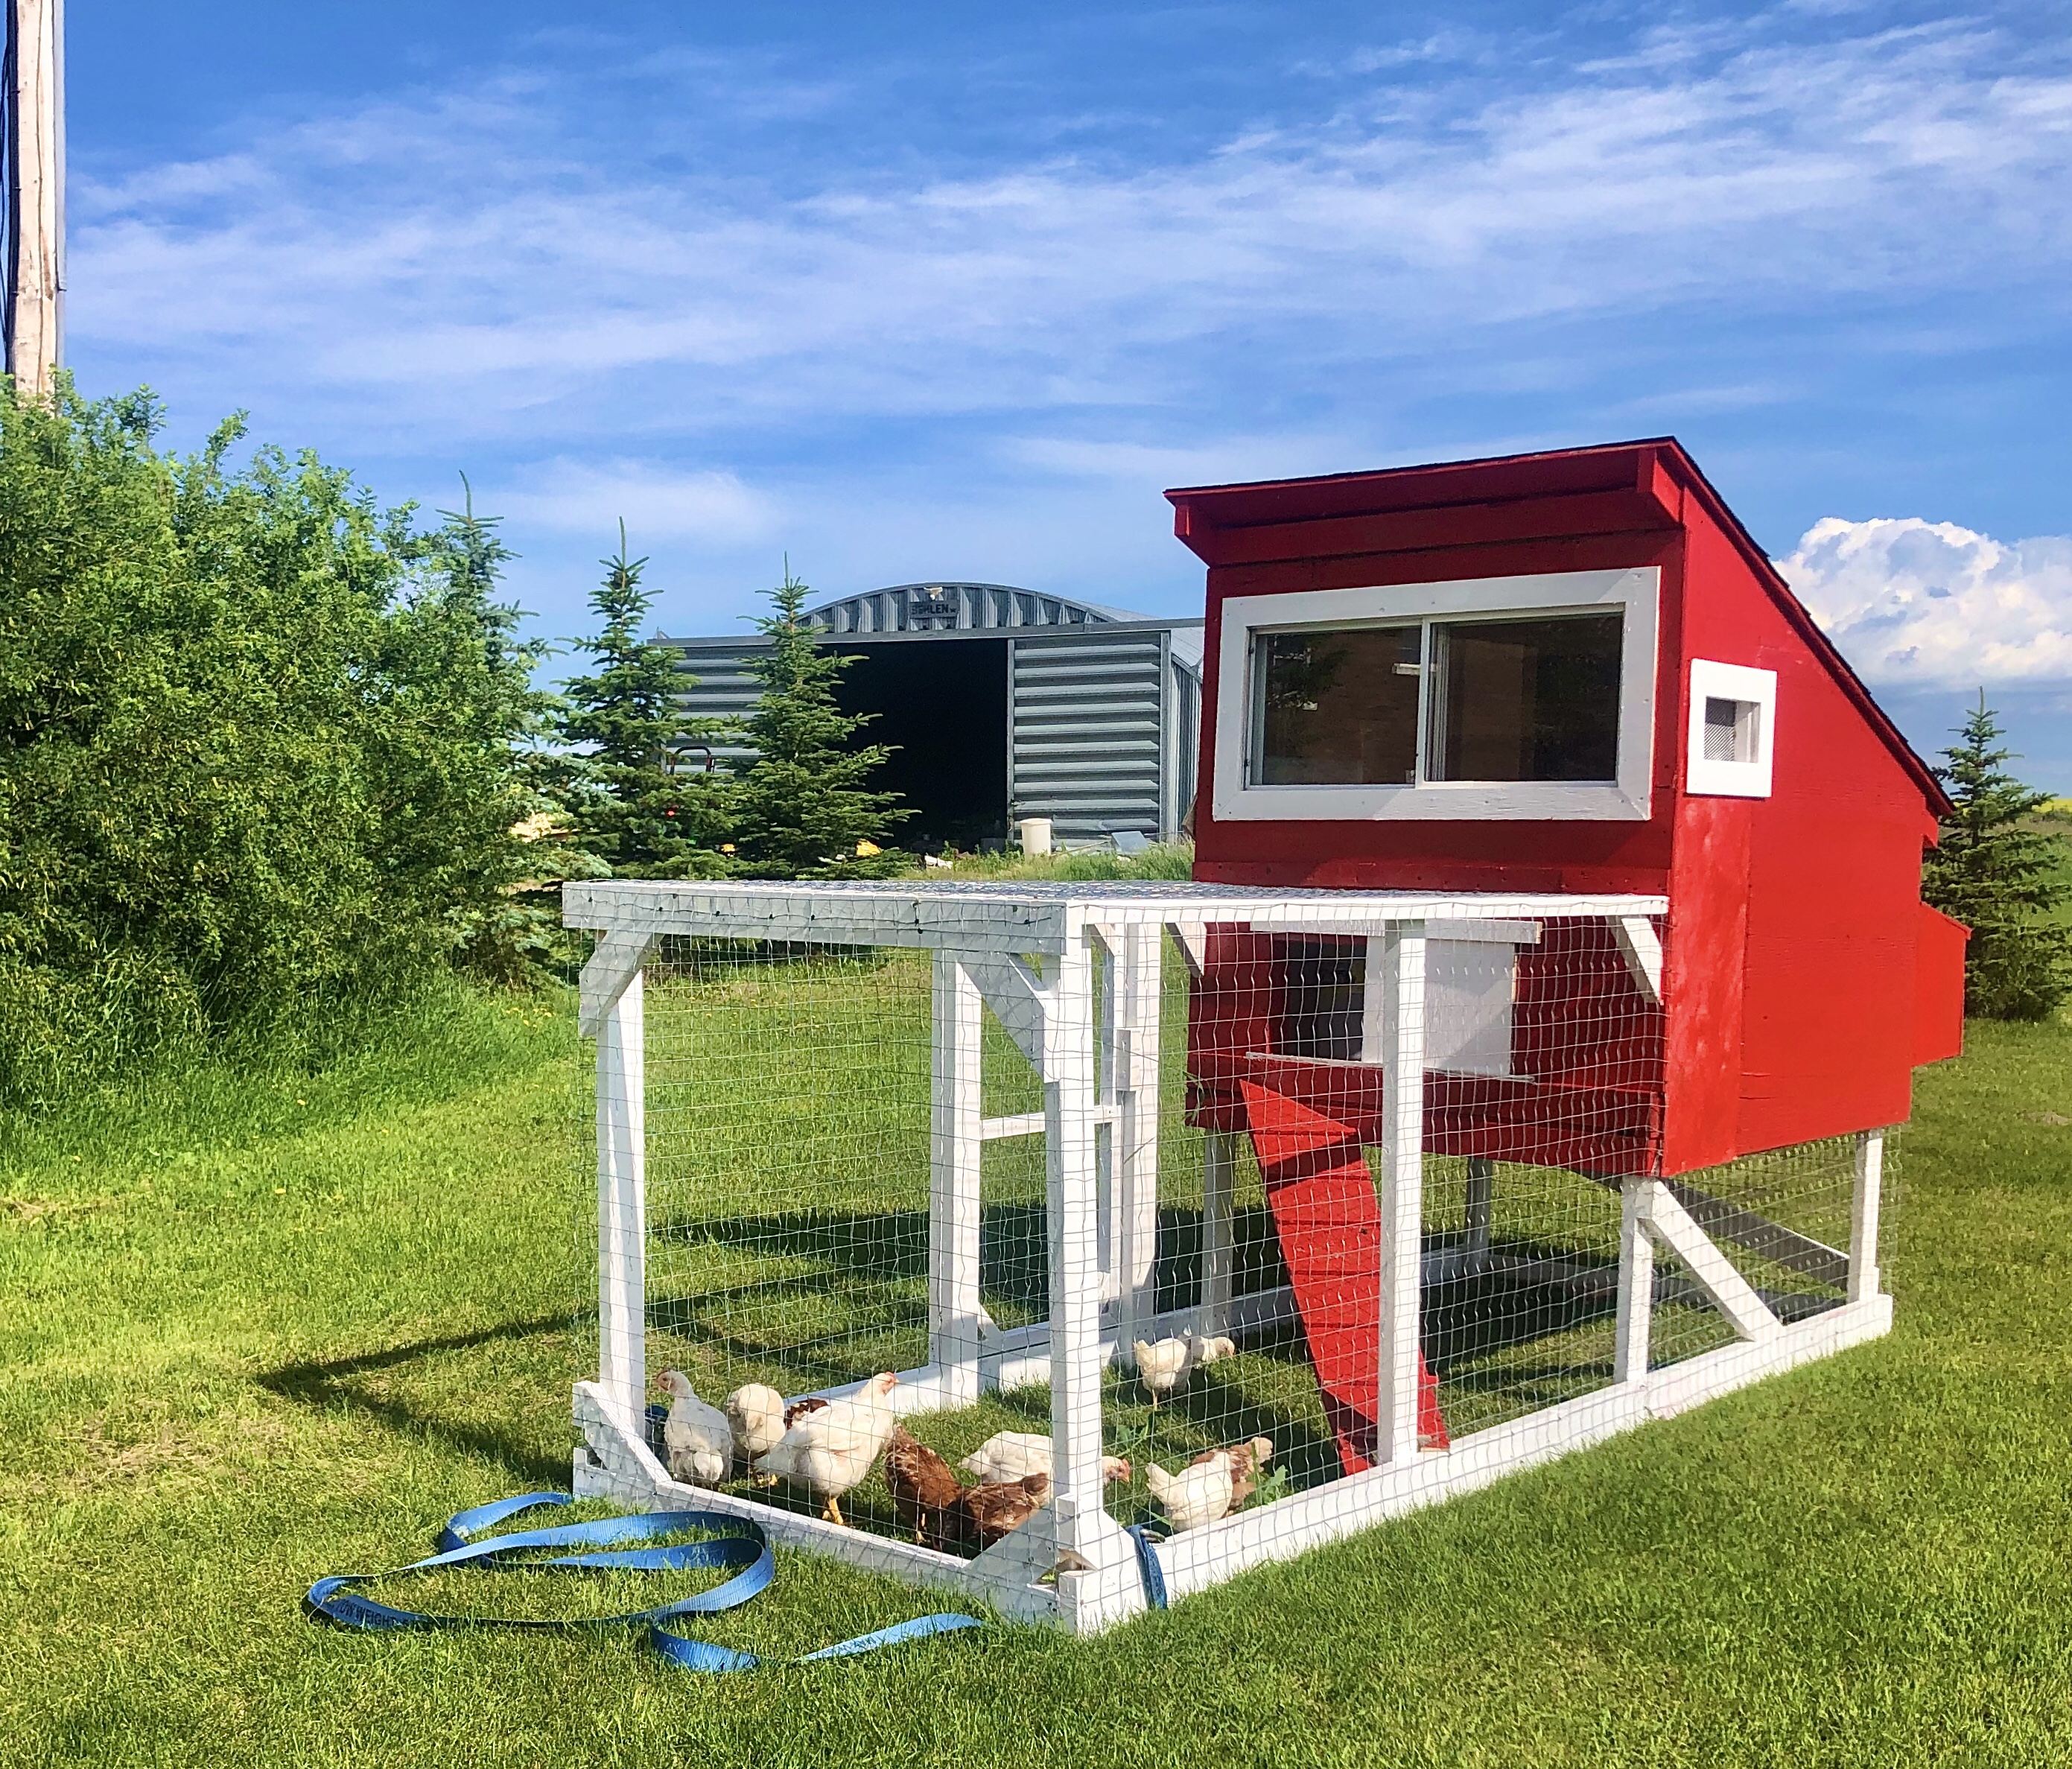
Personally, I think the plan turned out quite well…
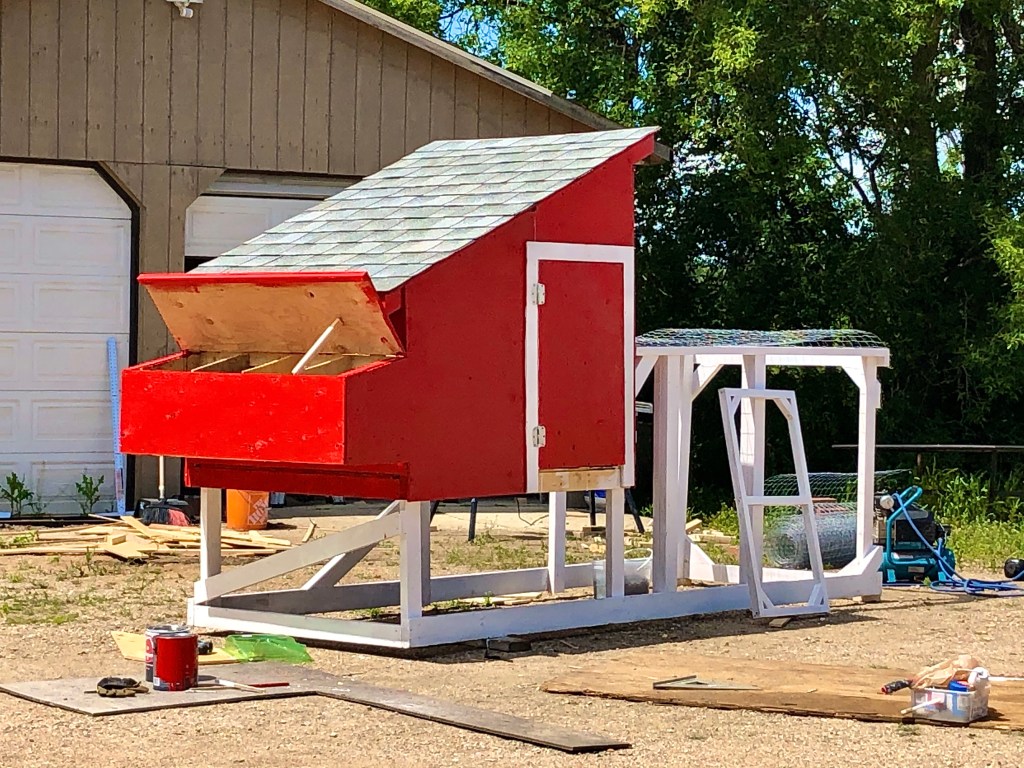
The design is top notch, the color scheme is vintage barn red with white trim, and the cheeps love to stretch their little wings flying up and down their little yard space.
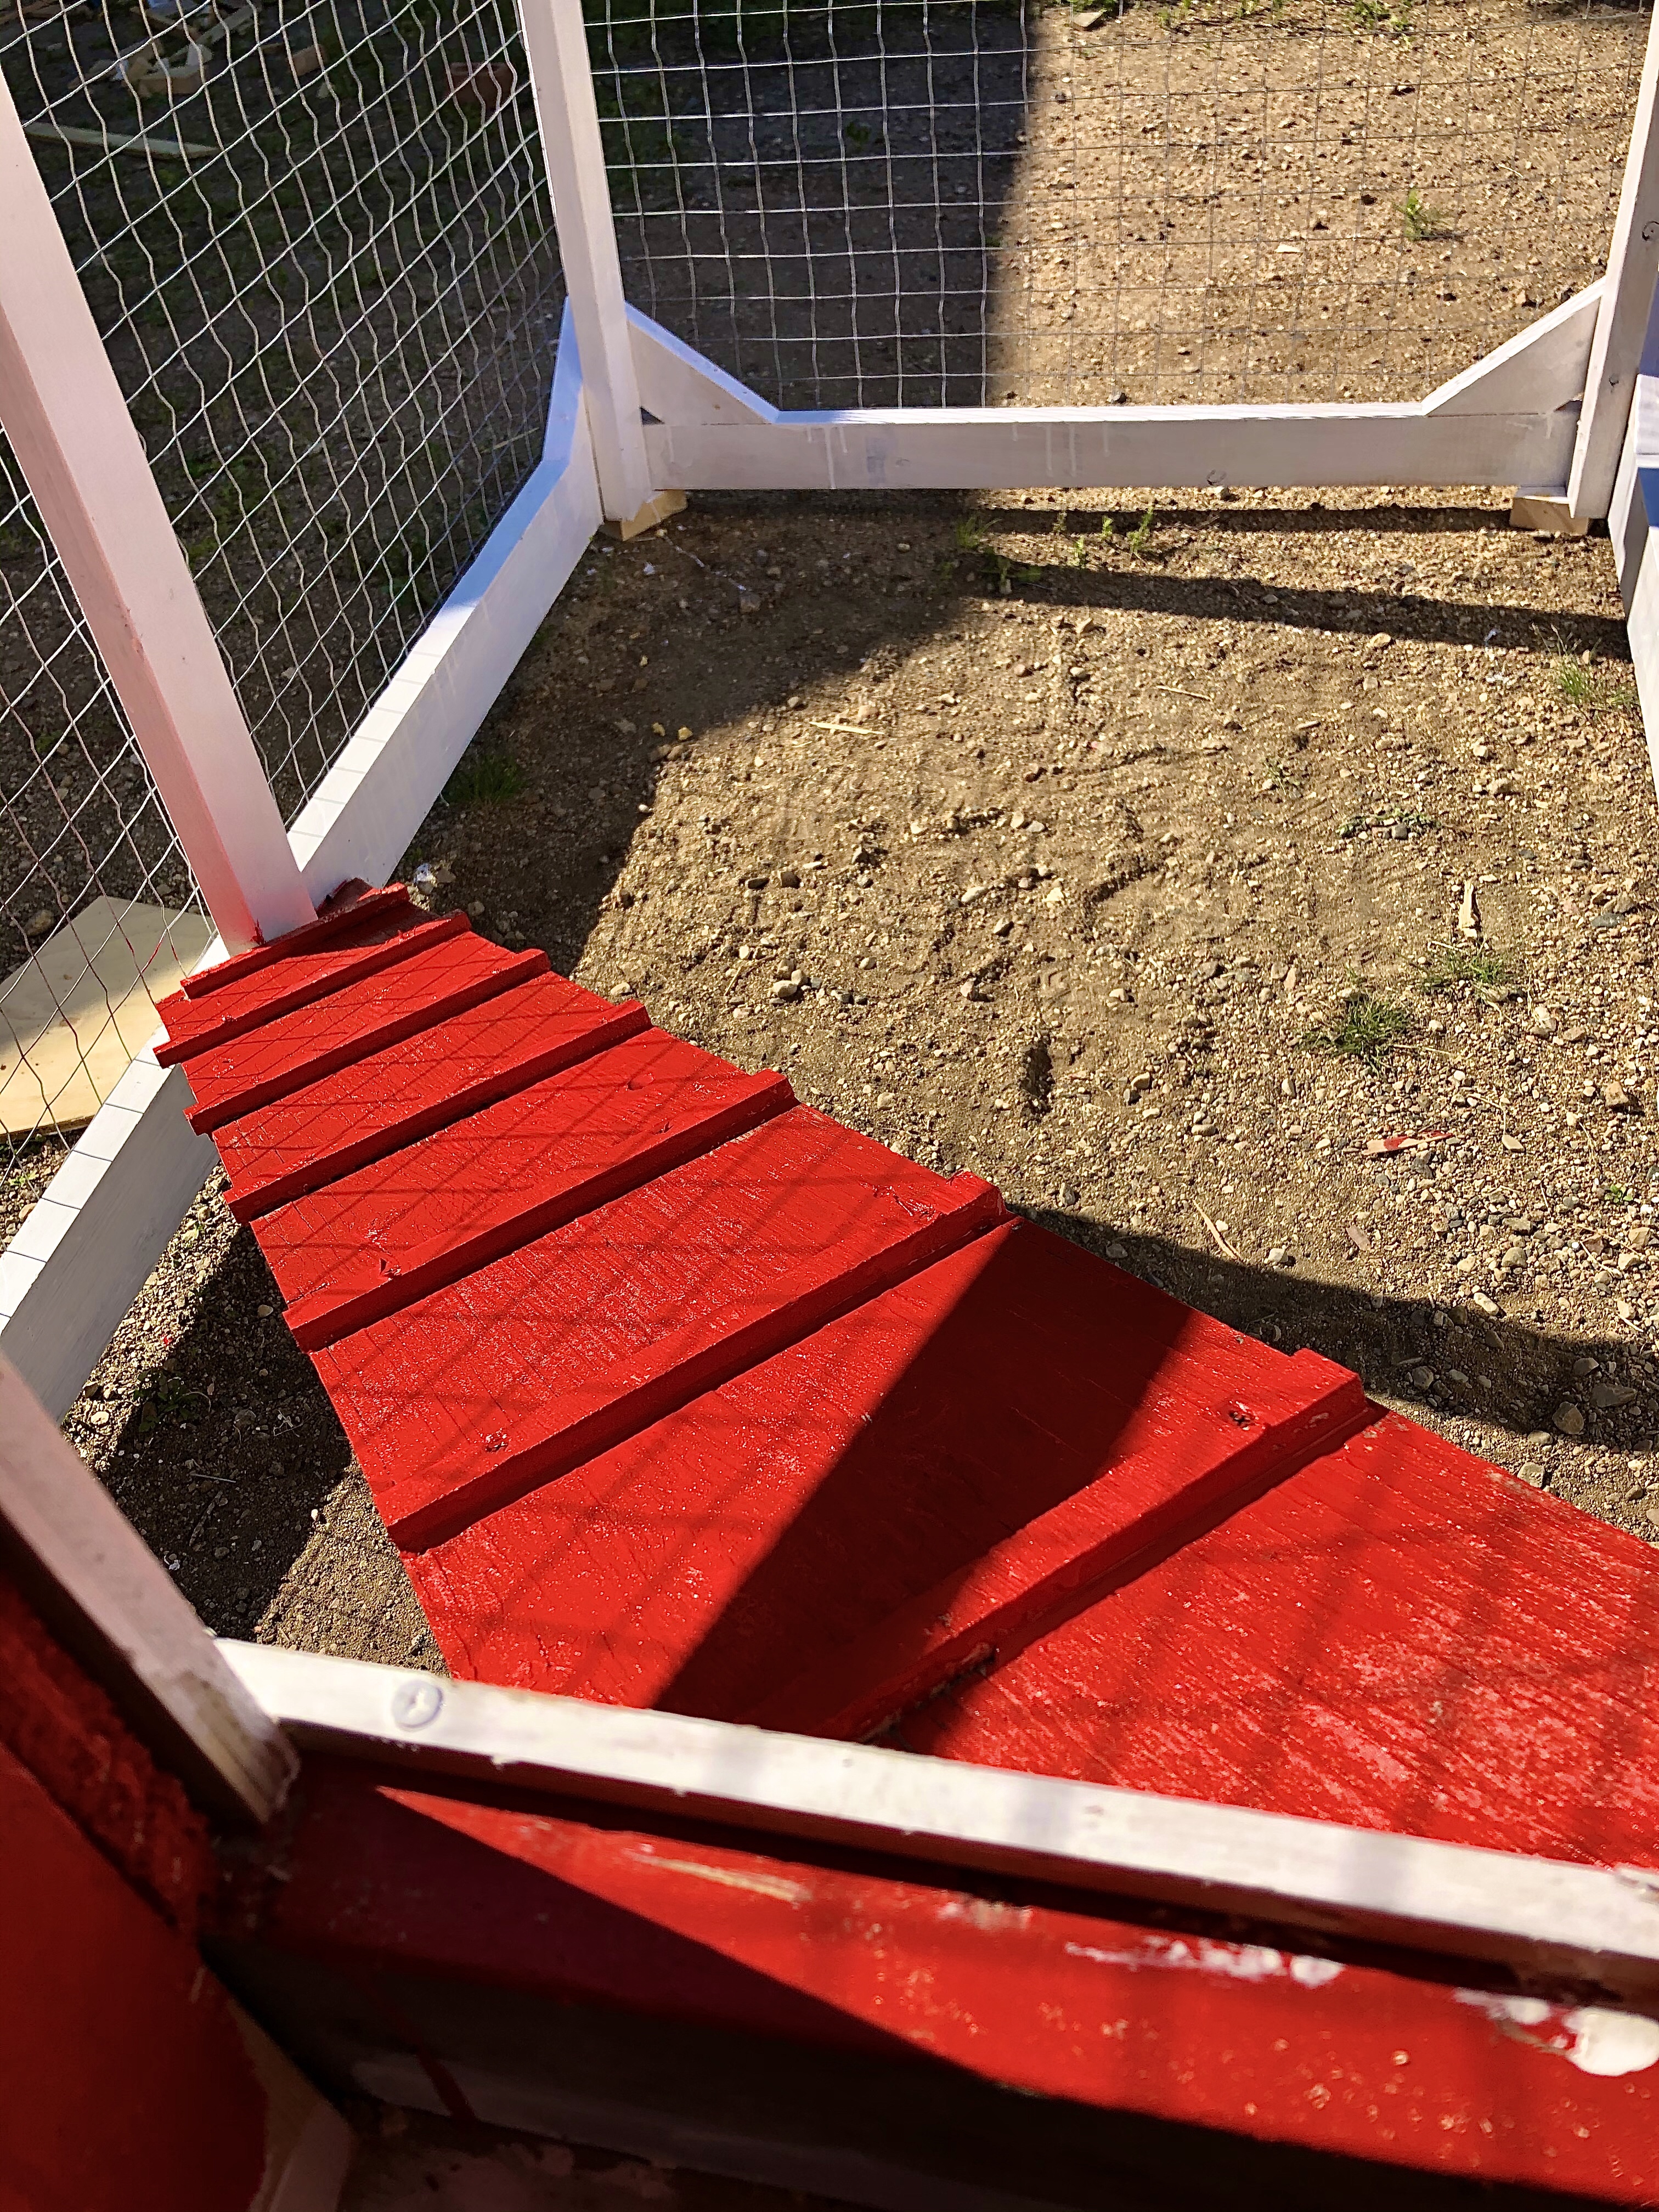
One of the biggest differences we made compared to many of the chicken tractors you will find on YouTube or Pinterest is the fact that we built their ramp on an angle and attached the bottom of the ramp to the frame of the run.
Advertisements
Advertisements
Advertisements
Advertisements
Why is this an innovative idea?
Most chicken tractors have the ramp sitting on the ground and have to have the ramp lifted before transporting the chicken tractor to the next part of the acreage for new grass…
… Moving parts make for more work and more chance of breaking!
(Plus extra hardware costs more money)
Advertisements
Advertisements
Having the ramp on an angle means that we do not have to worry about moving it up and down each time we move the chicken tractor.
One concern that was brought up was whether or not the chickens would fall off the ramp or if they would be able to figure out how to use it properly…
Well! Let me tell ya, they only use the ramp half the time at this young age.
Advertisements
Advertisements
At this point, they are flying down from their coop door – and flying back up again!
Once they are fully grown we will see if they still do this, but for now I am happily amused by watching them try to fly.
Advertisements
Advertisements
We installed treads along the ramp to make sure the chicks wouldn’t slip off when they were coming up or going down.
Advertisements
Advertisements
The features
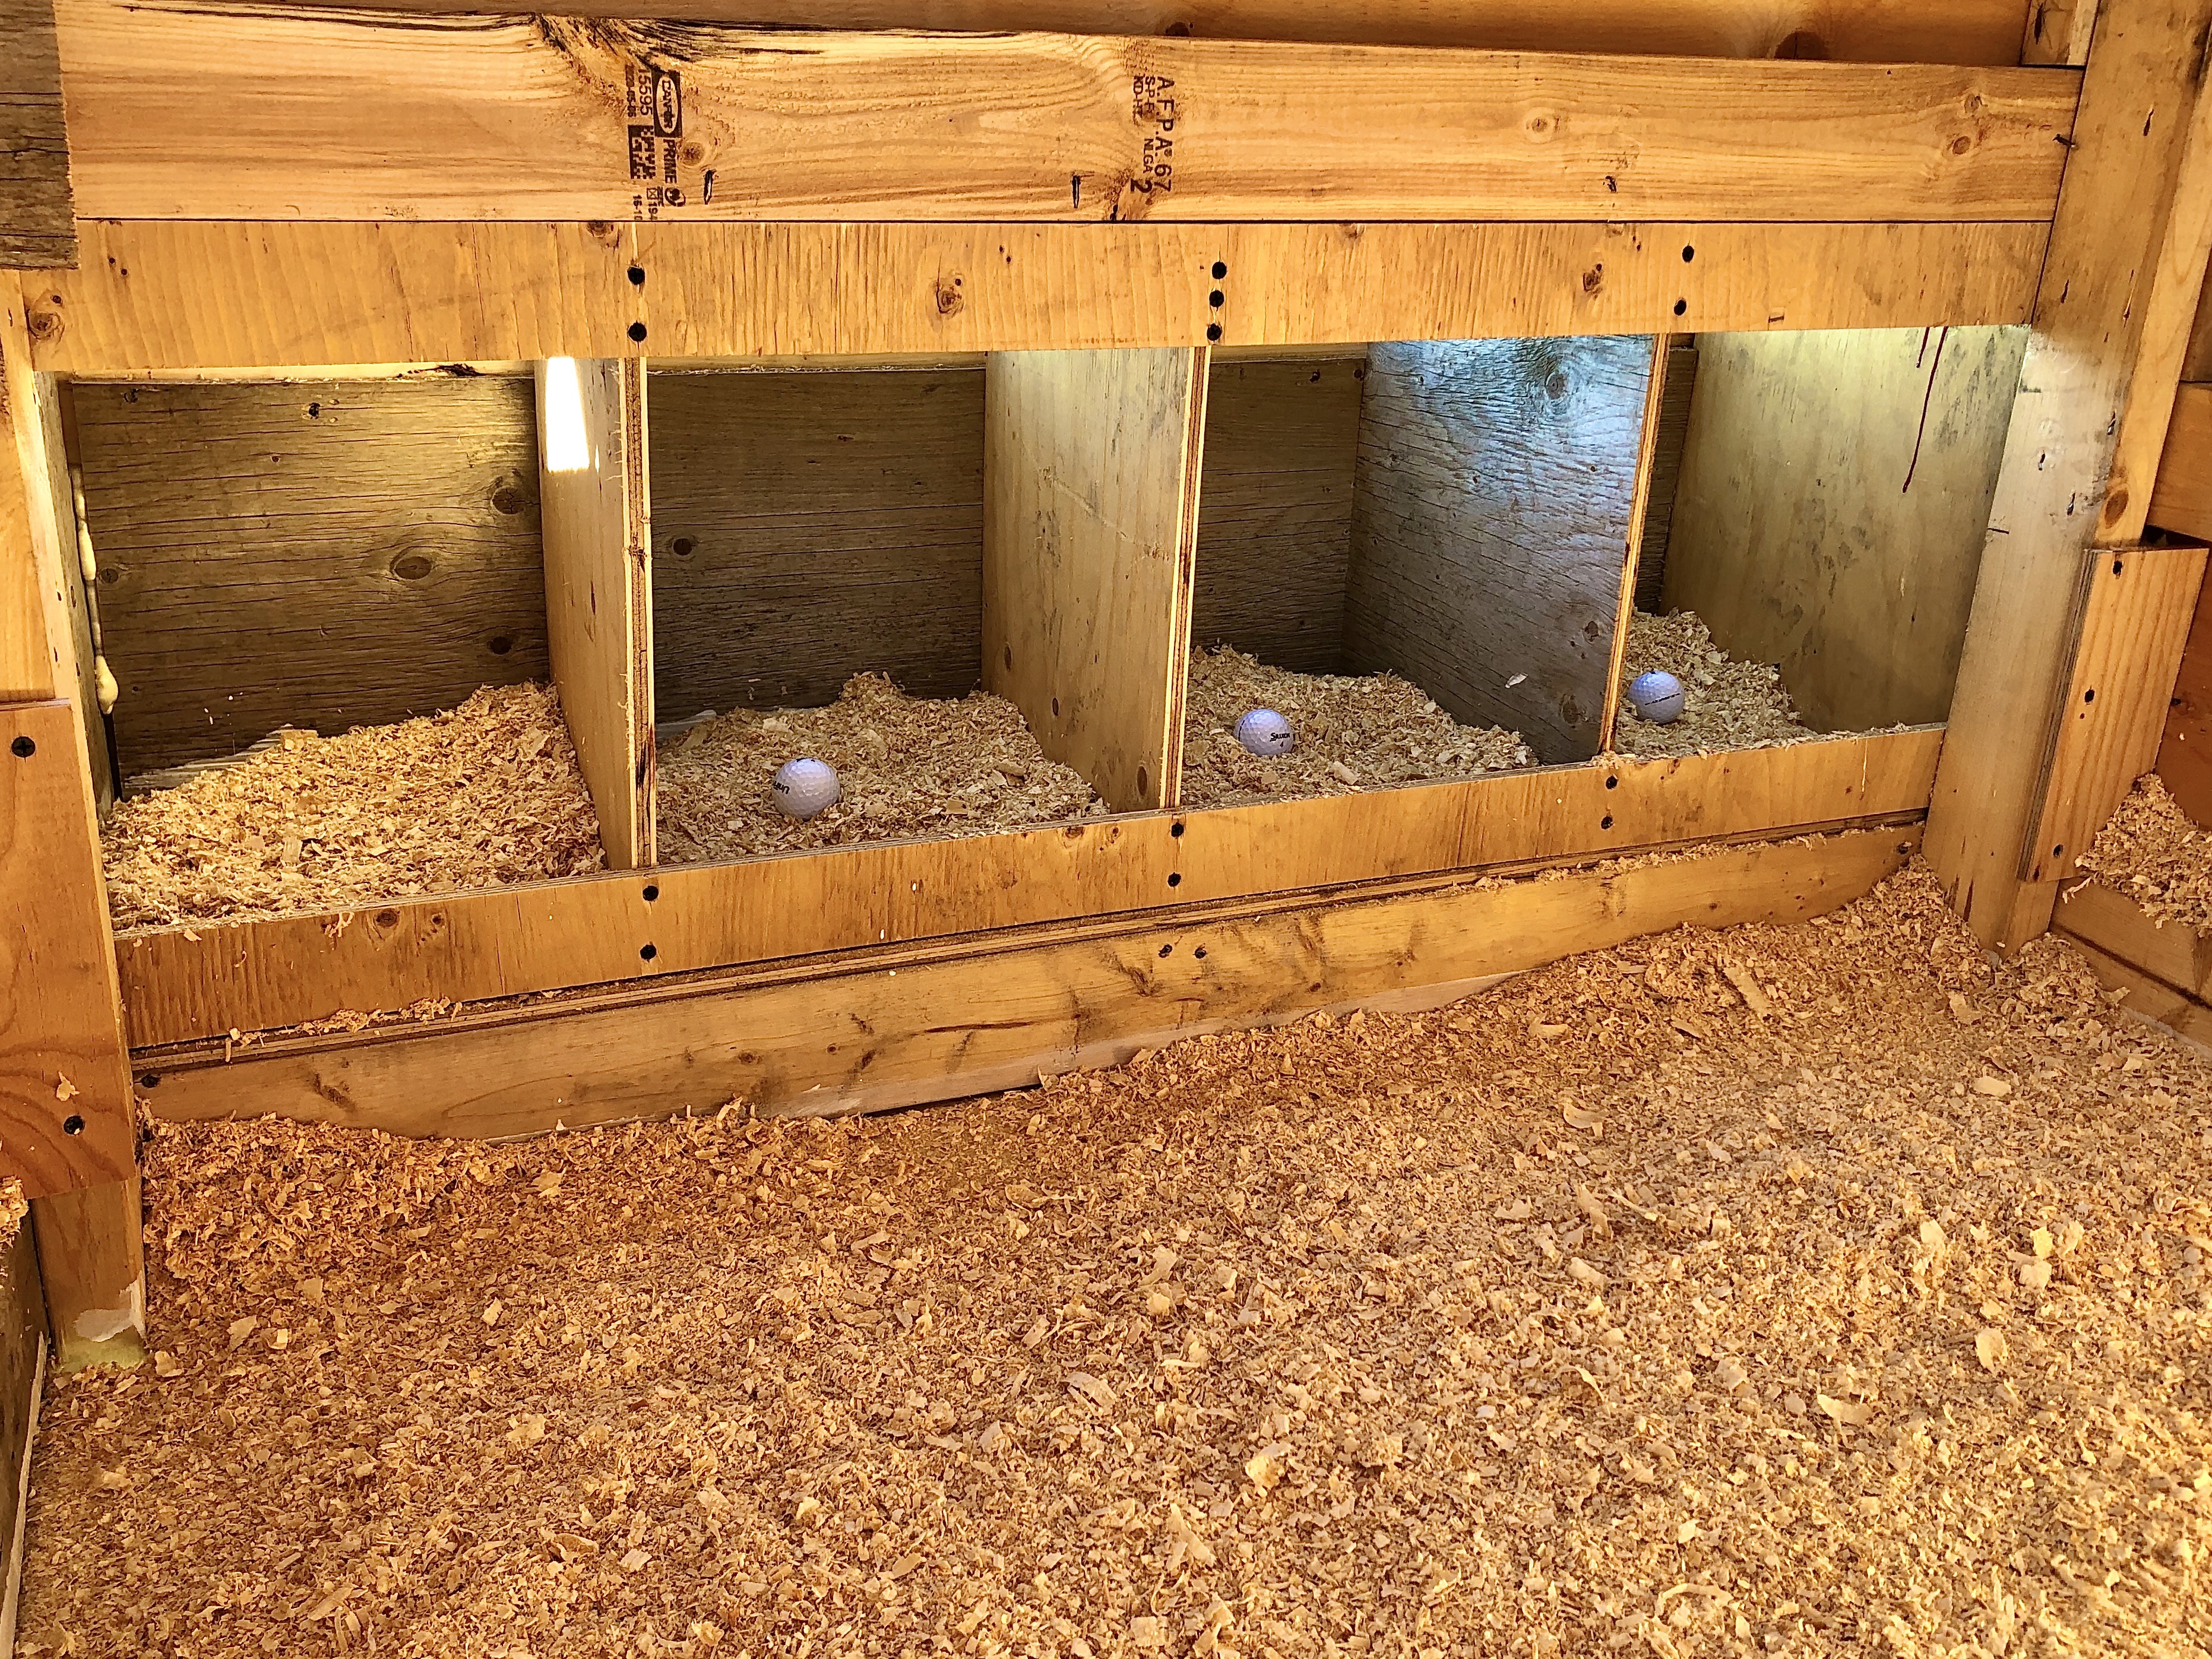
Laying Nests
The next highlight of this luxury chicken tractor (on a budget) is the laying nest setup.
As with many chicken tractors, the laying boxes open from the top on the outside so I can easily collect eggs.
If any of you have ever had to walk through a dusty chicken coop (or worse yet – one that needs to be mucked out) to collect eggs, you will know how nice it is to not have to step foot inside!
Advertisements
Advertisements
Some of you are looking at the photo below thinking that we have a few eggs to pick… while others of you are wondering why on earth there are GOLF BALLS in the nesting boxes?!
Yep. Golf balls.
WHY?
They are there to help teach the hens where to lay. Weird, I know, but it works.
Also, if there are “egg breakers” in the flock, this will help cure them of the habit.
Advertisements
Advertisements
Advertisements
Advertisements
Easy Cleaning
Another nice feature is the fact that there is no lip on the coop door opening, so I can simply scoop or sweep the dirty wood shavings directly into the wheel barrow below.
Easy coop cleaning is a must!
Advertisements
Advertisements
Roosts
Chickens love to roost, especially at night!
This is an addition we still need to make at the moment, but once we do, they will have that much more space inside their coop to hang out comfortably.
We will be going with natural wood from small trees around the acreage for both the “budget” factor as well as the fact that it is supposed to be easier on the feet for the cheeps as opposed to a square shaped roost.
Advertisements
Advertisements
Chicken Door
Obviously a sliding door to close them in at night is a good security feature…
Most nights they put themselves to bed around nightfall and are ready to simply have the door closed.
The first day we let the chicks into the chicken tractor, we put them directly into the run so they could enjoy the grass and figure out the ramp from down below (rather than fall out of the coop from above).
Advertisements
Advertisements
That first night we had to catch them and put them into the coop, but since then they have gotten their new home all figured out!
Some people will even go as far as upgrading from a manual chicken door to one set on a timer to open and close at dawn and dusk!
But remember, we are doing a BUDGET chicken tractor here, right?!
Advertisements
Advertisements
The window & vent
Chickens need natural light to lay well (about 14 hours worth, if I’m not mistaken).
During the darker months, they often will not lay as consistently if they lack light.
While we could add a light to mimic sunlight, at least having a window to give them natural daylight helps a lot.
The vent is needed to keep fresh, clean air circulating in their coop.
Even during cool months, chickens need sufficient circulation to keep them healthy; if it gets too damp and musky in the coop it will cause problems!
Advertisements
Advertisements
Height
The height of the coop is a HUGE benefit!
The chicken tractor is designed to allow the chickens to eat and play underneath the coop and is an easy height for me to clean out (remember the wheel barrow fitting right under the door for cleaning?)
It also allows easy access so I can reach in to fill their feeder, check their water, and open the nest box without having to bend down.
Advertisements
Advertisements
Flooring
The flooring is a sturdy, plywood floor.
We painted it to help with the ease of cleaning.
Some people choose to use off-sale laminate or linoleum flooring; this makes the dirty wood shavings sweep out of the coop that much easier. We didn’t have any on hand, so we didn’t fork out the extra cash to go that route.
Advertisements
Advertisements
You remember how I said this was a “budget” project?
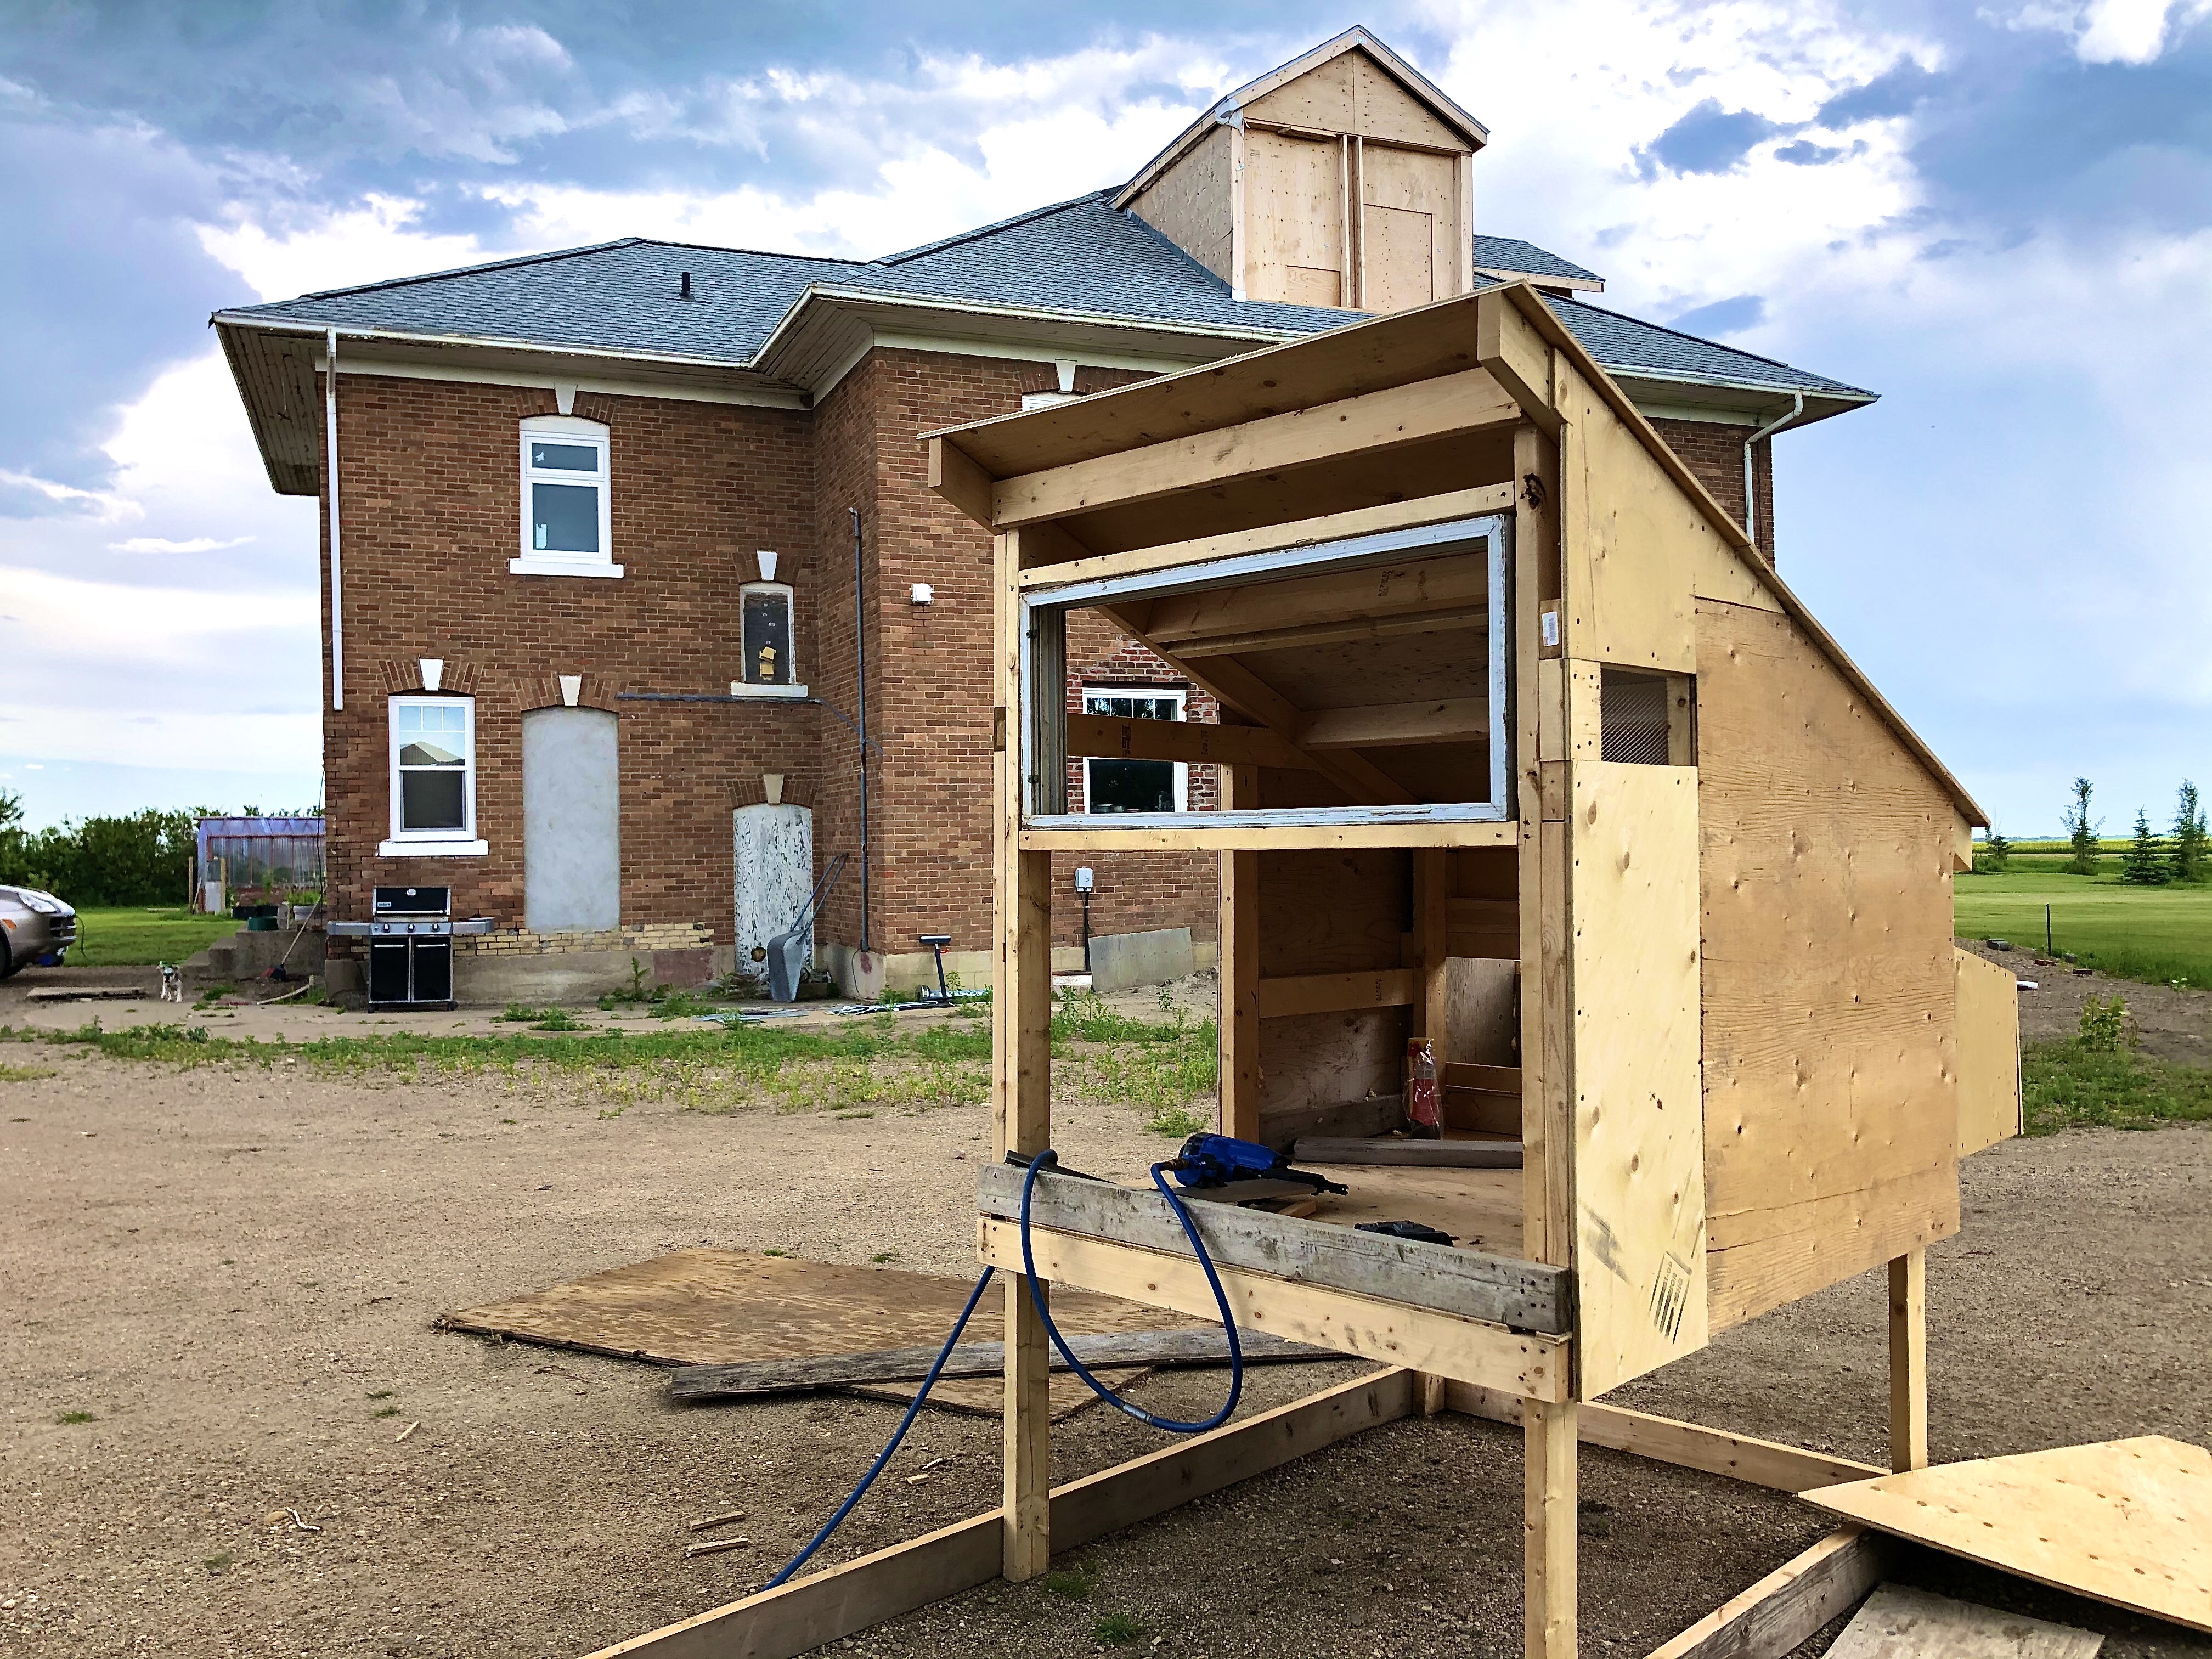
Let me get into that part!
We used a window we had removed from the 3rd story when we ditched the old windows and replaced them with high-efficiency ones.
It would have ended up in a landfill if it had not been repurposed, therefore it is not only cost effective for us, but also more environmentally responsible.
Advertisements
Advertisements
(Don’t get me wrong; I’m not one of those people worried about cow farts contributing to “climate change,” but I HATE people littering and I hate to waste resources)
Some other ways this was a “budget build” is the fact that we used a lot of scrap wood we had left over from other house projects.
LIKE A LOT!
We used so many small pieces of boards that would have been useless on most other projects, plywood, and even used shingles we had left over from roofing our house last fall (yes, they were still good strips that could be used to patch the roof later, but the point is – we had extras on hand)!
Advertisements
Advertisements
What did we spend money on?
Wire
This was likely the largest cost for this project; quality wire is not cheap!
What they call “chicken wire” is okay for keeping chickens inside an enclosure, however if you need to worry about keeping critters out (foxes, dogs, etc) you need something much hardier!
Also, adding wire to the top of the chicken tractor was necessary to keep the chickens inside – AND keep the hawks and eagles OUT!
I have seen large birds of prey take out a few chickens over the years, so this was a big concern of mine…
Advertisements
Advertisements
Lumber
With the scrap lumber on hand, we still did have to buy some 2×4’s and plywood to finish the project.
Paint
Paint was something that we did not have on hand – at least not in the exterior variety that would hold up to our harsh weather.
Insulation
We live in a very cold climate and needed to have the coop insulated for the winter months. We purchased a few small spray foam bottles to seal up the corners that would make the coop drafty and then used old bats of fibreglass insulation for the rest of the coop. (NOTE: chickens will eat insulation, so you need to make sure you have it covered so they can’t munch on it!)
Advertisements
Advertisements
Hardware
We had old hinges on hand from other projects, however had to purchase latches for the run and coop doors.
Wheels
Well, as you can see from these photos we haven’t installed wheels yet… That is a purchase we still need to make at this point, but it will be a cost when all is said and done.
Advertisements
Advertisements
Feeder & Waterer
You would not believe how hard it can be to find some of the basic items needed to raise chickens during prime-time in the spring!
I searched everywhere for a feeder and waterer when we were getting the chicks – only to find a feeder, but NOT a waterer that the tiny chicks would be able to drink out of!
I ended up making a homemade waterer using a Tupperware and a flaxseed oil bottle to mimic the “self-watering” capabilities of a store-bought waterer… And it worked!
However, when the chicks were large enough, they got to start using a proper waterer.
Advertisements
Advertisements
Advertisements
Advertisements
All in all, having a mobile chicken tractor to move around the yard has been a great choice!
Yes, it took time and thought to build, but we don’t have any dead patches of earth where the chickens have demolished their run (the way they do in a stationary chicken run) and I personally like the idea of fresh eggs that are truly “free range” quality without the worry of a chicken mysteriously disappearing due to a hungry animal!
Advertisements
Advertisements
Now all I need to grab is a good ol’ fashioned metal egg basket for when our chickens start laying and I’m set!
Looking for a way to help your dog beat the heat this summer?
This frosty recipe is a great way to reward your loyal pup!
Warning: it does melt fast, but your dog is faster!
Advertisements
Advertisements
Oh! Did I mention that it only takes 3 ingredients?!
And they are ingredients you likely already have in your house; a banana, peanut butter, and plain yogurt.
They are quick and easy to make – the time they take to freeze is the longest part of making these pupsicles.
Advertisements
Advertisements
Advertisements
Advertisements
Begin by mashing one ripe banana, then combine the yogurt and peanut butter so the mixture is a smooth, even consistency.
There are some really cute dog paw or dog bone forms out there, however you can also use an ice cube tray to form the treats if you don’t have anything fancy to use.
Fill the forms to the top, trying to minimize any air bubbles in the batter.
Advertisements
Advertisements
Place in the freezer for 2 hours or until fully frozen.
And let the treat-earning-tricks begin!
The first time my dogs tried this recipe, they took a few slow licks before digging in – and the treats disappeared like magic!
As with all snacks, I don’t recommend giving your dog more than one or two per day because they still will make your pup chubby even though they are homemade.
Advertisements
Advertisements
Advertisements
Advertisements
Recipe
1 ripe banana
2 tablespoons peanut butter
2 cups plain yogurt
Advertisements
Advertisements
Directions
Mash banana well, then mix in yogurt and peanut butter.
Place in ice tray or form of choice.
Freeze for 2 hours or until fully frozen.
Let the pups enjoy!
Advertisements
Advertisements
Advertisements
Processing…
Success! You're on the list.
Whoops! There was an error and we couldn't process your subscription. Please reload the page and try again.
The smell of well marinaded meat sizzling on the grill makes my mouth water – instantly!
While doing a good, long marinade tries my patience, it certainly is worth the flavour and tenderness it gives even a mediocre cut of meat in the end.
Sure, you can spend big bucks on the highest quality meat…
Advertisements
Advertisements
…but sometimes it is nice to have an option to turn the more affordable cuts into a melt-in-your-mouth delight!
Hence the 24 hour marinade time for my carne asada recipe.
I often buy a bulk cut of round steak to cube for round steak and gravy, slice and tenderize for chicken fried steak or keep a good chunk to use as a slow cooker roast.
However, it also makes for a delicious alternative to skirt, flap or flank steak for carne asada.
Advertisements
Advertisements
I clean all the fat off and cut long slabs of meat with the grain, about an inch thick.
Then the marinade process begins!
Some people prefer to place meat in a glass pan with a lid, however I tend to simply place the meat in a large zip-lock bag; this method makes it so easy to make sure the marinade is mixed well and equally proportioned across the meat.
Advertisements
Advertisements
To start this marinade, I zest a lime, then squeeze all the juice into the bag.
The citrus is an amazing tenderizer and adds flavour that makes all the others really pop.
Next, I add cayenne powder (I LOVE a bit of spice), cumin, and garlic.
Spices are what really kick an ordinary recipe up a notch!
So do herbs, hence adding a bunch of chopped cilantro (even if you are not a huge cilantro lover, trust me on this and try it this way at least once!)
Advertisements
Advertisements
The drizzle of avocado oil helps the steak sizzle on the grill.
The splash of soy sauce, along with my secret weapon – Worcestershire sauce (and no! I did not spell that correctly the first time, but I sure know how to use it in cooking) – come next.
They bring a ZING of WOW!
Sometime I will add a few drops of liquid smoke for that amazing smokiness.
And finally, some brown sugar.
Advertisements
Advertisements
If you have never marinaded meat before, you might be surprised that there is sugar in this recipe.
The sugar helps give a carmelized finish to the meat as it grills and enhances the flavours.
Have I mentioned that flavour is my #1 focus when cooking? You can probably guess, given how much I mention it!
Advertisements
Advertisements
Advertisements
Advertisements
Close the bag, leaving as little air as possible. This helps make sure the meat is evenly marinaded.
Then, give it a good mixing by working the marinade into the meat with your hands (make sure you don’t accidentally open the zip-lock – it makes a mess!)
This method is a win-win for me; less dishes to wash is always a win plus it is a fast, easy way to fully mix the marinade.
Advertisements
Advertisements
Now throw that bad boy in the fridge for 24 hours and try not to drive yourself crazy, thinking about how amazing it is going to taste – TOMORROW!
Sure, if you want to rush things you can get away with marinading it for 4 hours (or even 1 hour if you are in that much of a hurry), but the 24 hours gives it amazing, deep flavour that you just can’t beat – not to mention the tenderness!
Once your countdown has hit about 1 hour left to go, prep time starts!
If you like chips and dip as starters or sides, this is the time to whip up some guacamole and chunky salsa.
Advertisements
Advertisements
Next, thinly slice the cabbage, red onion, and cucumber.
Add these to the same bowl, drizzle lemon juice over, add salt & pepper to taste, and stir well.
The crunch this “slaw” adds to the tacos makes for great texture (have I mentioned that texture is a big deal in my cooking, too?)
The crema sauce is my easy go-to for Mexican recipes. I almost always have sour cream, lime, and zest on hand!
Advertisements
Advertisements
Some people prefer variations of an avocado sauce (there are lots of recipes), which is also so tasty!
You take your pick!
If you want to go with crema sauce, mix the sour cream, lime zest, and lime juice. Add salt and pepper to taste.
Now that the prep work is done (unless you are going all out and make homemade flour tortillas, too),get that grill going!
Advertisements
Advertisements
You want it pre-heated and on high heat.
Sear the meat, turning and drizzling additional marinade over it several times.
The length of time you leave it on the grill will depend on how hot your grill is in addition to your preferred “done-ness.”
I personally like a little pink in the centre, however Jake likes his more well-done.
You do you!
Advertisements
Advertisements
Well, if you are cooking for the whole family you kind of have to think of them, too (in which case, having a couple cuts of meat to cook to different “done-ness” is a great idea!)
Once the meat is cooked as desired, remove from heat and let rest for a couple minutes.
This helps those juices to re-absorb into the meat and keeps it – well – juicy. And tender.
While the meat rests, this is a great time to pull out all the prepped toppings from the fridge and heat the tortillas.
Advertisements
Advertisements
You want to use the small, taco-sized flour tortillas for this recipe.
I put them in a pan (without oil) individually on high heat until they feel hot, then flip them and remove from the heat after they puff up.
Repeat this process with each of the tortillas.
Advertisements
Advertisements
Once again, this helps bring out the flavour as well as make the tortillas nice and flexible so they don’t break apart.
PRO TIP: you can also do this part on the grill, just make sure the heat has been turned down so the tortillas don’t burn!
Now it the time to slice up that yummy goodness you have waited a full day for!
The key to cutting meat to be as tender as possible is to cut it against the grain – in nice thin strips.
You can also slice the meat into even smaller chunks and fry them in a bit of oil like the taco stands in Mexico do.
The choice is yours!
Advertisements
Advertisements
Plate your tortillas (or serve buffet style) by layering the veggie slaw on the bottom, then the carne asada, then crema sauce.
You can garnish with radishes, pico de gallo, and/or cilantro.
I personally also love an added wedge of lime to squeeze over my carne asada!
YUM! Enjoy!
Oh, and if you happen to have any leftover carne asada (like that’s going to happen!), carne asada nachos and carne asada poutine are totally a thing.
Pet stores have loads of different treats to choose from, but are they all healthy for your pup?
Probably not.
In fact, there are a lot of snack options I would not want to feed my dogs.
I personally like to know what goes into the food that I eat, so why should it be any different for my dogs?
Advertisements
Advertisements
Homemade treats are not only easy to make, but they also give me a feeling of pampering my dogs a bit more than if I had just gone out and bought a tasty snack for them.
These sweet potato chews are the veggie alternative to rawhide – and the dogs LOVE them!
PSA – just because they are a vegetable doesn’t mean you should feed your dog more than one or two per day; they will still make Fido chubby if he has too many treats!
So just how do you go about making these yummy chews for your dog?
Easy!
Advertisements
Advertisements
Simply slice the sweet potato into thin strips, then place in the food dehydrator at 140º F for 4 hours.
Advertisements
Advertisements
If you do not have a food dehydrator, you can bake them at 250º for 3 hours.
You can peel them, however I usually leave the peel on and the dogs eat the whole treat.
And viola! It is as easy as that!
If you have more than one dog, you may need to keep an eye on the one who tends to be the “treat snatcher” like Lady is!
Poor Zeus has lost his fair share of treats to her when my back was turned.
Advertisements
Advertisements
What is your dog’s go-to treat? Drop a comment below!
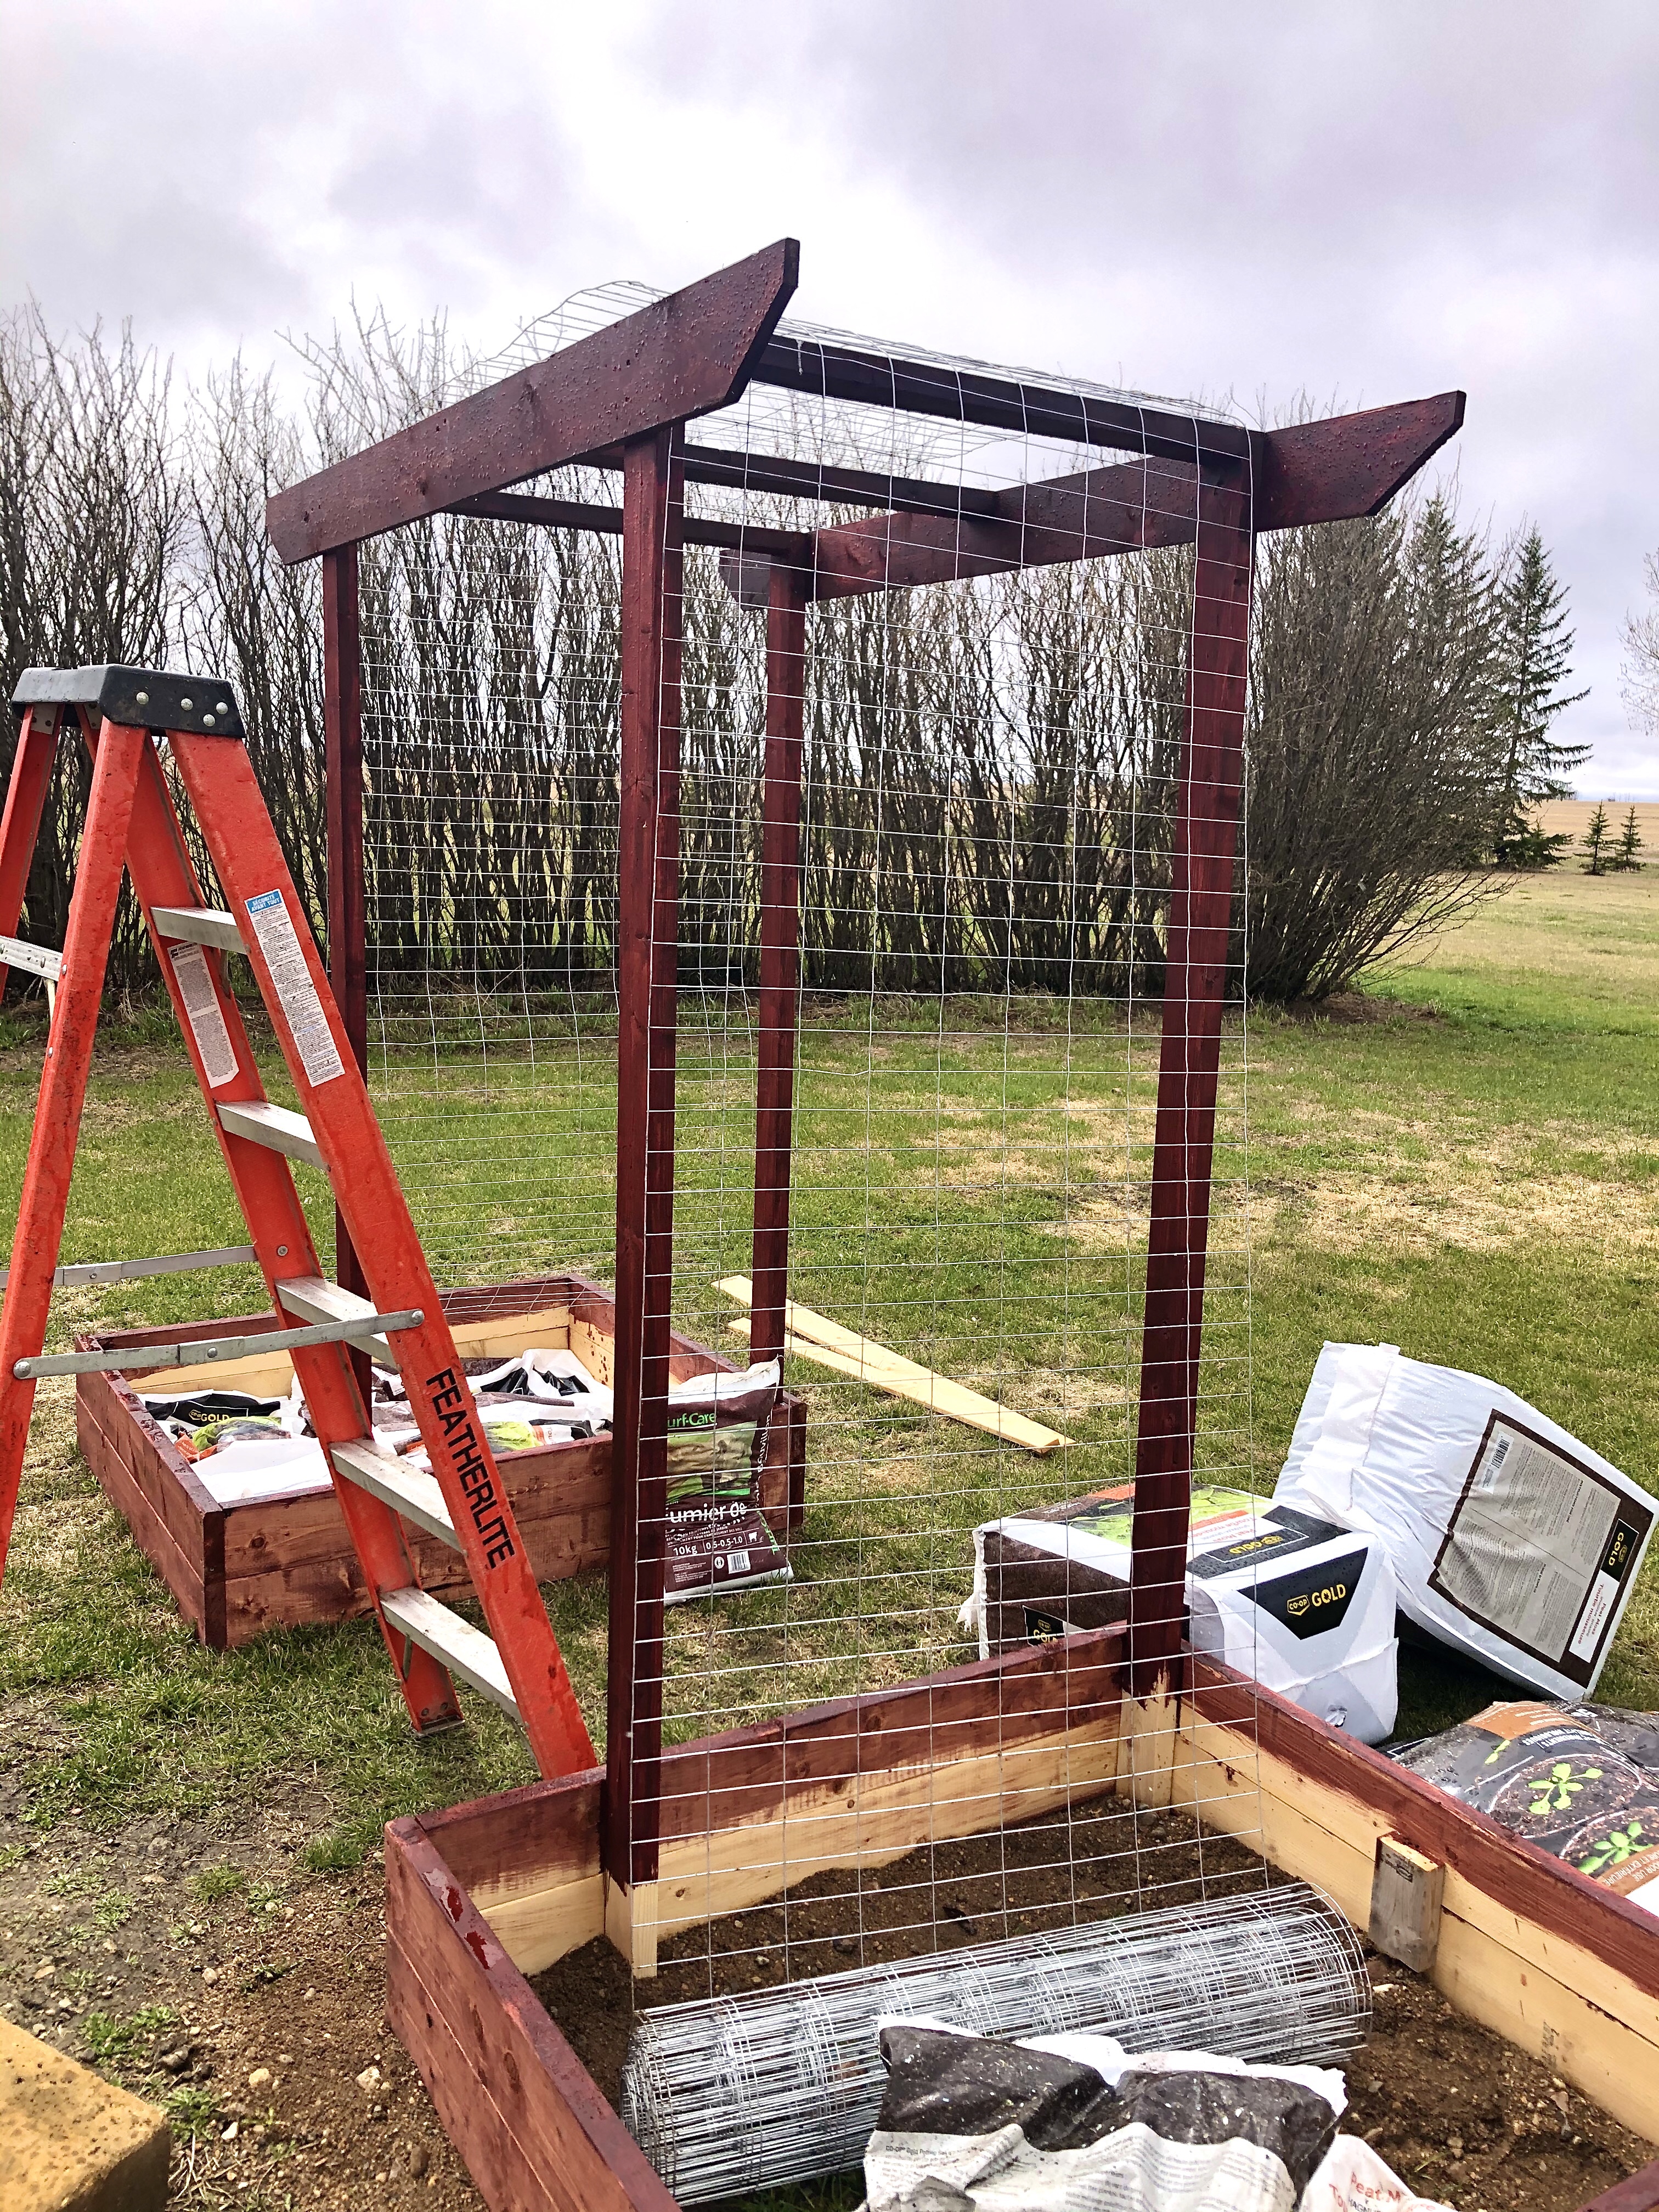
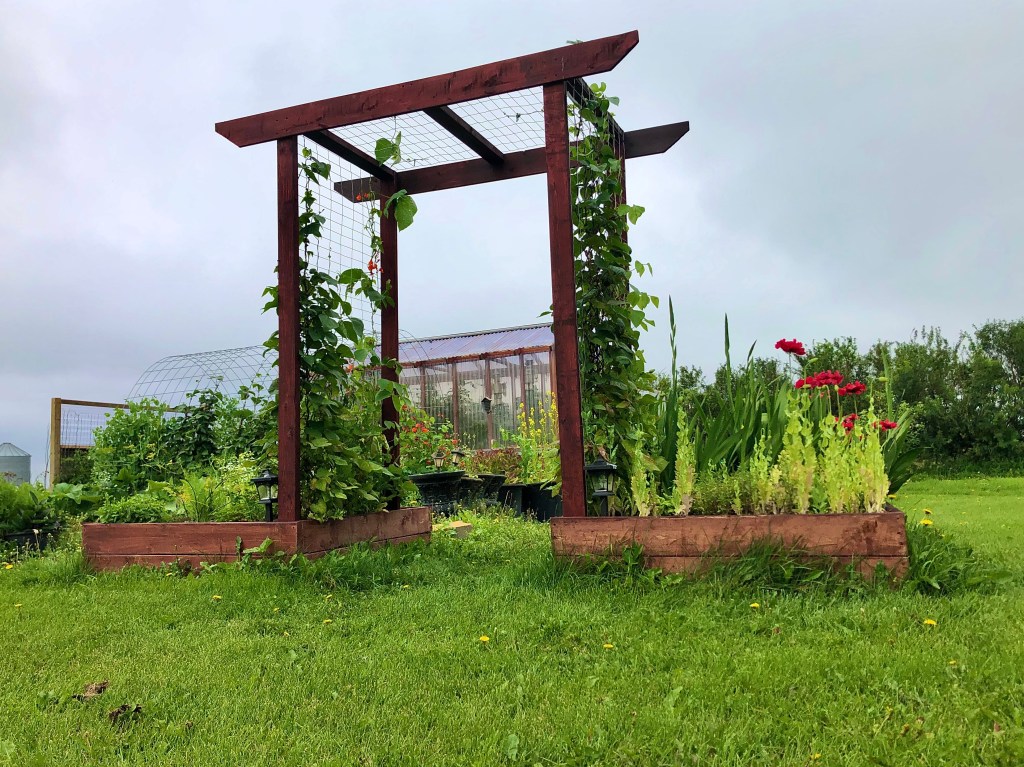
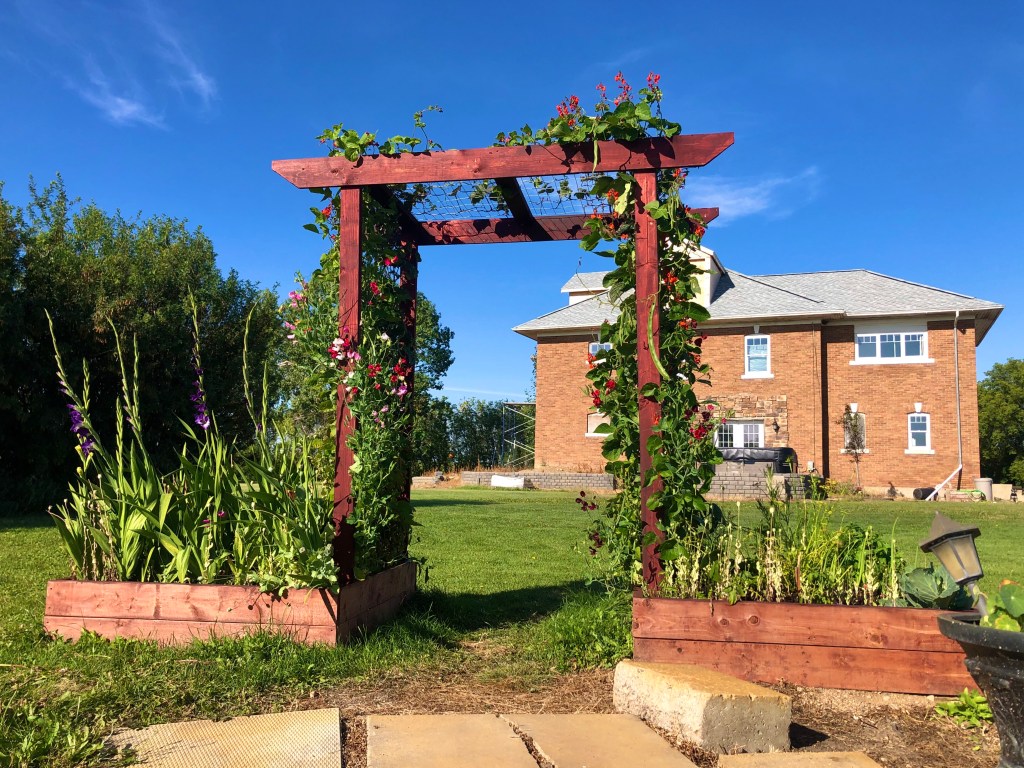
I have always enjoyed the look of an arbor with flowering vines framing the structure, so why not use that concept in the garden as both an architectural accent and a functional growing space?
My garden path was begging for a beautiful entrance and a garden arbor sounded like just the thing!
After a trip to Home Depot for building materials, we started our project by building the raised beds that would go on either side of the archway.
4’x4′ boxes may have been a bit of overkill, however I planned to use most of the space for my kitchen garden filled with fresh herbs, so the space came in handy.
Advertisements
Advertisements
Once both boxes were built and stained, we put them in place and started on the archway.
We checked out many different design ideas on Pinterest and decided that a pergola-style arbor was the look for us!
Advertisements
Advertisements
Advertisements
Advertisements
Next, we squared and levelled everything .
The full supply list was very simple for this build:
10 – 8 foot 2×6’s
7 – 8 foot 2×4’s
1 pail of stain
20 feet of wire
And a handful of screws…
I love projects that come together in such a short amount of time with supplies that are easy to find!
Advertisements
Advertisements
Tommy photobombing my progress photo.
Advertisements
Advertisements
After we finished staining everything (except the insides of the boxes) we ran the wire and secured it in place.
Advertisements
Advertisements
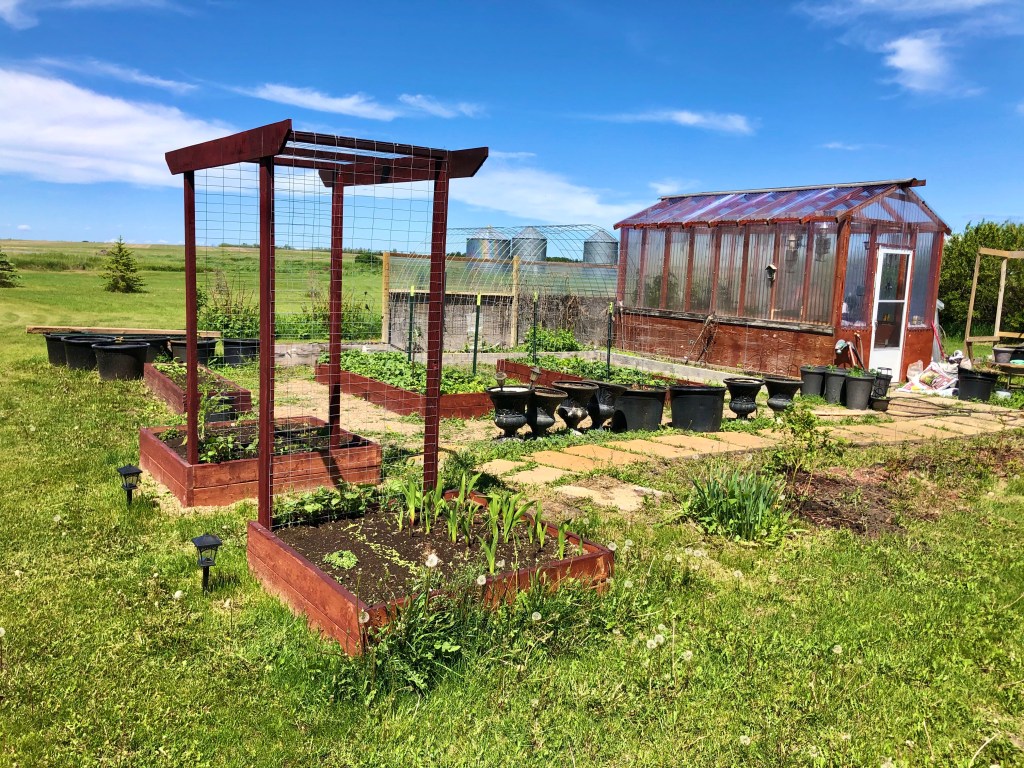
The next step was to fill the boxes with soil, plant them, and then wait…
I am a fairly patient person, however I was anxious to see how our new garden arbor would look once the vines had grown up and over the trellis…
There is no rushing plants, so I was forced to wait!
Advertisements
Advertisements
I planted scarlet runner beans, purple runner beans, and sweet peas as the vines to climb the trellis and filled the rest of the boxes with flowers and herbs like basil, oregano, thyme, mint, and chives.
Never having grown scarlet runner beans before, I was impressed with how prolific and bright their red blossoms are (not to mention beans that grew up to 12 inches long)!
The beans had to be trained to wind around the wire every couple days as they grew, however the sweet peas did well attaching themselves on their own.
In this day and age, gardening isn’t just a plot of land that you till and plant.
Modern gardens range from traditional in-the-ground gardening, to window herb gardens in an apartment, to decorative raised garden beds that add to the back yard’s aesthetics.
Advertisements
Advertisements
Raised garden beds not only look nice, but they are easier on the back when planting, weeding, and harvesting.
They also keep the soil slightly warmer than ground-soil temperatures and make it easier to keep the pathways nice and tidy.
While you can buy kits to build your own raised beds, creating them from raw materials really isn’t that hard – and is a lot more cost effective!
You just need a few tools and a bit of know-how.
Obviously, the first part of planning is deciding where you would like to put the raised bed and the size you want.
Advertisements
Advertisements
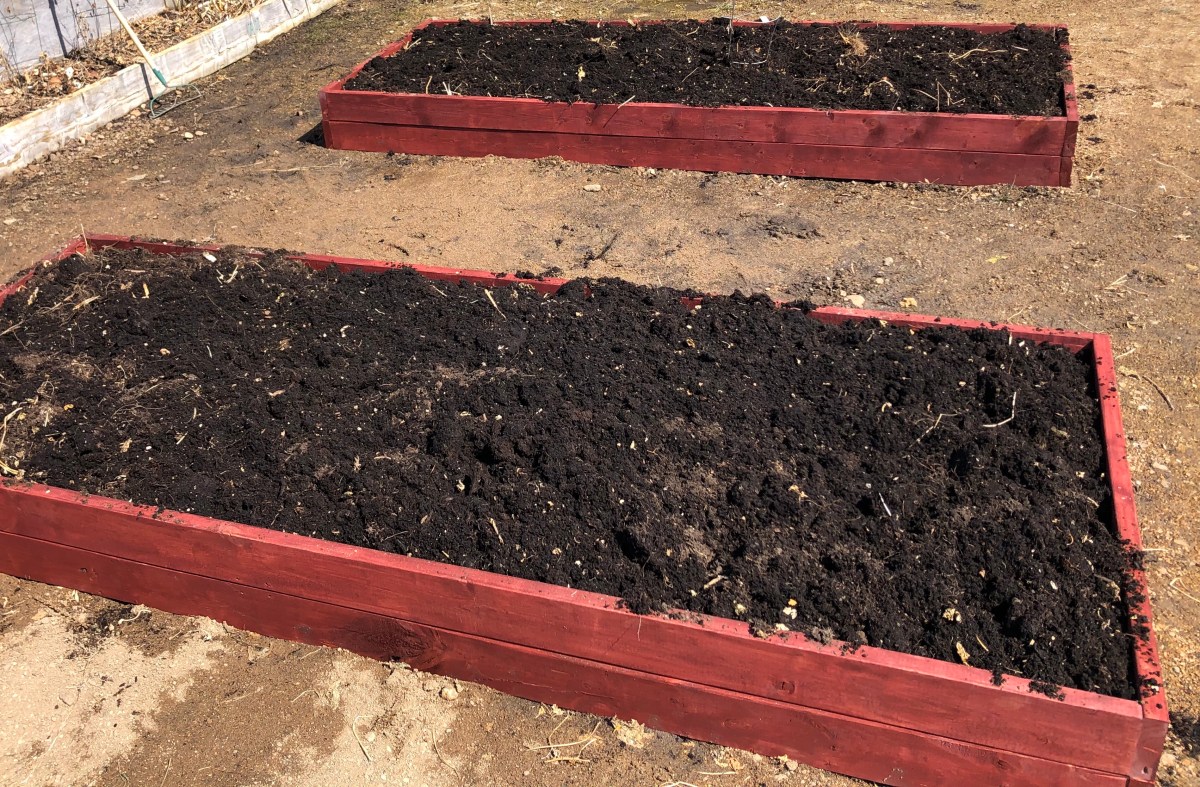
For my most recent raised bed project, I wanted to have 2 identical raised beds that were 4’x10′ so I could add a decorative trellis arched between them for my beans and peas. (CLICK HERE FOR “HOW TO GROW GREEN BEANS!”)
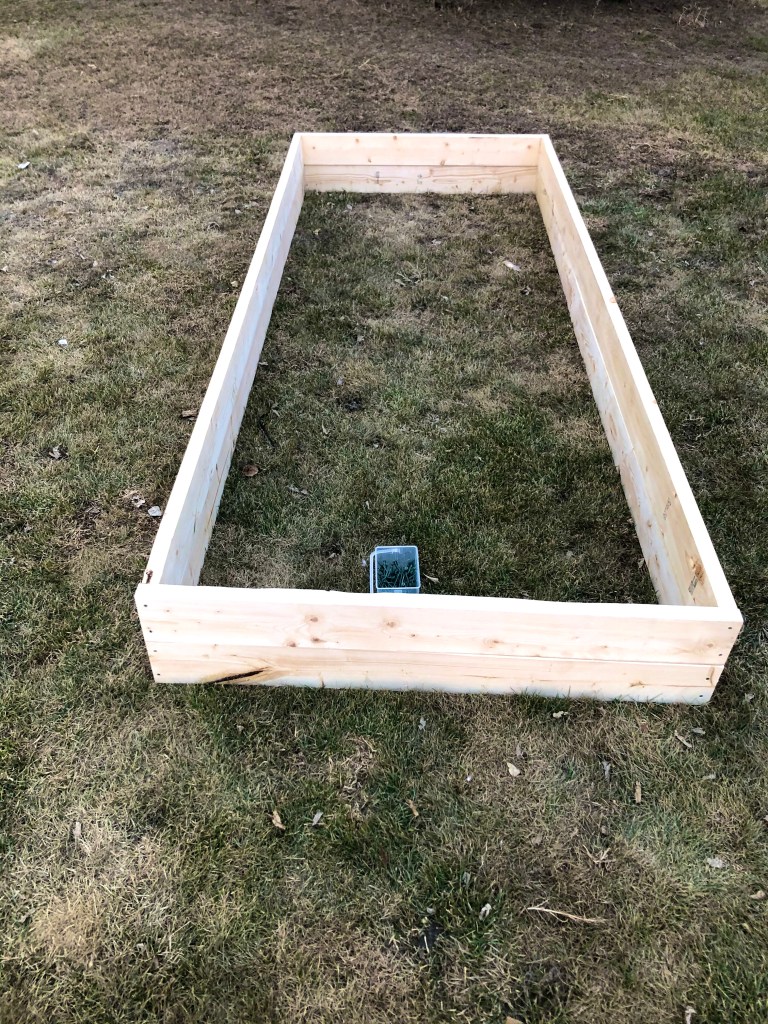
You can make your raised bed whatever depth you would like; I wanted mine 12″ deep for this project.
We used 2×6 boards rather than 2×12 because not only do they tend to warp less, but it was also less costly to do it that way.
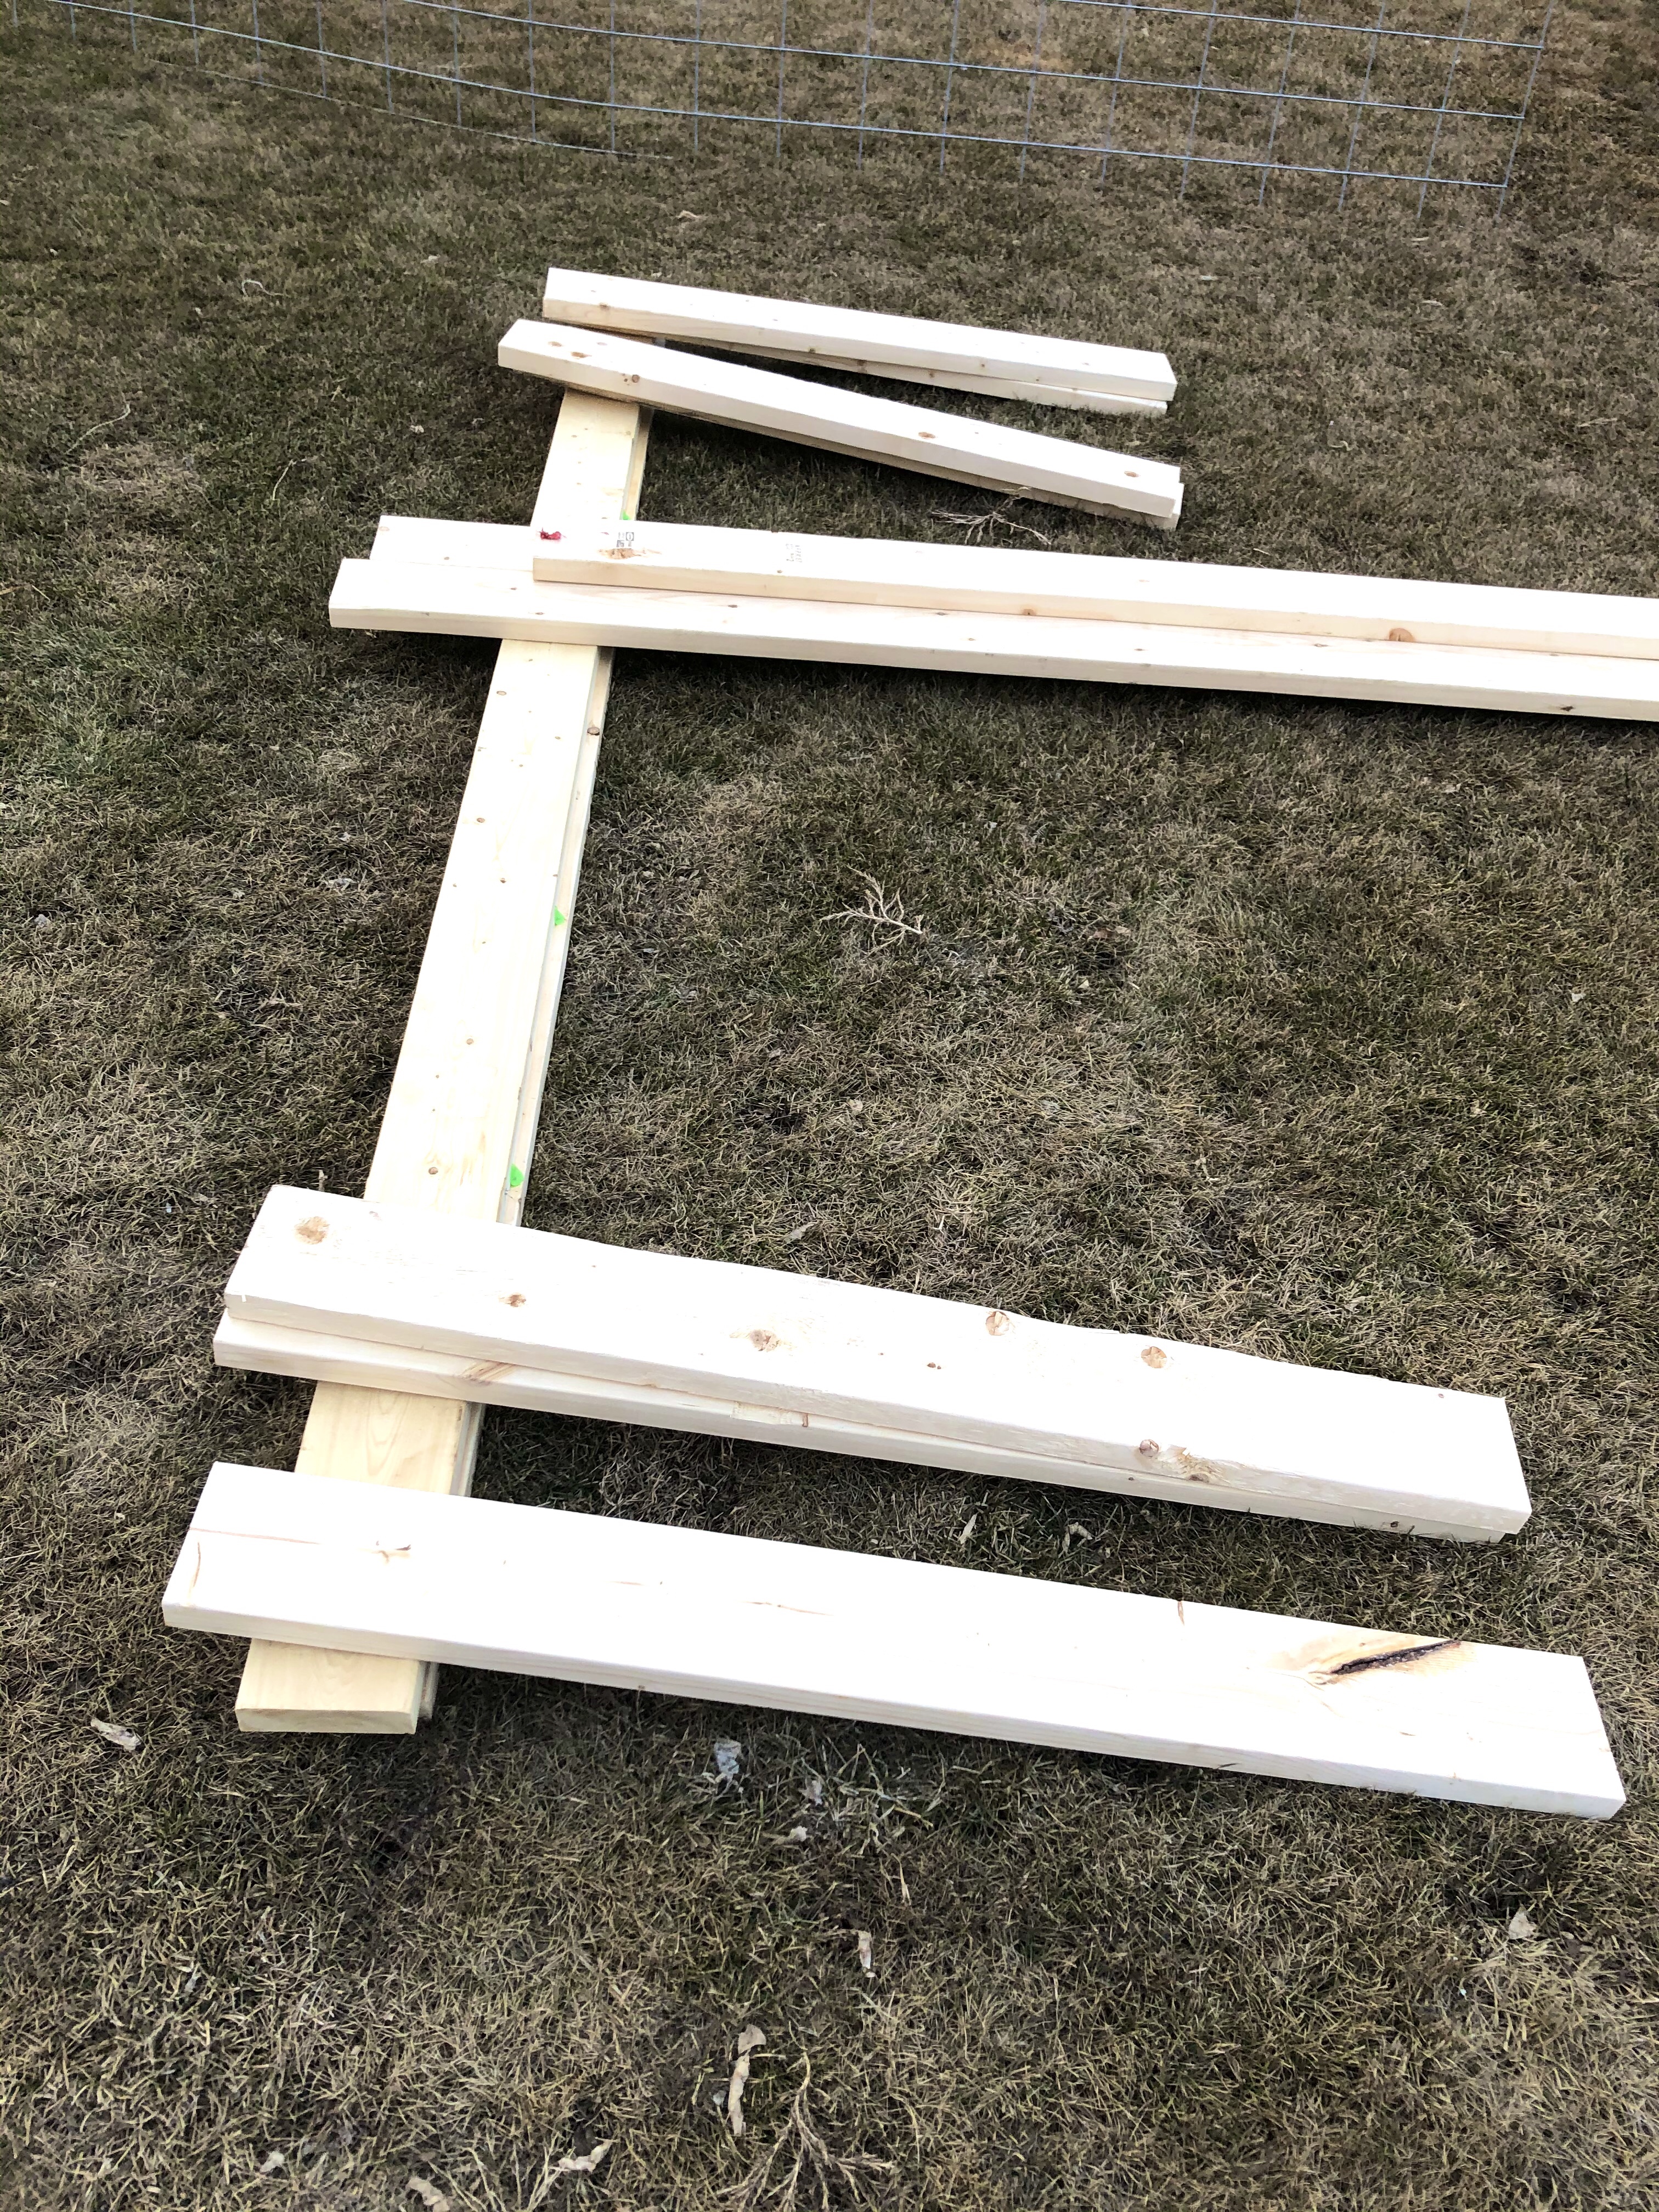
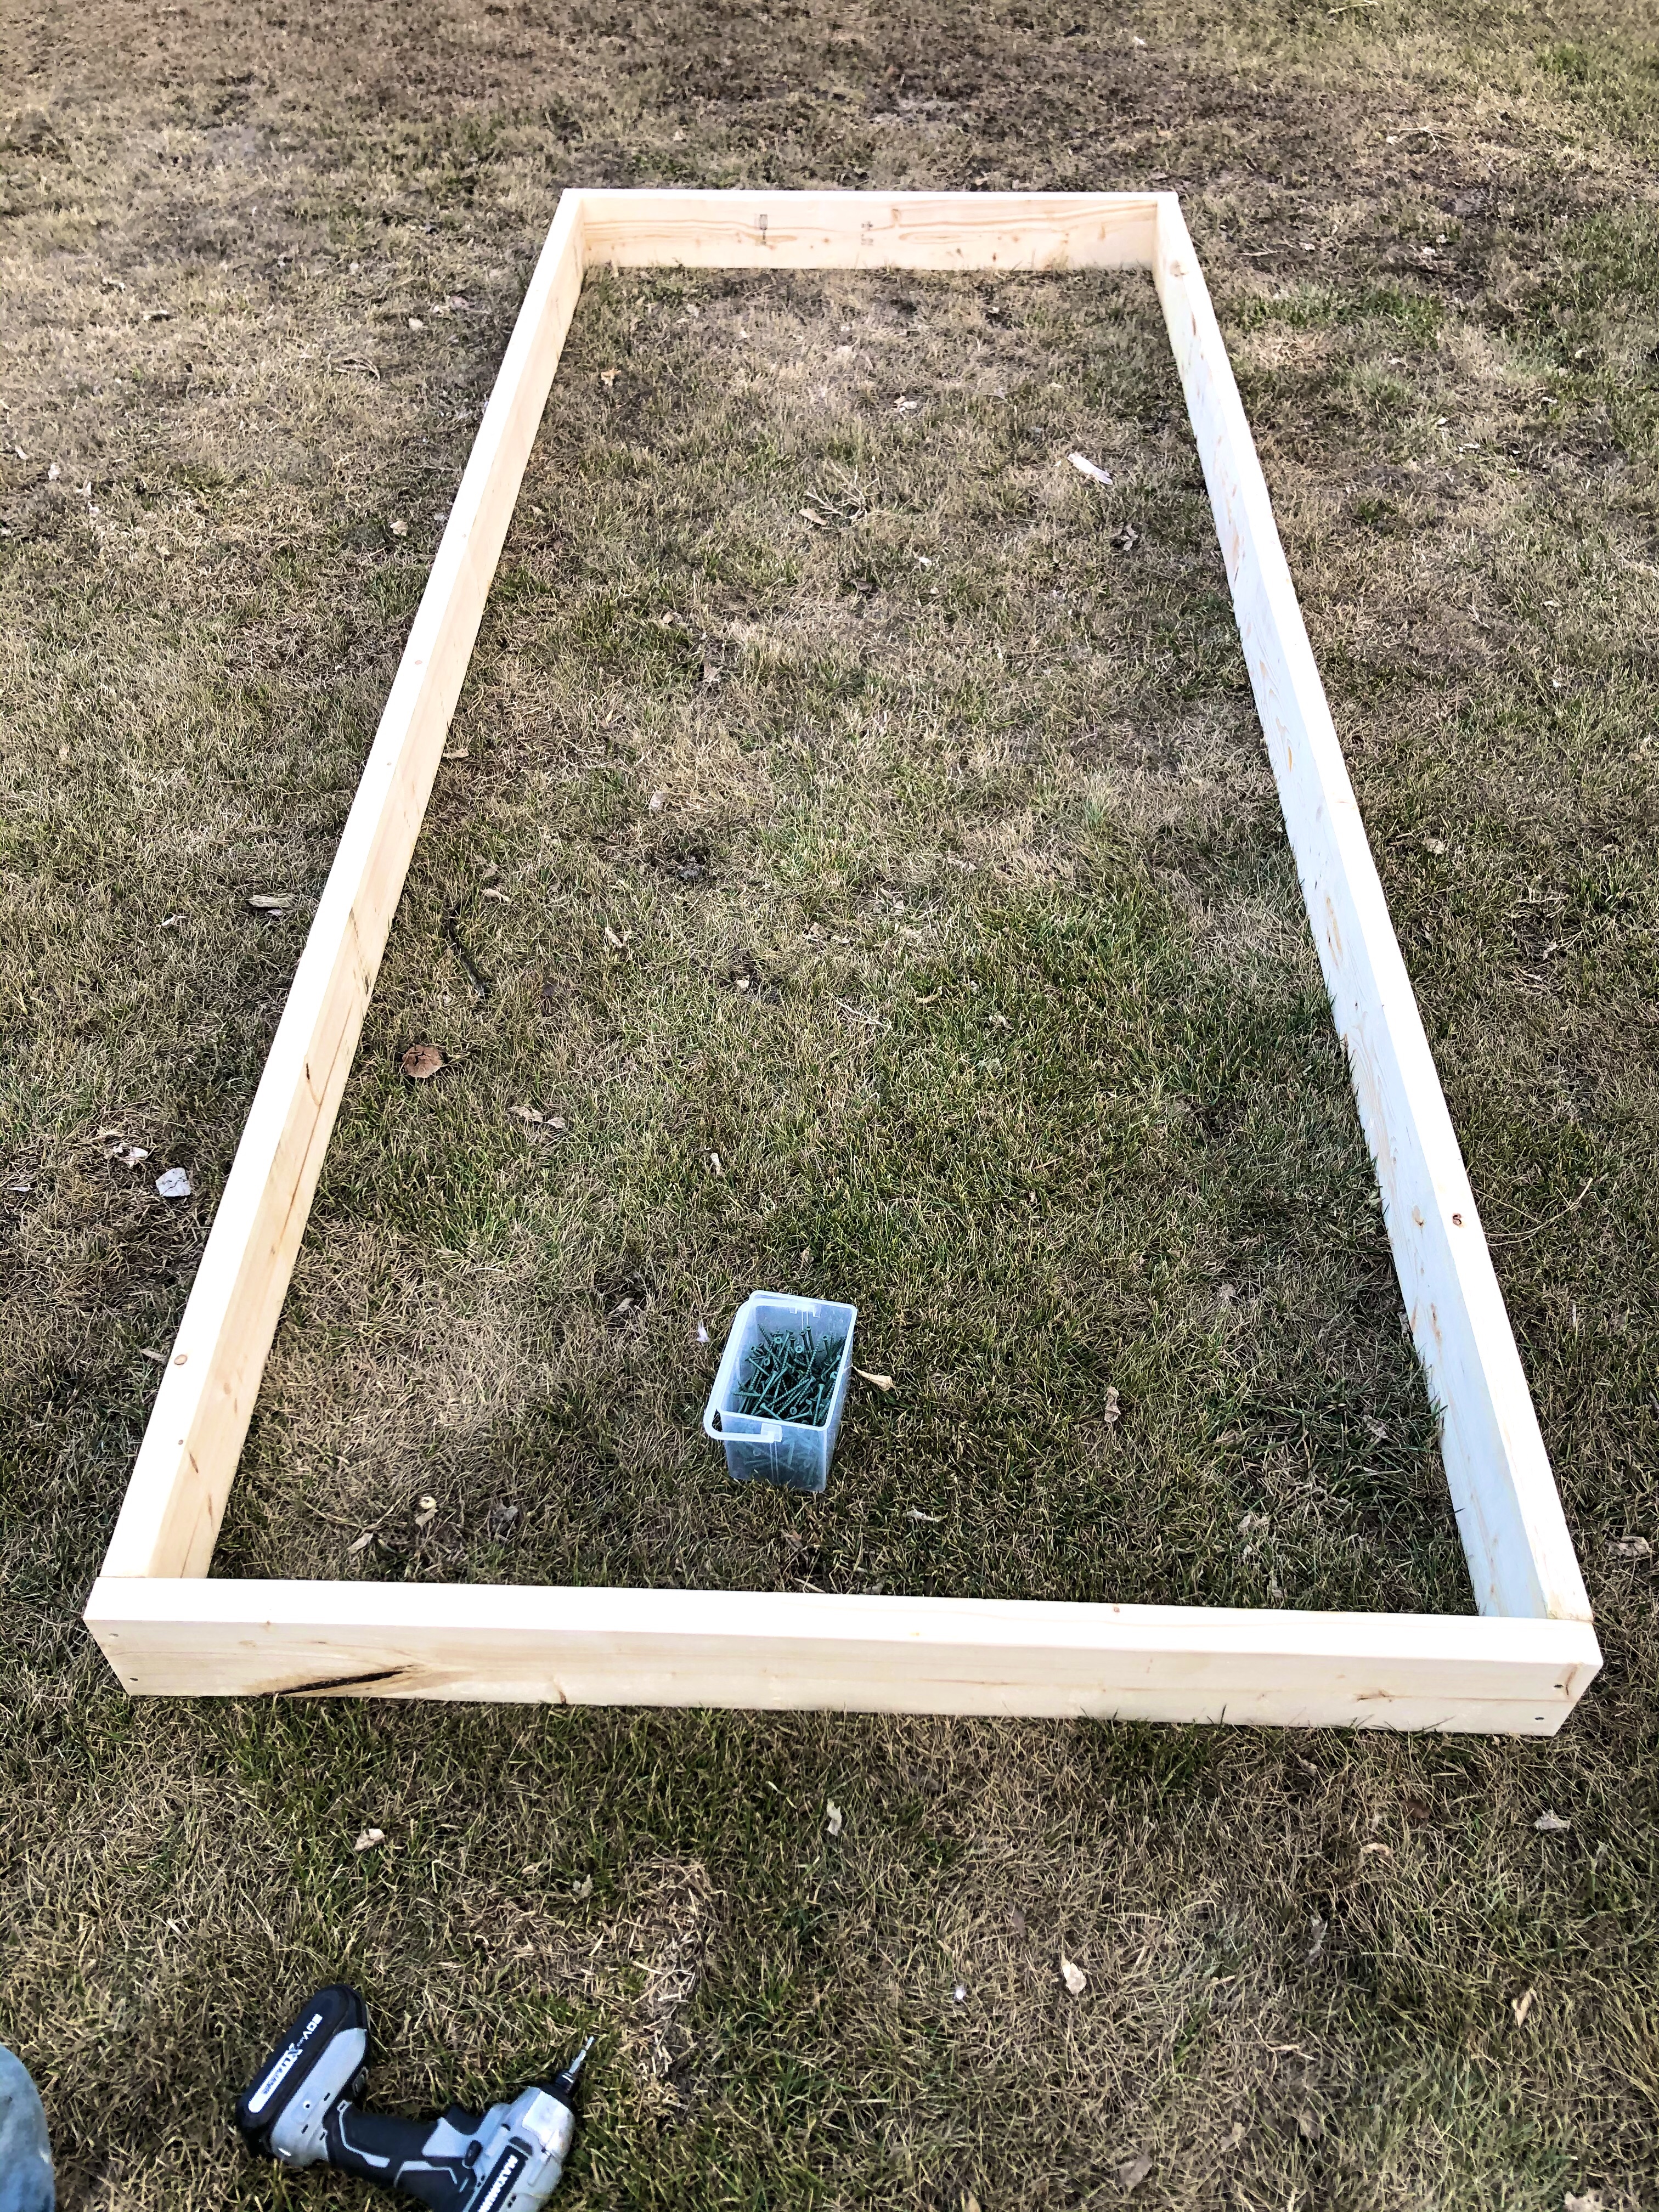
Next, we cut our boards to length – 4 boards 4′ long and 4 boards 10′ long per bed.
Advertisements
Advertisements
Then, we screwed the lower part of the box together and then added the top boards.
We added some supports in the middle and “toenailed” a few screws on an angle to hold the top and bottom sections together.
Advertisements
Advertisements
Staining was next! This was definitely the fun part! I personally love red tones, so we went with a deep red stain.
Advertisements
Advertisements
Not only does stain add to the overall look of the raised beds, but it also helps protect the wood against the sun and rain.
Once the beds were both built, stained, and dried, we moved them into place and squared them off against the greenhouse so the paths would be even and everything in line.
Advertisements
Advertisements
Filling the beds with dried out tomato plants, squash vines, and other plants from the summer before helped add some bulk to the base layer and add organic matter to break down over time.
We also had shavings and wood bark that needed to be cleaned up from around our wood pile, so we threw that in too! (I love the “two birds with one stone” projects like that!)
Finally, we topped it all off with a layer of good garden soil.
The project only took a few hours to finish in total and the updated look for my greenhouse area was well worth every minute of it!
Advertisements
Advertisements
Follow my blog for the trellis project yet to come!
So what do you think? Have I inspired you to give it a try yourself? Drop a comment below!
Advertisements
Processing…
Success! You're on the list.
Whoops! There was an error and we couldn't process your subscription. Please reload the page and try again.
I suppose this Swiss Steak isn’t quite the recipe Grandma used to make… Her style of cooking was “a little bit of this, a little bit of that” and recipes seemed to change slightly from one time she made a dish to the next.
Fundamentally, though, this has all the building blocks of that hearty, aromatic Swiss Steak we all looked forward to.
I have seen recipes that do not have mushrooms and some recipes that use carrots. You do you. This is my favourite combo for this recipe!
Advertisements
Advertisements
One of the beautiful parts of a meal like this is how fast and easy it is to throw together for a crowd!
I will often use crockpots so I can prep our meal in the morning and forget about it until dinner time rolls around and it is time to eat. This is especially nice when you don’t know exactly when dinner time will be, which can happen when we are working on renovation projects or if there are quite a few people to “round up” before eating.
Advertisements
Advertisements
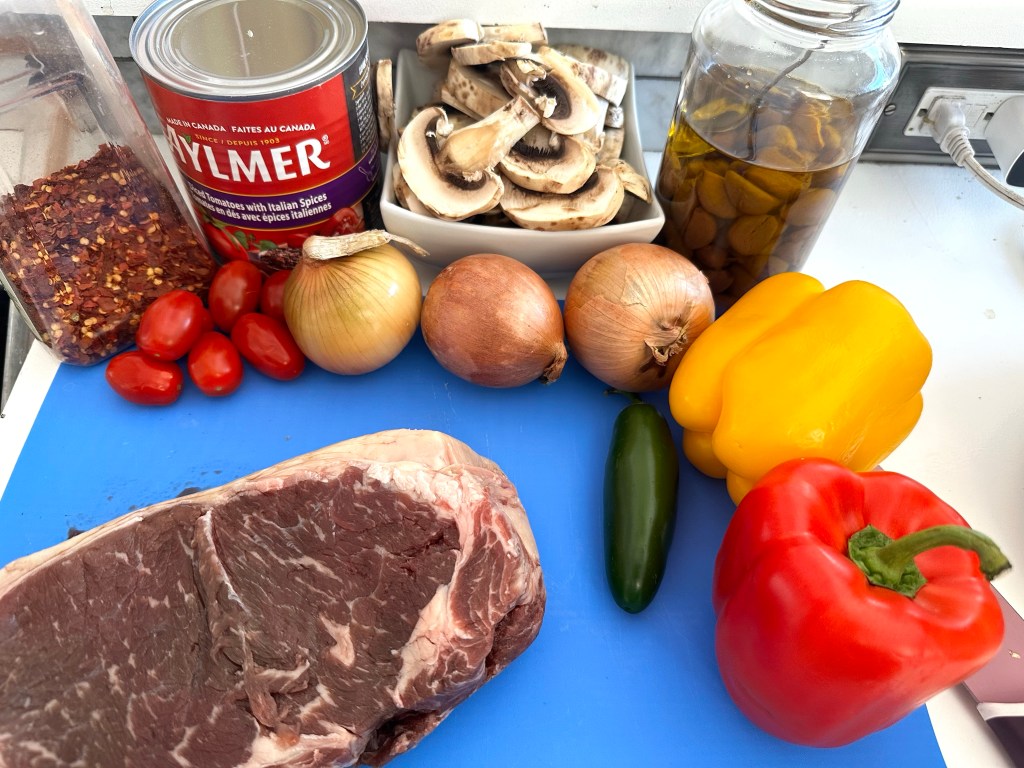
I use an entire roast for this recipe; you can use round steak roast or other, tougher cuts that are cheaper since this will have a long, slow cook time to tenderize everything.
Make sure all the excess fat is trimmed off, then cut the roast into cubes.
Mix flour, salt, and pepper (I like a bit of heat, so I add some cayenne powder as well, but this is optional), then coat your beef cubes in batches.
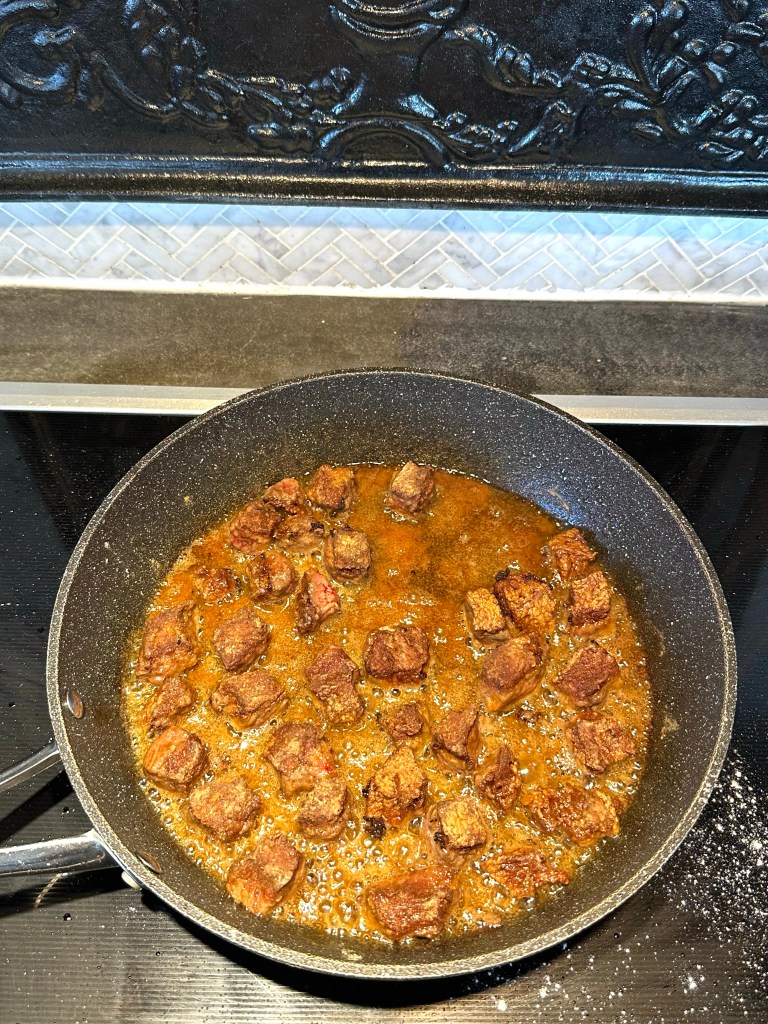
Pre-heat a pan to a medium-high heat with a generous drizzle of canola oil, then place the floured beef cubes in the oil. You want to make sure your cubes are not touching so they brown nicely.
Also, you don’t want to get too much excess flour in the pan when adding your beef cubes.
The goal here is not to fully cook the meat; you just need it to brown nicely on a couple sides to make the flavour pop. The beef will finish cooking in the crockpot.
Advertisements
Advertisements
Depending on the size of your frying pan and how much beef you have to brown, you may have to fry the meat in batches.
Once the meat is nicely browned, go ahead and transfer it into a large crockpot on low heat.
Next, add your sliced onions to the same pan and fry on medium heat until the onion begins to soften. This will enhance the flavour for your Swiss Steak.
Advertisements
Advertisements
Transfer the onions to your crockpot, then add a little more oil (a tablespoon or so should do) and the remainder of the flour mix from coating your beef cubes.
Whisk the flour so it mixes with the oil and allow it to brown a bit before adding about 2 cups of beef broth. Mix again, then add this to the crockpot as well. This will make for a thick, rich gravy consistency for your Swiss Steak.
Next, add stewed tomatoes (or better yet, fresh tomatoes if you have some on hand!), garlic, Worcestershire sauce, balsamic vinegar, cayenne pepper flakes, oregano, basil, lemon juice, and mushrooms to your crockpot.
Advertisements
Advertisements
Note: I prefer oven roasted garlic, so I make large batches in olive oil so I can simply grab cloves of garlic as needed. If you don’t do this, you can use raw, diced garlic.
If you don’t like spicy food or have family members that can’t handle the heat, go ahead and skip the cayenne peppers. The amount I use is enough for a bit of heat, but is not overpowering.
I should also mention that if you do not have Worcestershire sauce or balsamic vinegar on hand, you can still make this recipe! These ingredients make the flavours pop, but aren’t a deal-breaker if you just don’t have them.
One last note! If you have fresh basil and oregano, you will need to add about double the amount I list in the recipe to get the same effect. I should also note that these herbs tend to get bitter when cooked too long, so you may want to add them closer to when you plan to serve the Swiss Steak.
Advertisements
Advertisements
Mix well and allow it to slow-cook on low heat for a few hours. If you have all day, that’s great! The flavours will really develop the longer this cooks. If you only have a couple hours, that works too.
Oh! I almost forgot!
You can also make this a budget-friendly meal that is high in protein by adding dried lentils at this point… You can use less meat to save the pocket book, yet make this just as filling. The lentils will also help make the gravy thicker, which I prefer.
When you are about an hour or so before dinner time, add the sliced peppers. I like adding them toward the end so they still have a little crunch to them.
Advertisements
Advertisements
Serve over mashed potatoes and enjoy!
If you end up with leftovers, you can change things up the next day by turning this into stew by adding cubed potatoes, sliced carrots, and corn and serve with fresh no-knead bread.
Advertisements
Advertisements
Advertisements
Advertisements
Recipe
1 large roast, cubed
1/2 cup flour
Salt & Pepper
1 t cayenne powder (optional)
3 medium onions, sliced
3 cups mushrooms, sliced
5-6 cloves oven roasted garlic (or raw, diced)
1 large can Italian stewed tomatoes (or 2 cups fresh tomatoes, diced)
2 T balsamic vinegar
1 T Worcestershire sauce
1 T lemon juice
1 T dried basil
1 T dried oregano
1 T cayenne pepper flakes (optional)
2 cups beef broth
1 cup dried lentils (optional)
2 bell peppers, sliced
Advertisements
Advertisements
Directions
Trim excess fat from roast and cube meat.
Mix flour, salt, pepper, and cayenne powder, then coat beef cubes.
Fry beef cubes in canola oil over medium-high heat until browned. Remove from pan and place beef in crockpot.
In the same pan, fry onion slices on medium heat until soft, then add to crockpot.
Add another tablespoon or two of oil to the pan, then brown remaining flour left from coating the beef cubes.
Add 2 cups beef broth and mix well, then add to the crock pot.
Add all remaining ingredients to the crock pot except peppers. Slow cook on low heat for at least 2-3 hours for best flavour.