You can never go wrong with tacos! I mean, we even have a day of the week dedicated to their deliciousness!
My family’s taco recipe is a little different than what you traditionally think of when you are planning Taco Tuesday (or TacoS Tuesday, as my niece calls it).
Advertisements
Advertisements
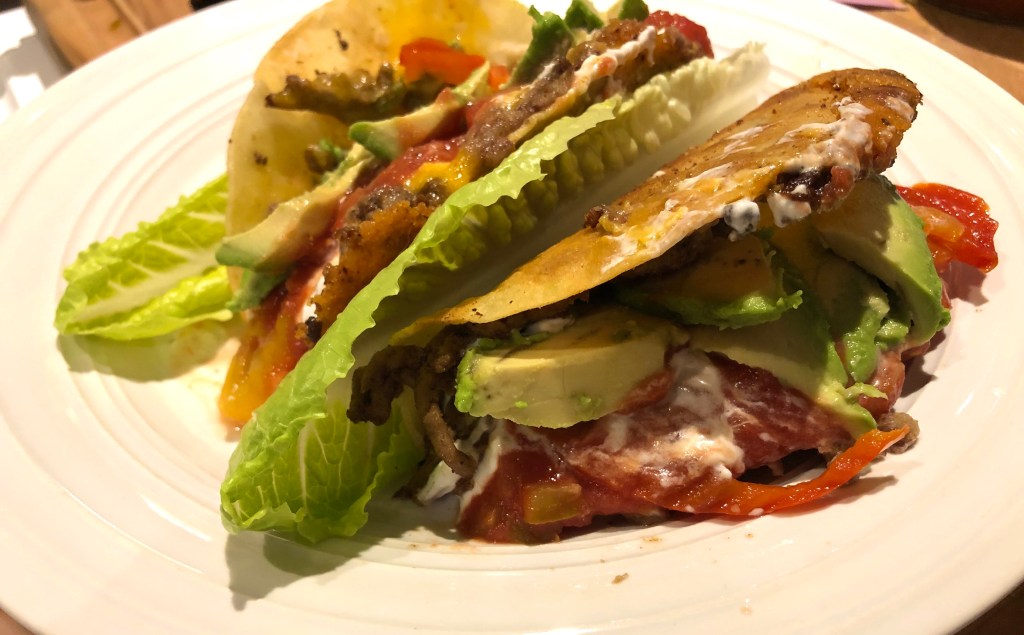
We actually fry our tacos, which makes the cheese super gooey and extra delicious!
First, you’ll need to fry the raw ground beef. I often will fry a large package of the ground beef all at once so I have extra meat to freeze for next time I am making tacos.
(I haven’t tried using ground turkey or pork, but I imagine those meats would work quite well, too!)
As you cook the meat, add salt & pepper to taste as well as cumin, paprika, cayenne pepper, and a splash of lemon juice. If you have taco seasoning, you can use that instead; I just keep all the individual spices on hand and tend to make the spice mix myself.
Make sure to break the ground meat into small chunks as it cooks.
Once it is fully cooked so there is no more pink showing, drain any excess fat off. I like to place the pan back on the heat again and fry the meat until it is slightly crispy, but that’s up to you.
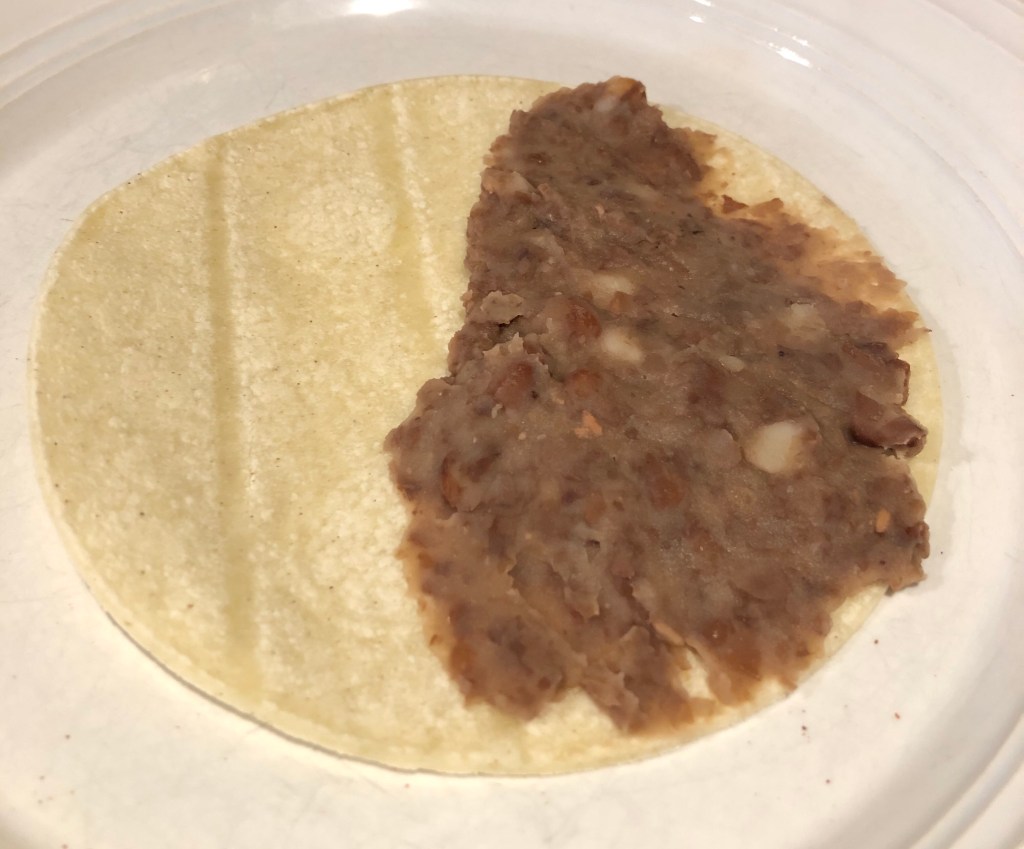
Next, spread refried beans on half the corn tortilla. CLICK HERE for the refried beans recipe.(I find making refried beans from scratch is WAY more cost effective than buying the canned version. And it really doesn’t take a ton of time as long as you plan ahead)
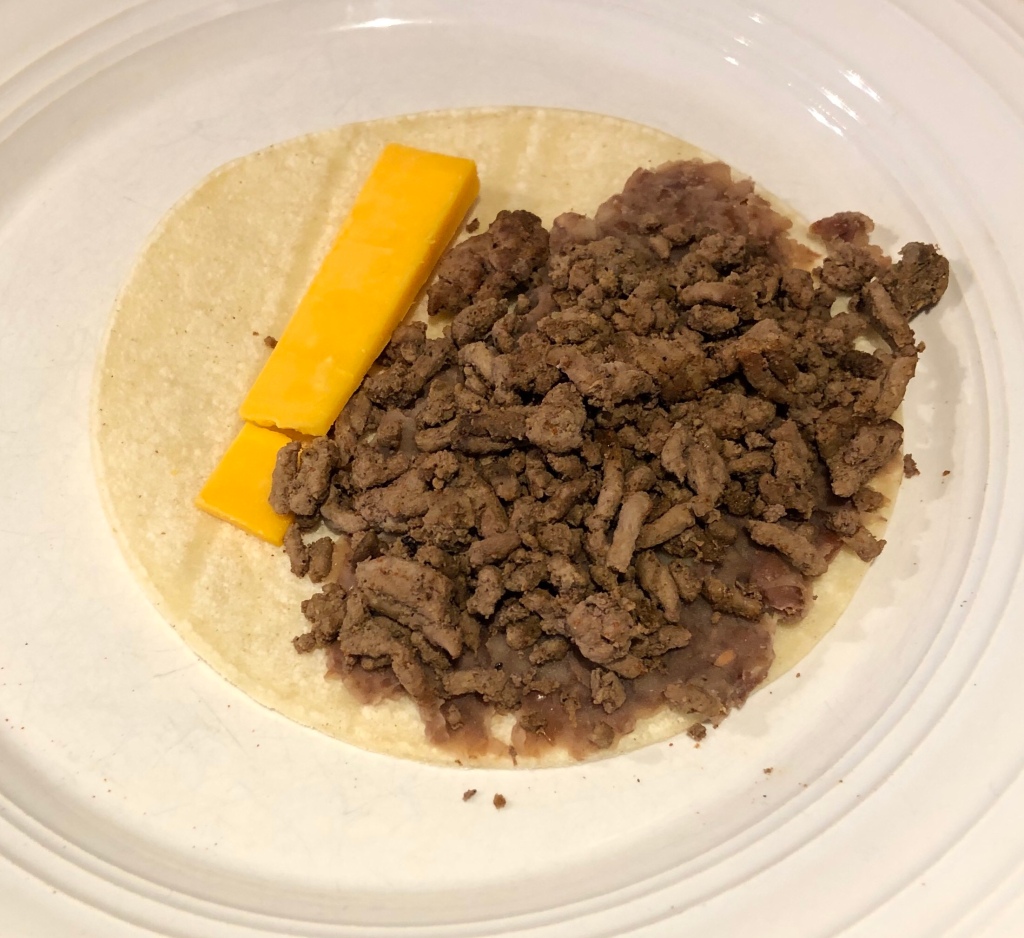
Then add your ground beef on top of the beans and then a slice of cheese.
The amount of meat you add is totally up to you! If you have carnivores in your house, you may want to add as much meat as you think will stay on the taco.
If you are on a tight budget, trying to make ends meet, you can keep this meal filling without breaking the bank by adding more beans and less of the meat.
Advertisements
Advertisements
Fry the taco, folded over, in a pre-heated pan with oil. Don’t add too much oil; you just want enough to give the tortilla a nice golden finish.
If you end up with a lot of splattering, it means you added too much oil.
At one time during our kitchen renovations, I had to make a “temporary kitchen” work without a stove… and I actually just brushed oil on a griddle to make these tacos. It worked great! The point is, that’s how little oil you really need for this recipe.
To that point, I bet you could even make these tacos on the BBQ if you had a griddle accessory. Summer is so short where we live that I love using the grill as much as possible when the weather is nice!
Advertisements
Advertisements
Once the first side of the taco is golden-brown, flip it to the other side and fry it to the same crunchy perfection.
Advertisements
Advertisements
Once both sides have been fried, you add your toppings and enjoy!
I personally love sour cream, chunky salsa, jalapeños, cilantro, avocado, green onions, and lettuce on my tacos. You can also add Frank’s Red Hot Sauce, tomatoes or cucumbers. If you like spicy food, you could even try my Fire Roasted Salsa to turn up the heat.
They also freeze really well, so I will often make a large batch and freeze the leftover tacos (it seems impossible to have leftover tacos, right?!) to have as a quick, yummy lunch later on.
Advertisements
Advertisements
Just microwave for 2 minutes from frozen and – viola! Tacos!
Or toss them in the oven at 350º until they are hot and crispy.
Either way, they are the first on my “freezer meal prep” list for when baby arrives!
Fried zucchini steaks are quick and easy to make – and my husband thinks it smells like KFC! lol (I assume because I use canola oil to fry the zucchini steaks)
So let’s get started on this recipe!
Advertisements
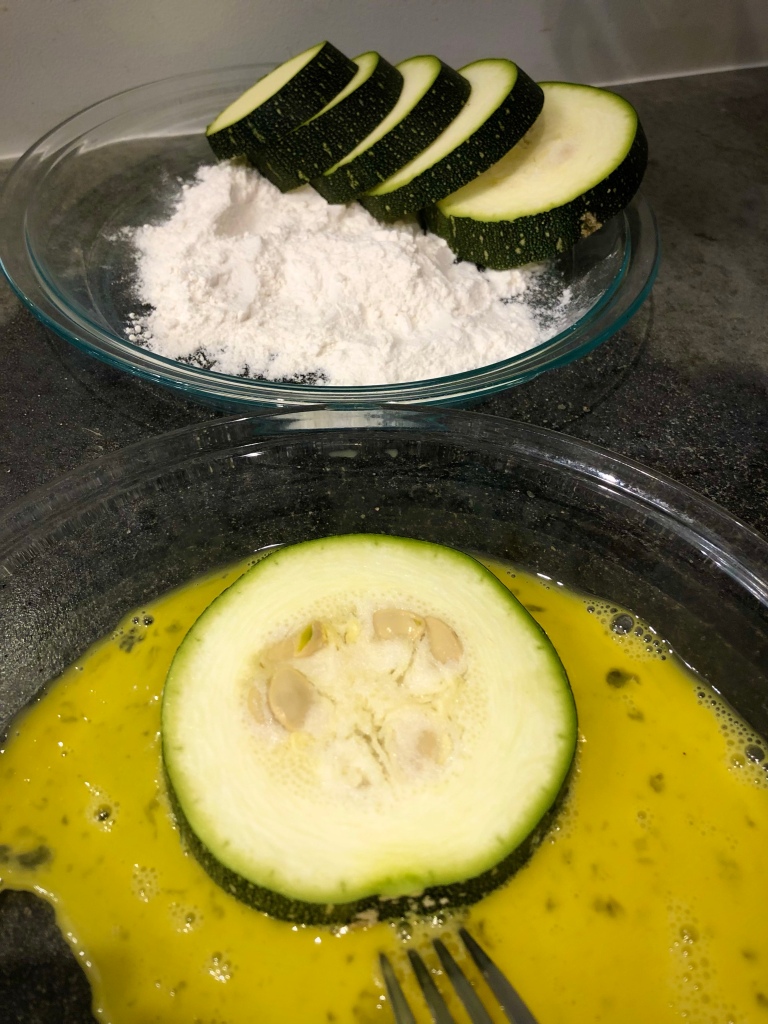
I begin by slicing the zucchini into thick rounds. This recipe works best with an oversized zucchini.
Next, I beat an egg in a pie pan and coat one zucchini round at a time in the egg.
Then, I coat the zucchini round in flour.
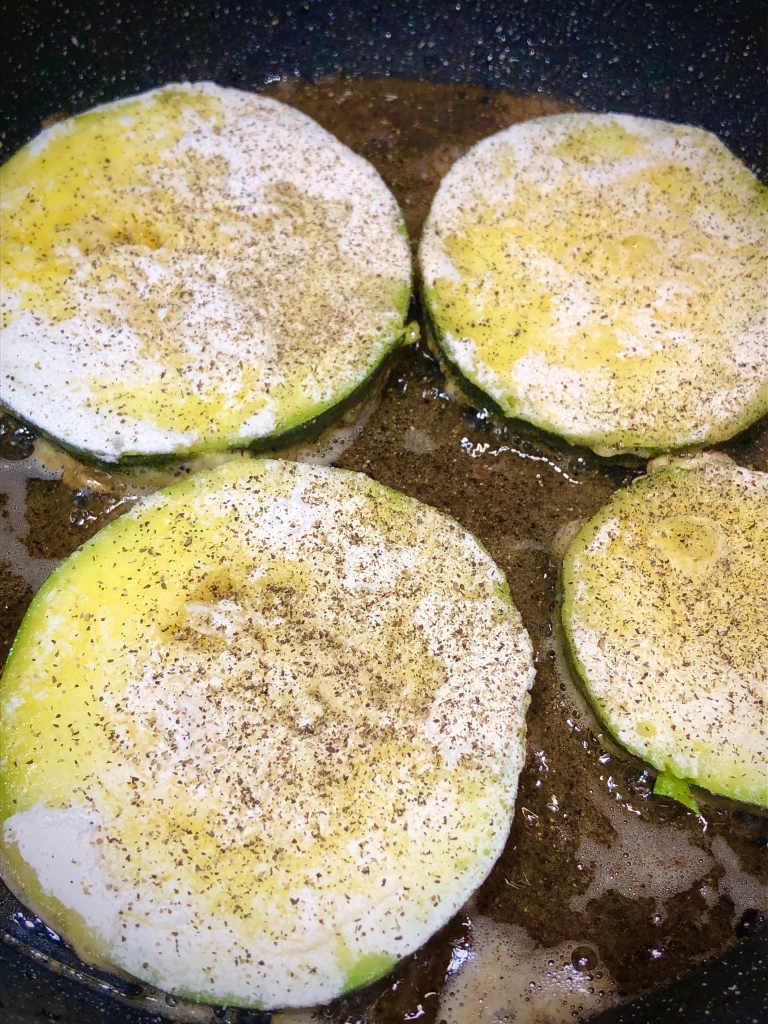
Once I have about 4-5 zucchini steaks coated, I add them to a pre-heated pan with canola oil.
Advertisements
It should only be enough oil to cover the bottom of the pan; if you use too much, it will splatter and make a mess.
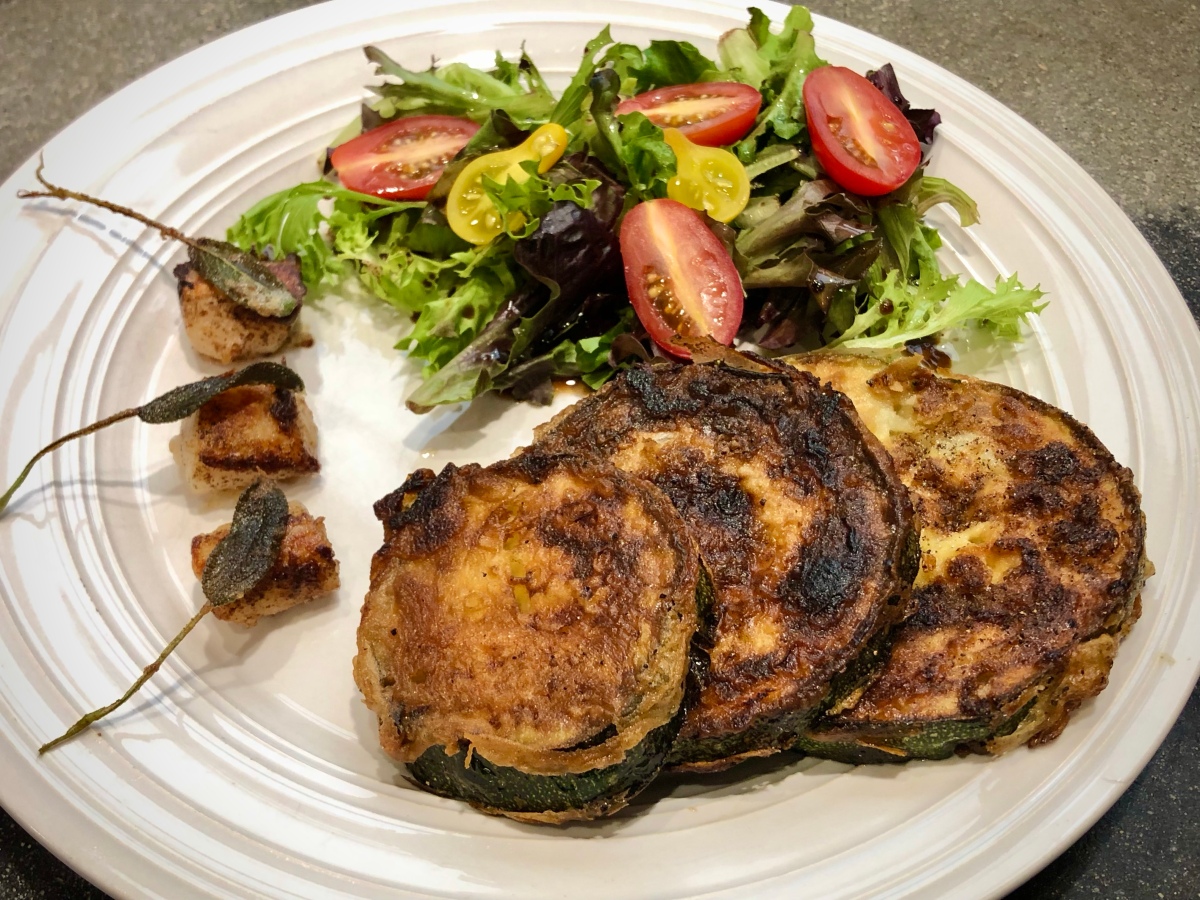
I salt and pepper the zucchini steaks as they fry and then flip them when they are golden-brown on the first side.
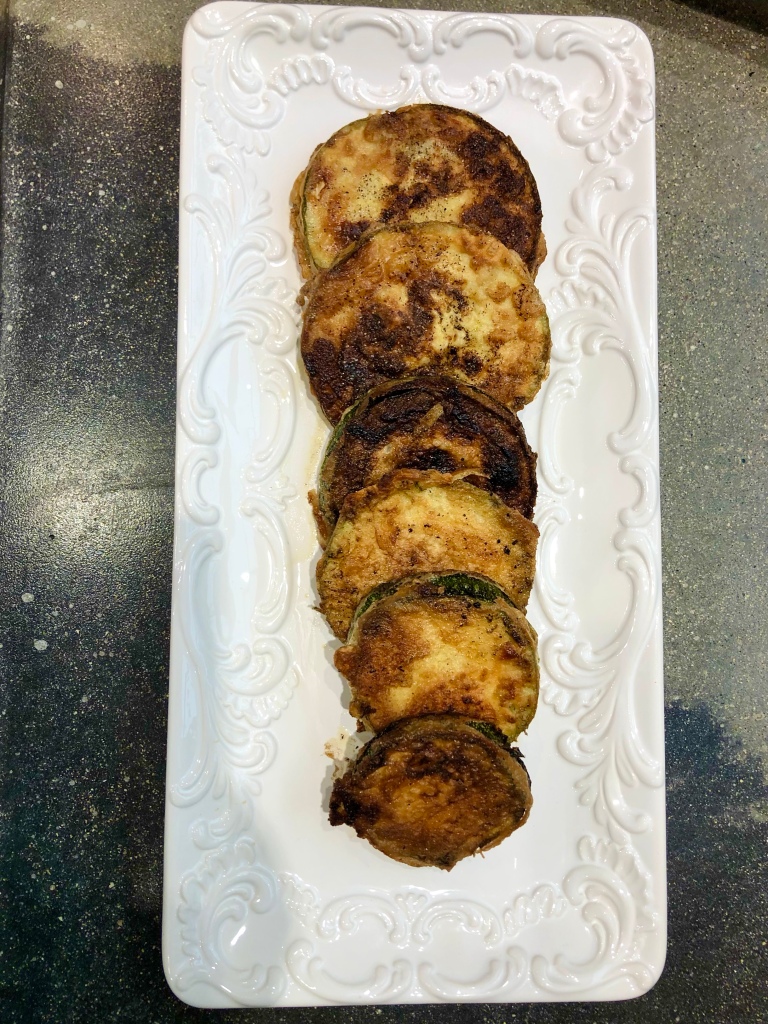
How long they should be cooked will depend on you; some people prefer them to be fairly crunchy, whereas other people like their zucchini steaks cooked until they are soft all the way through.
If you would like crunchy zucchini steaks, I recommend cooking them on higher heat so you still have a nice, golden crust on them – but with a shorter cook time.
Advertisements
If you would like them to be soft all the way through, you’ll likely want to cook them on a medium heat so you don’t burn the outsides while trying to get the insides nice and soft.
Advertisements
You can serve these zucchini steaks as a main course or as a side veggie.
Make sure to prepare lots if your family loves this dish as much as mine does! We rarely end up with leftovers!
Fried zucchini steaks go well with scalloped potatoes and dilly green beans for a garden fresh meal – or you can throw some actual steak into the mix!
Advertisements
Recipe
1 large zucchini
1 egg, beaten
1/2 cup of flour
Salt & pepper to taste
Canola oil, as needed
Advertisements
Directions
Slice zucchini into thick rounds.
Coat zucchini in egg, then in flour.
Place in a pre-heated pan with canola oil over medium-to-high heat (depending on “doneness” desired).
Fry until golden-brown on both sides.
Add salt & pepper to taste.
Enjoy!
Prep time: 5 minutes
Cook time: 10 minutes
Advertisements
Advertisements
What do you think?
Will you give this quick, easy – and yummy – recipe a try?
Summer is the time for lazy days at the lake, yard work – or harvesting tons of fresh veggies from the garden!
Here in Saskatchewan, this is the time of year that the zucchini go crazy.
Gardeners use every possible recipe to use up their excess and then start giving zucchini to their friends, family, neighbours, and maybe even complete strangers!
We all want to make sure the produce we have worked so hard to grow doesn’t go to waste.
Advertisements
Advertisements
So I’m here today to give you inspiration for one more yummy way you can use your zucchini – Zucchini Pizza Boats!
The great part about this recipe is that it is low carb, does great on the grill, and you can use other garden fresh veggies.
Just like with pizza, it is a flexible recipe that you can pick and choose which toppings you would like to use.
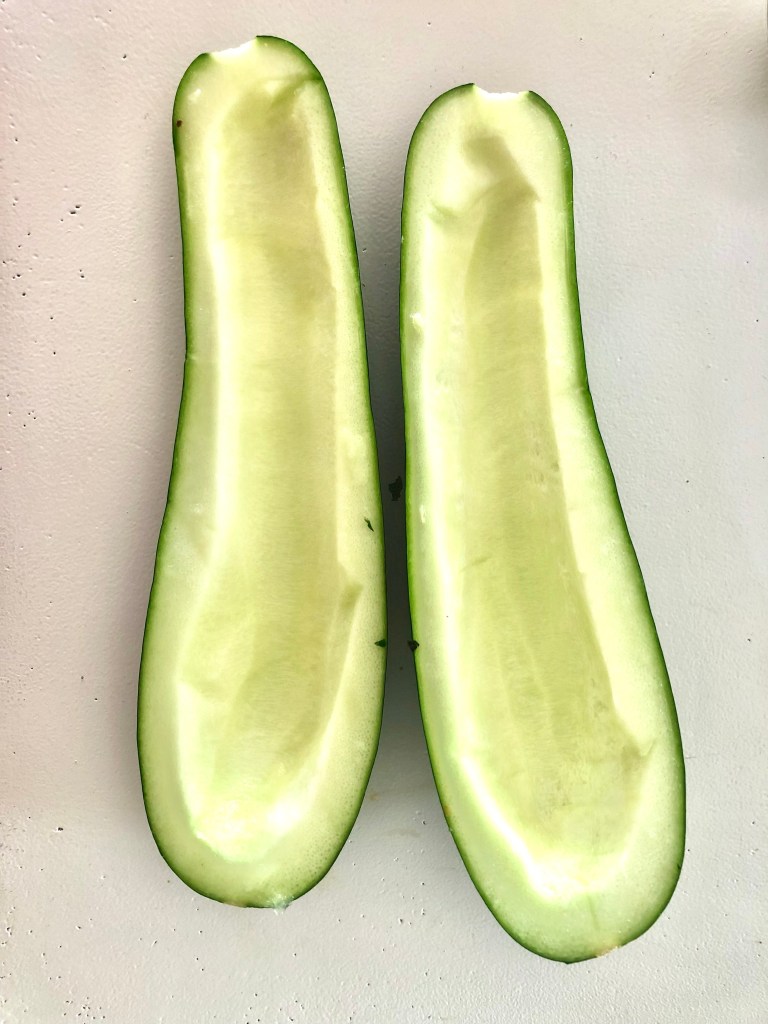
I like to start with a zucchini that is borderline too large because the skin will be a little tough, which makes the “boat” hold its shape on the grill better. Plus this gives you a larger hollow to add your sauce and toppings to!
Advertisements
Advertisements
Cut the zucchini in half long-wise and scoop out the soft, seedy part.
Don’t throw it out, though! We will use the insides in the sauce in a minute.
Next, heat a pan on medium heat and add some butter, a few cloves of garlic, and diced onion.
I personally like to add whole cloves of garlic; once they are nice and soft, I just smash them with my knife on the cutting board and give them a quick chop.
I find that method a lot quicker than mincing or grating the garlic raw.
Advertisements
Advertisements
Oh! And this is where the zucchini insides get added; toss it into your sauce, seeds and all.
Next, add diced tomato and some chopped oregano & basil.
I like a bit of heat to my food, so I add an entire cayenne pepper (either a fresh, chopped pepper or a crumbled, dehydrated pepper).
Then, add a splash of balsamic vinegar and a splash of Worcestershire sauce. This really makes the flavour pop!
Advertisements
Advertisements
And as expected, give the sauce a nice seasoning of salt & pepper.
Allow it to come to a simmer and cook the sauce down until it is no longer watery.
The more tomato you add, the more like a pizza sauce it will be.
Adding the zucchini insides, however, makes the sauce a bit different texture than normal pizza sauce, but hey – waste not, want not!
Advertisements
Advertisements
Once your sauce has cooked down to the desired consistency, scoop it into your zucchini boats.
Then you get to add your toppings!
I find that the toppings work best when they are added first and then the cheese added on top; when the cheese gets gooey, anything on top tends to try to slide off if the zucchini boat isn’t quite flat.
Advertisements
Advertisements
You can bake the zucchini boats at 350º for about 40 minutes (depending on their size, time will vary).
My favorite, however, is throwing them on the grill with a bit of smoke!
The flavour is amazing that way, plus if it is a hot day you aren’t heating up your house.
Advertisements
Advertisements
On a pre-heated grill, it typically takes about 40 minutes on low-to-medium heat to cook the zucchini boats.
NOTE: Be careful how high your flame is; you do not want to char the skin!
You can also use a pre-soaked wood plank to add flavour (and catch any gooey cheese that tries to drip off).
I like my Maple Grilling Plank better for this recipe than my Cedar Grilling Planks because it has a lighter flavour.
I like the zucchini to be soft enough to easily pierce with a fork, but not so soft that it is falling apart.
Some people may prefer their zucchini to be firmer so they are almost crunchy still.
That is completely up to you!
Once you remove the zucchini boat from the heat, allow it to cool for a couple minutes.
Enjoy!
I promise this will become a fast favourite!
Advertisements
Advertisements
While zucchini is usually served as a side veggie, I like serving this dish as a main course – or even the entire meal because it is so filling!
Recipe
1 large zucchini
1 large tomato
1/2 large onion
2 cloves garlic
2 tablespoons butter
1 cayenne pepper (optional)
1 tablespoon balsamic vinegar
1 teaspoon Worcestershire sauce
Basil & oregano, to taste
Salt & pepper, to taste
Advertisements
Advertisements
Directions
Cut the zucchini in half long-wise and scoop out the soft, seedy centre (reserve for later).
In a pan on medium heat, sauté garlic, diced onion, and diced tomato in butter.
Add zucchini insides along with balsamic vinegar, Worcestershire sauce, basil, and oregano.
If you want some heat, add cayenne pepper as well.
Salt & pepper to taste.
Simmer until the sauce has reduced to desired consistency.
Scoop sauce into zucchini boats, then add toppings and cheese.
Bake at 350º for about 40 minutes or grill on low-to-medium heat for about 40 minutes.
Cook time will vary depending on the size of zucchini and desired softness.
Remove from heat and allow to cool for a few minutes.
Enjoy!
Advertisements
Advertisements
Advertisements
What is your favourite zucchini recipe? Drop a comment below!
I almost always make eggs of some kind for breakfast; fried, scrambled, poached… you name it, I’ve probably made it!
But, from time to time, it is nice to change things up with something different.
For me, biscuits and gravy are a treat because I don’t make it often.
Don’t ask me why!
Maybe I just get into a rut of making the same things over and over again…
Or maybe I make eggs so much because our chickens have been such prolific producers!
Either way, this biscuits & gravy recipe is always a hit.
Advertisements
Advertisements
The Biscuits
Start by mixing the flour, baking powder, and salt in a large mixing bowl.
Then cut in cold butter using a pastry blender.
Depending on how flakey you would like your biscuits, you can add anywhere from 1 – 3 tablespoons of butter. The more butter, the flakier the biscuits.
Pro Tip: Using cold butter helps make the biscuits fluffier and flakier.
Next, add the milk and gently mix until the flour is fully incorporated.
Make sure not to overwork the dough.
Then roll the dough out on a floured surface and cut into biscuits.
This recipe makes 6 – 2 1/2 inch biscuits, which I find is a perfect serving size.
I use my biscuit cutters from Amazon to get perfectly shaped biscuits with pretty scalloped edges.
Advertisements
Advertisements
Pre-heat your oven to 400º and bake your biscuits on a baking sheet for 20 minutes or until golden brown.
I personally like to line my baking sheet with parchment paper so I have as little clean-up as possible.
You can cover the biscuits and allow them to cool or serve them hot!
The Gravy
Mom always used Jimmy Dean Italian sausage, however I recently discovered that a local business carries Mild Italian beef sausage – AND delivers to our acreage!
For those of you who have never lived in a rural location, you likely don’t understand the excitement of actually being able to get delivery…
Where we live, we can’t even get the mail delivered to our house – so this is a big deal.
Oh! And the beef is also high quality and ethically raised.
Advertisements
Advertisements
While the biscuits bake, start the gravy by frying the sausage until fully cooked, breaking it into small chucks as it cooks.
Salt & pepper to taste (I like to season my meat now and then add more to the gravy later; this gives the meat great taste without the gravy getting too salty).
If you are using pork sausage, you will have plenty of drippings to mix the flour into, however if you are using a lean meat, you may need to add 1 tablespoon of butter.
Once the meat is fully cooked, sprinkle the flour on top of the meat and mix it in.
Allow it to brown slightly, string occasionally on medium heat (this step is the key to good gravy; browning the flour before adding the milk gives it a rich flavour).
Advertisements
Advertisements
Add 1/3 cup of milk and stir until the mixture has thickened.
Add the remaining cup of milk and 1 teaspoon of beef stock; stir until it is combined and starts to simmer.
Salt & pepper to taste.
Remove from heat once it has reached the desired thickness.
Cut your fresh biscuits in half and scoop the gravy over both halves.
Enjoy!
Advertisements
Advertisements
Biscuit Recipe
1 cup flour
1 teaspoon baking powder
1 tablespoon cold butter (up to 3 tablespoons)
1/4 teaspoon salt
1/3 cup milk
Directions
Mix dry ingredients, then cut in cold butter.
Stir in milk and incorporate ingredients (do not overwork dough).
Roll out dough on floured surface.
Cut & bake at 400º for 20 minutes or until golden brown.
Enjoy!
Makes 6 – 2 1/2 inch biscuits
Advertisements
Advertisements
Gravy Recipe
1 pound mild Italian sausage
1 teaspoon butter (optional)
2 tablespoons flour
1 1/3 cup whole milk
Salt & pepper to taste
Directions
Fry the sausage in a large pan, breaking it into chunks as you stir.
Salt & pepper to taste.
Stir in flour and allow to brown slightly (add melted butter if you are using a lean meat that does not have drippings).
Add 1/3 cup milk and stir until thickened.
Add remaining cup of milk and the beef stock.
Stir until thickened to desired consistency.
Salt & pepper to taste.
Scoop onto biscuits & enjoy!
Advertisements
Be sure to join my mailing list to get new recipes as I publish them!
Processing…
Success! You're on the list.
Whoops! There was an error and we couldn't process your subscription. Please reload the page and try again.
What is your favourite breakfast food? Drop a comment below!
This is a recipe I grew up on and still love making to this day!
These tasty biscuits are great with butter, hot out of the oven.
Or you can add fresh, homemade jam…
… or you can make biscuits and gravy…
… ooor, you can use the dough to make Pigs in a Blanket!
This recipe is the foundation for so many yummy options.
Advertisements
Advertisements
Start by mixing the flour, baking powder, and salt in a large mixing bowl.
Then cut in cold butter using a pastry blender.
Depending on how flakey you would like your biscuits, you can add anywhere from 1 – 3 tablespoons of butter. The more butter, the flakier the biscuits.
Pro Tip: Using cold butter helps make the biscuits fluffier and flakier.
Next, add the milk and gently mix until the flour is fully incorporated.
Make sure not to overwork the dough.
Then roll the dough out on a floured surface and cut into biscuits.
This recipe makes 6 – 2 1/2 inch biscuits, which I find is a perfect serving size.
I use my biscuit cutters to get perfectly shaped biscuits with pretty scalloped edges.
Advertisements
Advertisements
Pre-heat your oven to 400º and bake your biscuits on a baking sheet for 20 minutes or until golden brown.
I personally like to line my baking sheet with parchment paper so I have as little clean-up as possible.
You can cover the biscuits and allow them to cool or serve them hot!
Advertisements
Advertisements
Recipe
1 cup flour
1 teaspoon baking powder
1 tablespoon cold butter (up to 3 tablespoons)
1/4 teaspoon salt
1/3 cup milk
Directions
Mix dry ingredients, then cut in cold butter.
Stir in milk and incorporate ingredients (do not overwork dough).
Roll out dough on floured surface.
Cut & bake at 400º for 20 minutes or until golden brown.
Enjoy!
Makes 6 – 2 1/2 inch biscuits
Advertisements
Advertisements
Be sure to join my mailing list to get my recipe for the gravy I make for biscuits and gravy as soon as I publish it!
Processing…
Success! You're on the list.
Whoops! There was an error and we couldn't process your subscription. Please reload the page and try again.
What is your favourite way to eat biscuits? Drop a comment below!
The smell of baking bread filling the house is one of my favourite scents!
On cold winter days, fresh bread with a hardy stew really hits the spot.
This no knead recipe turns out perfectly every time – the main challenge is the patience it takes!
In order to ditch kneading the bread, extra rise time is required.
18-24 hours of rise time, to be more specific.
Advertisements
Advertisements
I will usually start a batch Saturday morning so we have fresh bread for lunch on Sunday.
Aside from the rise time, this recipe requires very little of your time to prep and bake.
Oh! And did I mention that it only has 4 ingredients?!
Advertisements
Advertisements
Start with a large glass bowl and add 1 1/2 cups of lukewarm water, then sprinkle 1/2 teaspoon of yeast on top.
Allow the yeast to develop for about 5 minutes before adding 1 1/2 teaspoons of salt and 3 cups of flour (if you are in a rush, you can skip the 5 minutes and the loaf will still turn out fine).
Mix everything together until the flour is all incorporated; you shouldn’t have to work too hard and can add a bit more water if you find you still have dry flour.
Cover the bowl with plastic wrap and place on the counter to rise for the next 18-24 hours.
Advertisements
Advertisements
Unlike many bread recipes, this loaf does not need to be in a particularly warm spot; during the winter months, my concrete counters can be quite cool and we usually keep the heat in the house fairly low.
The extra rise time is to thank again!
Fast-forward 24 hours… Now the dough is ready to bake!
Pre-heat the oven to 450º with your dutch oven inside the, um, “real” oven.
I have an old-school cast iron dutch oven that I scored at a garage sale years ago and it works great!
If you don’t have a dutch oven, you should seriously consider getting one. Some even have an enamel coating that helps eliminate seasoning the cast iron and makes cleanup much easier.
Advertisements
Advertisements
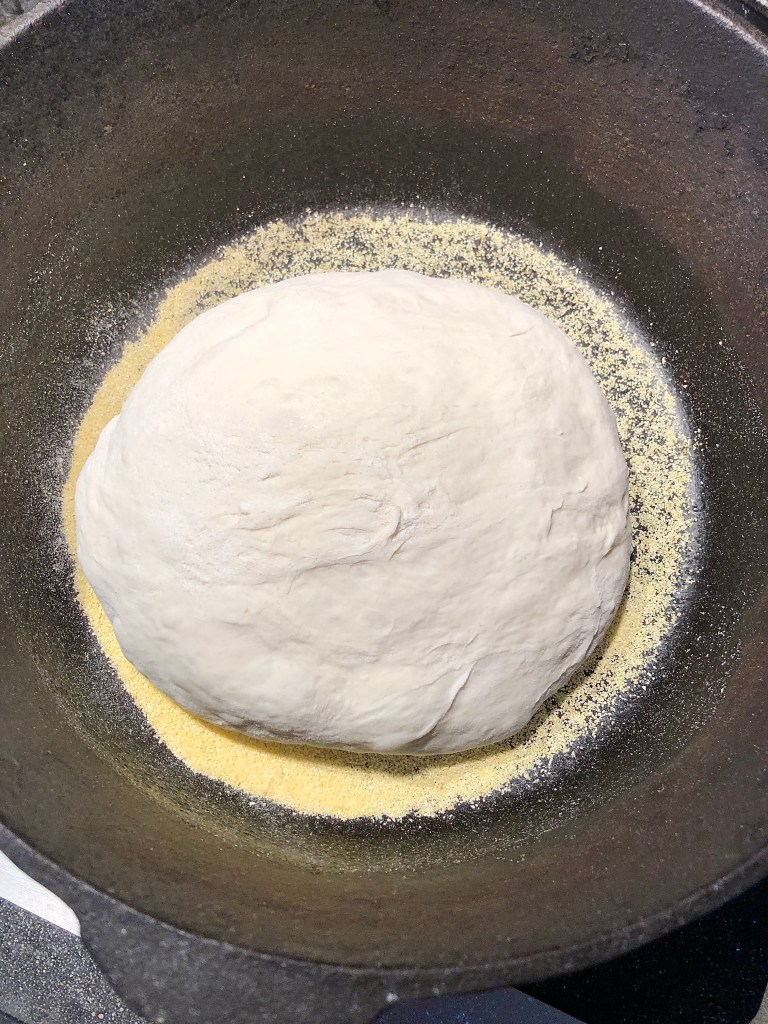
Once the oven and dutch oven are pre-heated, sprinkle some cornmeal in the bottom of the dutch oven to keep the dough from sticking to the bottom.
The cornmeal also gives the loaf a rustic, artisan feel.
Next, gently scoop the dough from the bowl onto a floured surface.
The dough will be quite sticky at this point, which is exactly what we want.
Try to disturb the dough as little as possible; this helps keep that nice, fluffy rise that we just waited 24 hours for.
Gently fold the dough from the right side into the middle, then from the left side into the middle. Repeat with the other 2 sides.
Advertisements
Advertisements
This helps shape the loaf into a nicely rounded ball.
Once you have shaped the loaf (remember, do not over-work the dough!), place it seam-side down in the dutch oven.
Bake with the lid on for 30 minutes. The moisture the lid holds in helps give the loaf the soft, chewy inside and the crusty, artisan exterior.
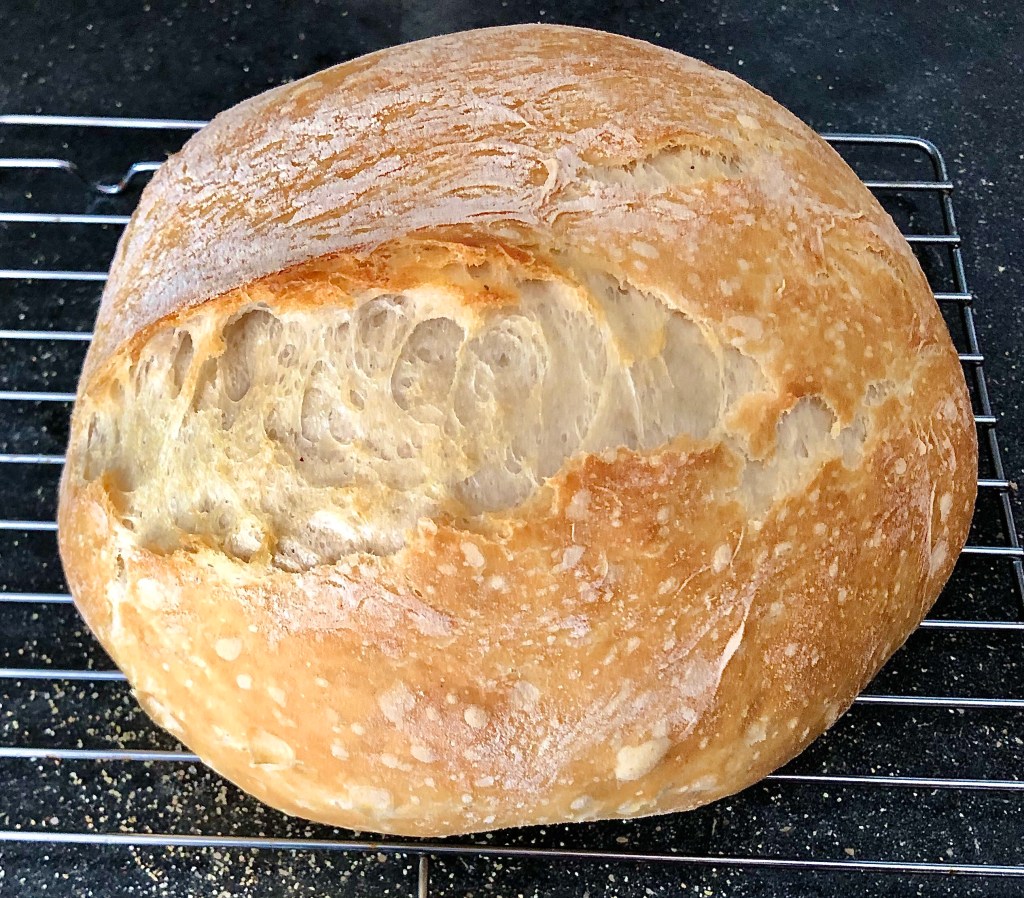
Remove the lid and bake for another 15-20 minutes so the loaf gets that nice, golden finish.
Once it has finished baking, remove your loaf from the dutch oven and place on a cooling rack; cover it with a towel to allow it to cool at a slow enough rate that it doesn’t get dried out.
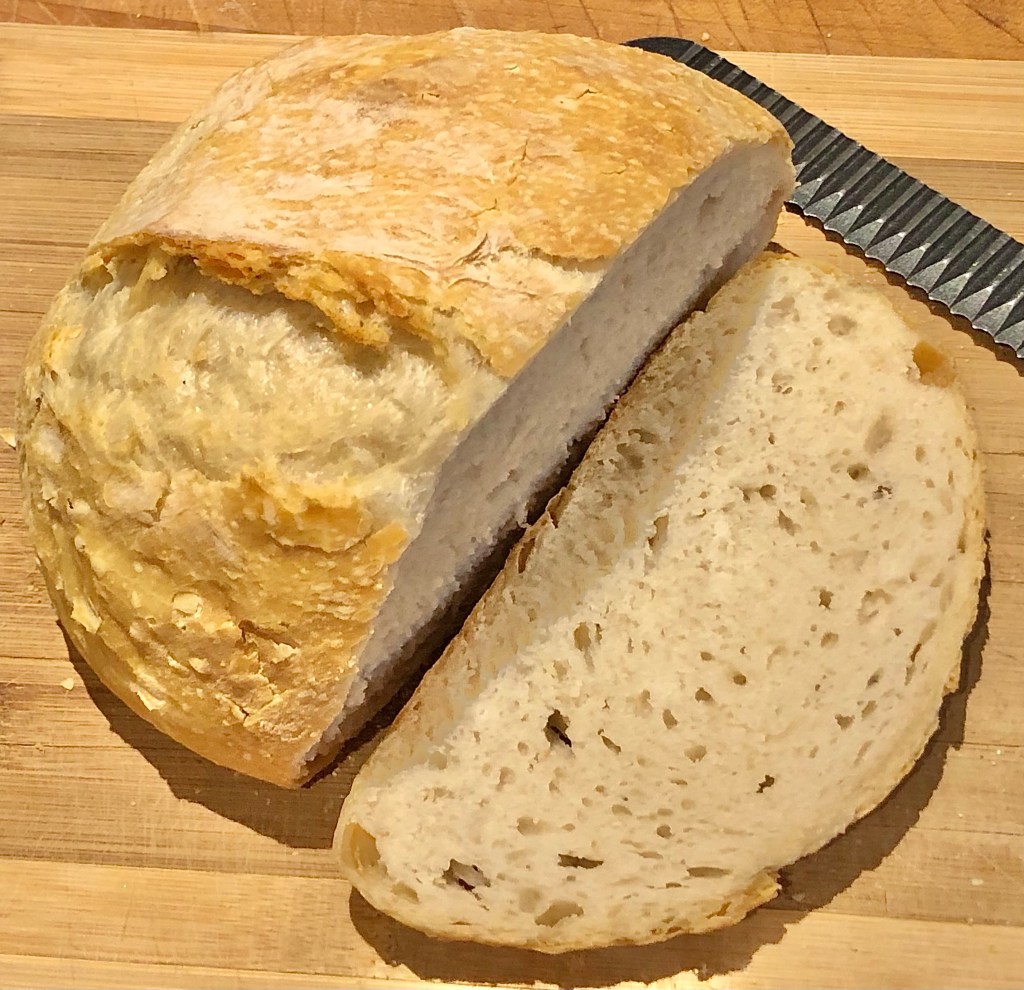
When you cut into your fresh loaf of bread, the crust should be fairly hard and the inside should be moist and chewy with large air pockets.
Be sure that your bread knife is sharp so it cuts the loaf well, rather than crushing the bread before it cuts through.
This is by far my favourite one-loaf recipe because of how quick and easy it is! At least “quick” in the sense that I only spend about 5-10 minutes of my time total making it.
And, it turns out perfectly every time!
Advertisements
Advertisements
You can add different finishes to your crust; this is just the most basic, easiest method to get you started.
Some people will brush the crust with melted butter or an egg wash (before baking) for different effects.
You can also get creative with the ingredients; do you want jalapeño cheddar loaf? Just throw some diced jalapeños, shredded cheddar cheese, and some cayenne powder in when you mix up the dough!
Want a garlic rosemary loaf? Add some fresh rosemary leaves and a dash of garlic powder!
You get the idea… This is the building block for all kinds of different options.
Advertisements
Advertisements
Recipe
1 1/2 cups lukewarm water
1/2 teaspoon yeast
1 1/2 teaspoons salt
3 cups flour
Advertisements
Advertisements
Directions
Sprinkle yeast into lukewarm water in a large, glass bowl.
Allow to develop for 5 minutes.
Add salt and flour.
Stir until incorporated.
Cover with plastic wrap and set on counter to rise for 18-24 hours.
Pre-heat oven & dutch oven to 450º
Sprinkle corn meal into bottom of dutch oven.
Scoop dough onto floured surface and fold all 4 sides into the middle to shape loaf. (DO NOT OVERWORK DOUGH)
Place loaf into dutch oven, seam-side down.
Bake for 30 minutes with the lid on, then another 15-20 minutes without the lid.
Place loaf on a cooling rack and cover with a towel.
Allow to cool, then enjoy!
Processing…
Success! You're on the list.
Whoops! There was an error and we couldn't process your subscription. Please reload the page and try again.
The hope of spring feels stronger when it is finally time to start seedlings indoors!
I don’t know about the rest of you, but I am always to impatient this time of year, wanting to get some seeds started – and now that March has arrived, the time has come!
Tomatoes and peppers should be planted in March so they have enough growing time to produce once our short growing season starts in the North.
Depending on the variety you plan to grow, the tomato plants will need anywhere from 60-100 days until you can harvest mature fruit.
And yes; I just called tomatoes fruit!
I know it can be a huge debate and I tend to call tomatoes fruit sometimes and vegetables other times, depending on the reference.
Advertisements
Advertisements
Why grow tomatoes?
Tomatoes are a versatile veggie (see what I did there?) that are used in everything from ketchup to spaghetti sauce to salads to pizza… The list goes on and on!
Whether you like raw tomatoes or not, I would be willing to bet that you like at least a few of the other recipes they get added into.
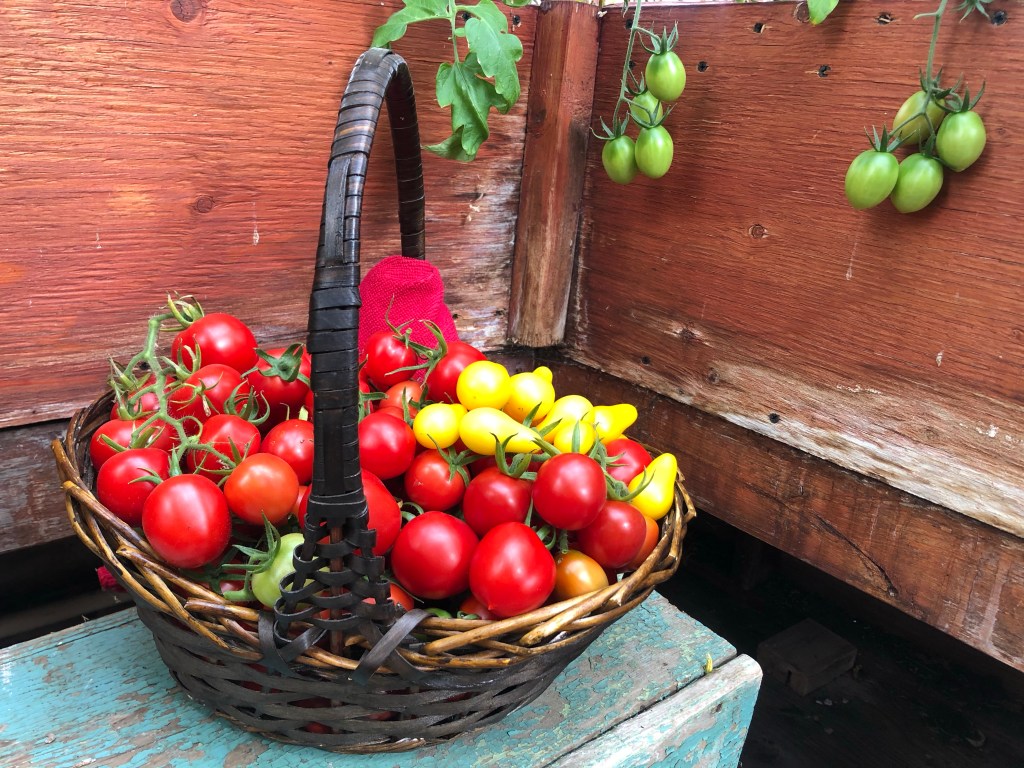
Also, there is just something so satisfying about the beautiful colors you can grow; classic cherry red, bright yellow, and even some that are a dark purple!
Another great reason is the fact that tomatoes are easy to grow once you have all the know-how (which is why you are reading this blog).
But the biggest reason of all?!!
The incredible flavour is NOTHING like you have ever tasted from a grocery store tomato!
It will make you feel like you have lived your entire life in black & white and finally see (taste) color for the first time.
It will make you feel like you have lived your entire life in black & white and finally see (taste) color for the first time.
There really is just something about homegrown that kicks the taste up to a million times better! Especially if it is a hot tomato straight off the vine…
Advertisements
Advertisements
So let’s get to it!
Germination
Tomato seeds need light, fluffy potting soil for ideal germination – DO NOT USE GARDEN SOIL!
The reason for this is that potting soil is easy for the new plant to poke up through without fighting through heavy-packed garden soil (plus potting soil tends to hold the moisture better).
Speaking of moisture, you should moisten the soil so it is damp, but not wet.
If you over-water the soil, your seeds will rot and you will find yourself spending $5 a pot for tiny plants at a garden centre.
HEAT: this is a big factor that I overlooked as a beginner gardener. Your seeds need enough heat to germinate and household temperatures aren’t always warm enough.
Tomato seeds can germinate at 60 F, however they prefer 80 F as an ideal temperature.
I use a heating pad with my covered seed starter kit to make sure they have the idea temperature and humidity – and let me tell ya! It makes a world of difference!
Advertisements
Advertisements
Not only do I have a better germination rate (a.k.a. how many seeds sprout), but my seeds also germinate much more quickly than they would at a cooler temperature.
You need to keep the soil moist (once again, make sure it’s not wet) while the seeds sprout.
Once the seeds poke through the soil and are close to touching the lid of the seed starter kit, remove the lid.
Advertisements
Advertisements
Lighting
Now that your tomato plants are up, they need proper light!
Early March where we live typically does not give the ideal amount of light, even with our huge South-facing picture windows.
I invested in a grow light that gives my plants the extra energy they need to get established during the “leaner” months of daylight.
Advertisements
Advertisements
Grow lights should be 4-6 inches from the top of the tomato plants to get the maximum benefit.
I won’t go into detail on the specifics of choosing a grow light on this post, so be sure to follow me here, on FaceBook and/or subscribe to my YouTube channel for when I go over those details
Advertisements
Advertisements
Hardening off
Once the weather warms up to temperatures that are consistently above freezing, it is time to begin hardening your plants off.
If you are new to starting plants from seed, you are probably wondering what I’m talking about.
Hardening off means that you gradually get your plants used to the temperatures outside, any wind they may be exposed to, and direct sunlight.
Most windows will block a certain amount of UV rays from the sun (some will block almost all of it), which means that your plants aren’t used to it – and can get sunburn, just like people!
Who knew?!
Advertisements
Advertisements
If you have really strong winds (like we do on our acreage here in Saskatchewan) you will have to be very careful with taller plants to ensure they don’t just get blown over or get broken tops. Your best bet is to keep them as sheltered as possible outside during the hardening stage.
When you are hardening off your plants, place them outside for about an hour the first day and then bring them back inside. Repeat this step for the next few days before extending the time to a couple hours for the next several days.
The goal is to slowly get them used to the environment they will be living in.
When I plant my tomatoes in a greenhouse, I typically skip this step. There can still be some minimal sunburn, but nothing major.
Advertisements
Advertisements
Planting tomatoes
Once your tomatoes have been hardened off, you are ready to plant!
First things first, we need to talk soil.
Tomatoes prefer soil that is slightly acidic (6-6.8 pH range), well drained, and high in organic material.
They love humidity and plenty of water, but (like most plants) don’t want to be drowned.
I use about a 50/50 mix of peat moss and soil in my beds; the peat moss is light, fluffy, and drains well.
When I plant my tomatoes, I add a banana peel (or even a whole banana if we won’t be eating it), a scoop of used coffee grounds, egg shells, compost, and a tablespoon of epsom salt in each hole.
Composting is another topic I will be discussing on my blog, so be sure to follow me so you don’t miss the “black gold” of gardening!
Why should I add any of this?
Advertisements
Advertisements
The bananas add potassium that the tomatoes will tap into and it helps prevent blossom end rot, which is a deformity caused by deficient nutrition.
The coffee grounds add nitrogen and the eggs offer calcium, which also help prevent blossom end rot.
Compost is pure energy for the tomato plants to feed off of and the epsom salt offers calcium and helps promote blooming.
When you actually get down to digging your hole, take into account how tall your tomato plant is.
Every hair on the stem of your tomato plant is a root just waiting to grow, so you want to maximize that root base as much as possible.
Every hair on the stem of your tomato plant is a root just waiting to grow, so you want to maximize that root base as much as possible.
By planting your tomato with as much of the stem in the soil as possible with the topmost leaves above the ground, you will have healthier, more vigorous plants.
Be sure to remove any leaves that are on the part of the stem that will be buried.
If you have an especially tall tomato plant, you can actually plant it sideways so the stem runs horizontally in the soil and then bends upward for the part you want above ground (I do this ALL the time!)
Advertisements
Advertisements
Varieties of tomatoes
Before we get deeper into the daily care of your tomato plants, let’s talk about my favourite varieties!
You can choose from determinate or indeterminate varieties of tomatoes; determinate means they will only grow to a certain size bush and indeterminate will never stop growing taller, if given the growing season.
All the varieties I list below are indeterminate.
Each year I end up with plants so tall they touch the roof of my greenhouse.
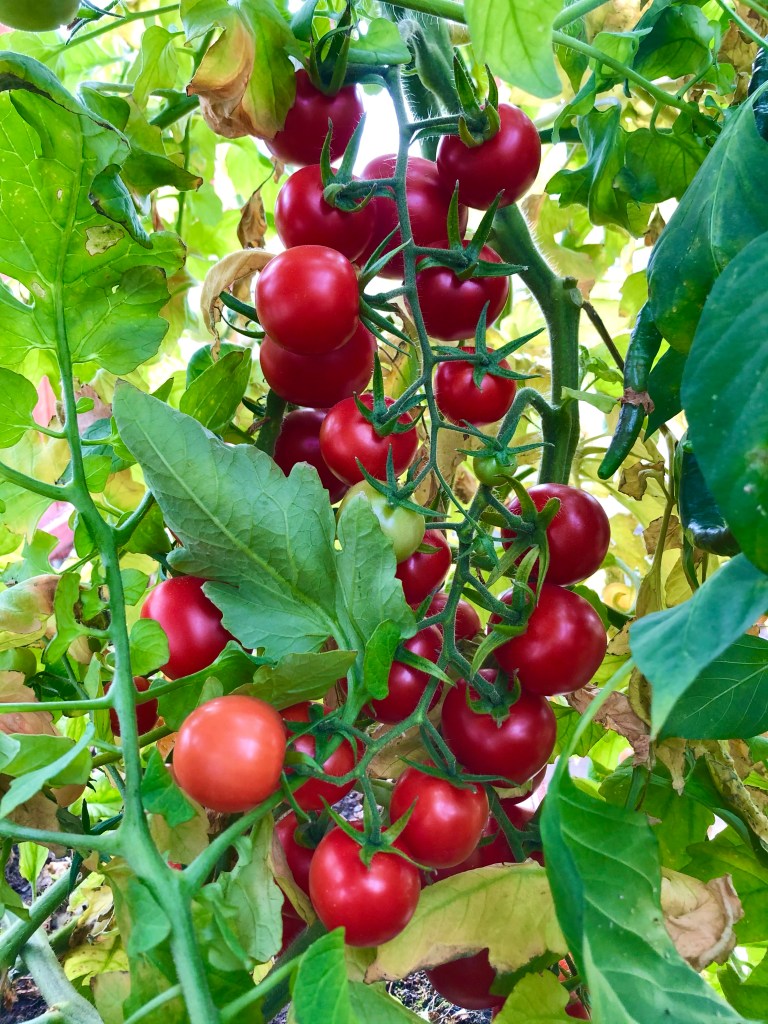
Cherry Tomatoes
Cherry Tomatoes
Aside from just being so pretty to look at, cherry tomatoes are such a tasty snack to munch on while I am watering the garden.
They are prolific producers and have such a juicy, full-bodied flavour that my husband and I enjoy all summer long – and winter, too!
Winter Too?! Let me explain: I am such a sucker for plants, I just had to bring a few cherry tomato plants into the house last fall… And they have been giving us DELISH tomatoes in the middle of winter!
There are many different varieties to choose from, which can range from 45 – 80 days to maturity.
I recommend doing research on varieties that do well in your particular zone and growing environment.
Advertisements
Advertisements
Beefsteak Tomatoes
Beefsteak Tomatoes
These gigantic tomatoes are amazing for so many reasons!
They are traditionally what you would have on a burger, but they also have a lower water content than many other tomatoes – which makes them great for sun-dried tomatoes, pasta sauces, pizza, ketchup, etc.
Their flavour is milder than the cherry tomatoes when eaten raw, but when cooked down in recipes it is a nice, rich taste.
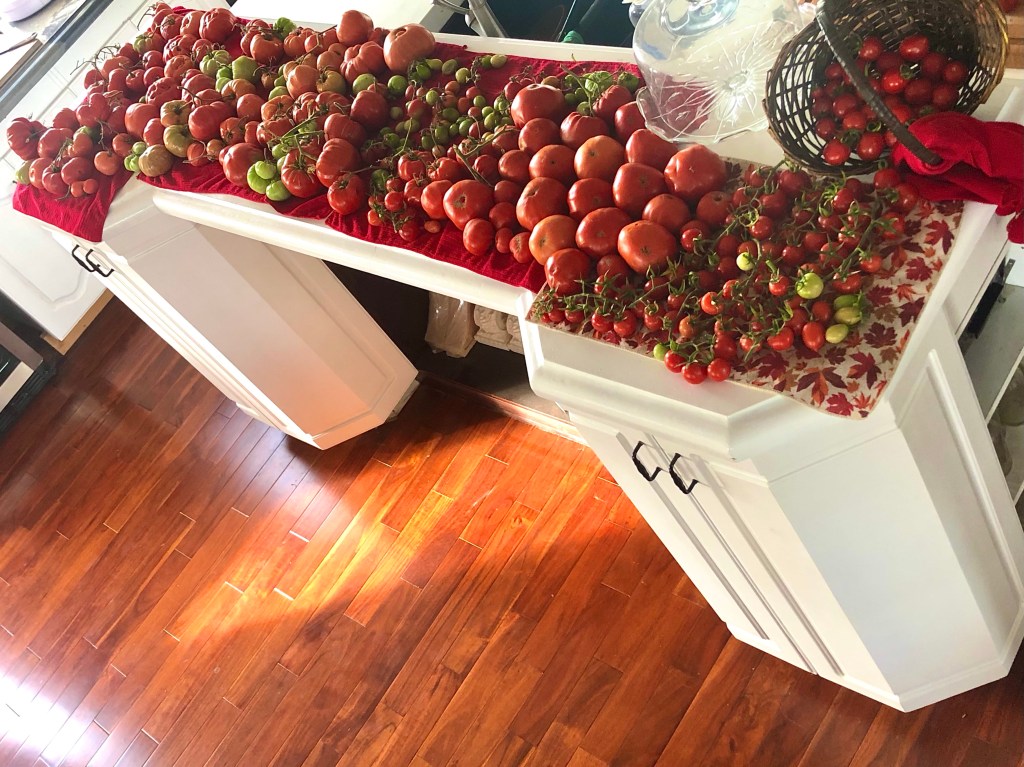
Plus, who wouldn’t feel a swell of pride while picking a huge basket of these from a plant that is bending from the weight of all those beautiful tomatoes?!
Beefsteak tomatoes average about 85 days to maturity, depending on variety.
Warning: they have more of a risk of blossom end rot than other tomatoes, so watch out for that.
Advertisements
Advertisements
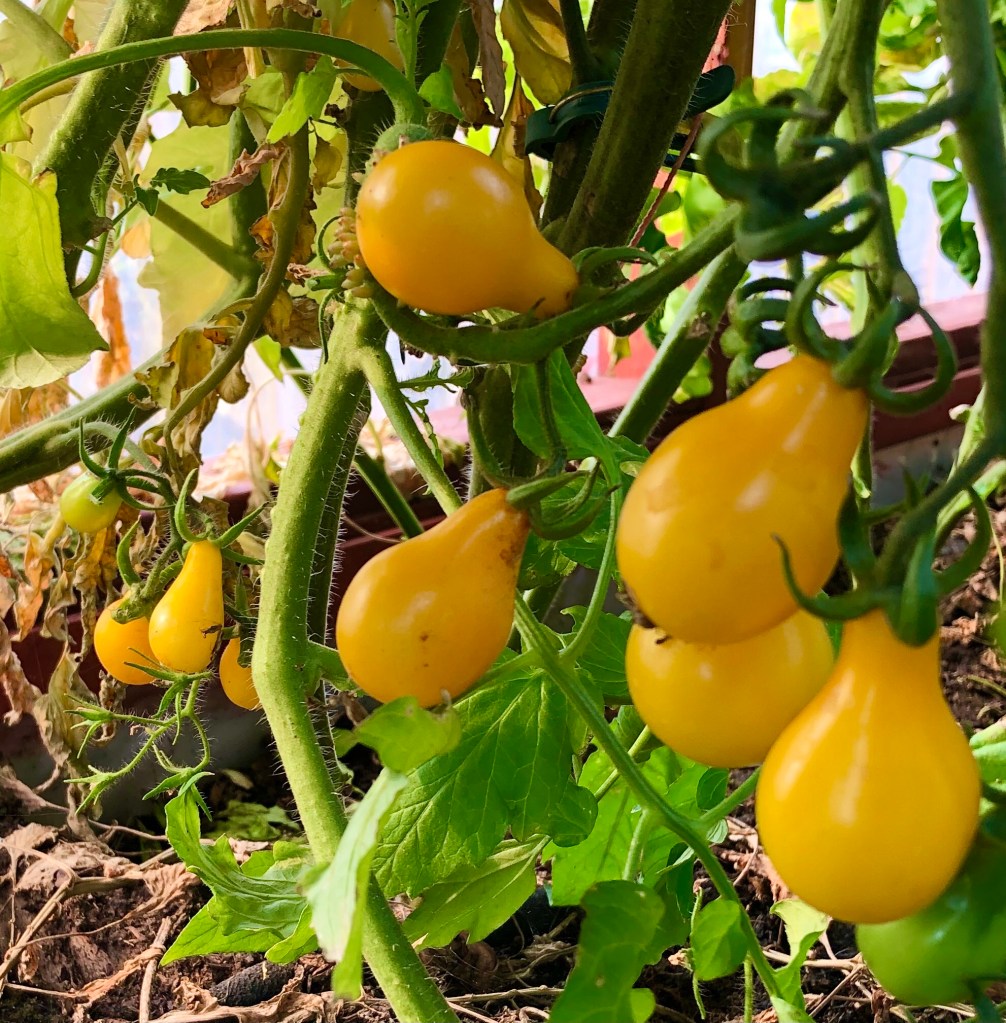
Pear Tomatoes
Aaah… Pear Tomatoes…
These are one of my absolute favourites because of their unique shape and color!
They are so pretty and their flavour is the sweetest of any tomato I have ever eaten.
Pear tomatoes are smaller than cherry tomatoes and have a similar growing season.
They can be difficult to find at times, so save your seeds if you want to be sure you can grow them year after year!
Advertisements
Advertisements
Daily Care
I give my tomatoes a good soak daily, but try to be sure they are not “drowning.”
Typically, I will trim the bottom leaves off the plant up until the place the lowest set of tomatoes are growing.
Why? Plants put their energy into everything attached to them. If they have leaves, they send energy there.
I hated this concept until I tried it the first time. I thought, “Leaves produce energy for the plants, so I am going to keep them!”
While it is true that leaves produce energy for the plant, they also require energy. By cutting the lowest leaves off, the plant forced more of its energy into the top part – including the formation of tomatoes!
Advertisements
Advertisements
Fertilizing
I have found that I have much more success when I am diligent on weekly or bi-weekly fertilizing.
I like using a combination of compost, liquid fertilizer, and pellet fertilizer from one week to the next.
If you choose to go organic, you can still use a compost tea weekly rather than the traditional store-bought fertilizer.
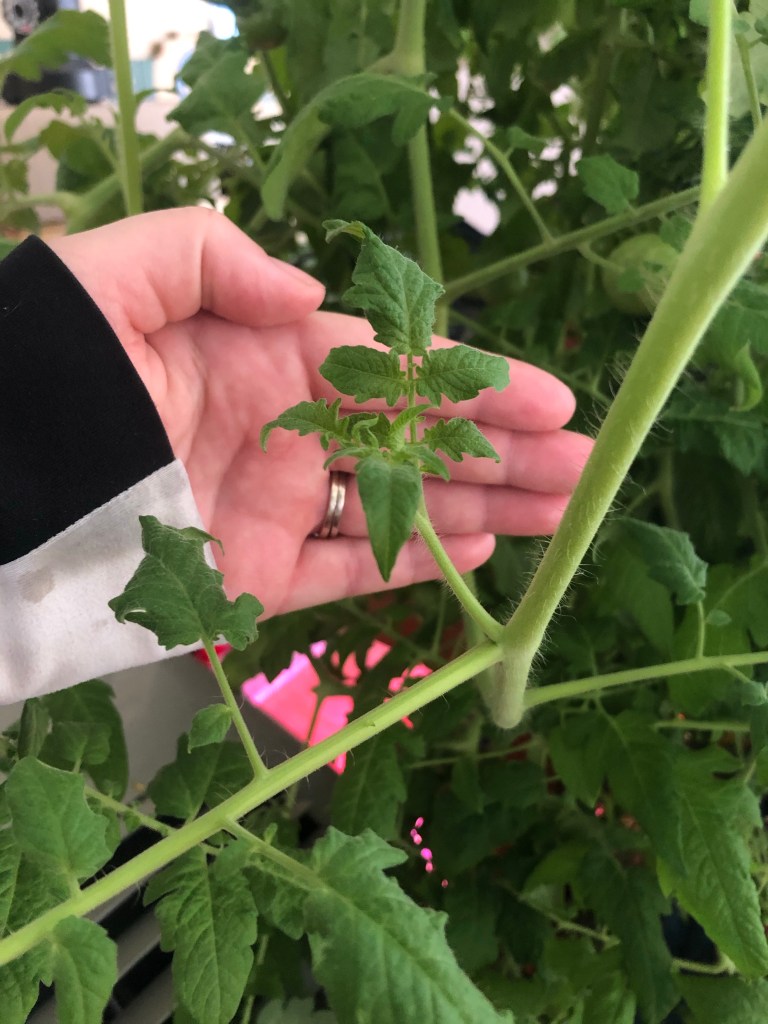
Pruning suckers
This is another counter-intuitive thing to do…
Suckers will produce tomatoes. Eventually.
We do not have a long enough growing season here to allow the tomatoes to spend all their energy producing suckers, so they have to go!
If you haven’t grown tomatoes before, suckers are the part that starts growing at the junction between a leaf and the stock of the tomato plant.
(Note: do not confuse suckers with blossoms; the blossoms will typically start growing on the stock where there isn’t a leaf growing)
I use small garden shears to cut the suckers off to make sure the plant isn’t damaged. You can also carefully twist the sucker until it breaks free from the plant.
Advertisements
Advertisements
Read to the end for my secret to create more tomato plants using suckers!!!
Pollination
Tomatoes are self-pollinated, which means that they do not need a “male” and a “female” flower to create fruit.
They do, however, need wind or vibrations to get the pollen to fall into the stigma of the flower.
They do, however, need wind or vibrations to get the pollen to fall into the stigma of the flower.
If you plan to grow your tomatoes in a greenhouse or indoors, you will need to give a gentle shake or taps to your plants every few days to make sure they have been pollinated.
Within a few days, if the yellow part of the flower falls off, but the stem remains, you likely have a successfully pollinated tomato. If the green part attached the flower or the entire stem falls off as well, you will not get a tomato from that blossom.
Support
Indeterminate tomatoes need support so they do not fall over or break under the weight of the tomatoes they produce.
Some gardeners will use tomato cages, however I have found that my tomatoes typically grow much taller than the cages.
Instead, I tie a sturdy string from the ceiling of the greenhouse and use clips to secure the plant to the string, adding more clips as the plant grows.
I have also seen bamboo poles used; for this method you will need to have a deep enough bed for the bamboo pole to offer sturdy support.
Advertisements
Advertisements
Ripening geen tomatoes
Frost is on the way; can you pick green tomatoes and ripen them?
Well, the answer is YES – and NO!
It really depends on how well developed they are.
If they are mature enough, they will ripen to a beautiful red with amazing flavour on their own.
If they are not mature enough, they will turn brown and rot.
Advertisements
Advertisements
So how do you know the difference?
Maturing tomatoes on the vine will turn from their juvenile color of dark green to a lighter green and will be roughly the size they should be when fully ripened.
If they have a twinge of pink or red (or yellow in the case of pear tomatoes), you can certainly pick them and allow them to ripen in the house.
The larger the tomato, the more forgiving they are when picked early; beefsteaks can still be very green and will be okay, however cherry tomatoes and pear tomatoes have to be a lot closer to maturity in order to finish ripening in the house.
One myth that has been prevalent for many years is that ripening tomatoes need sunlight.
Not true!
I have ripened many green tomatoes without any sunlight just fine.
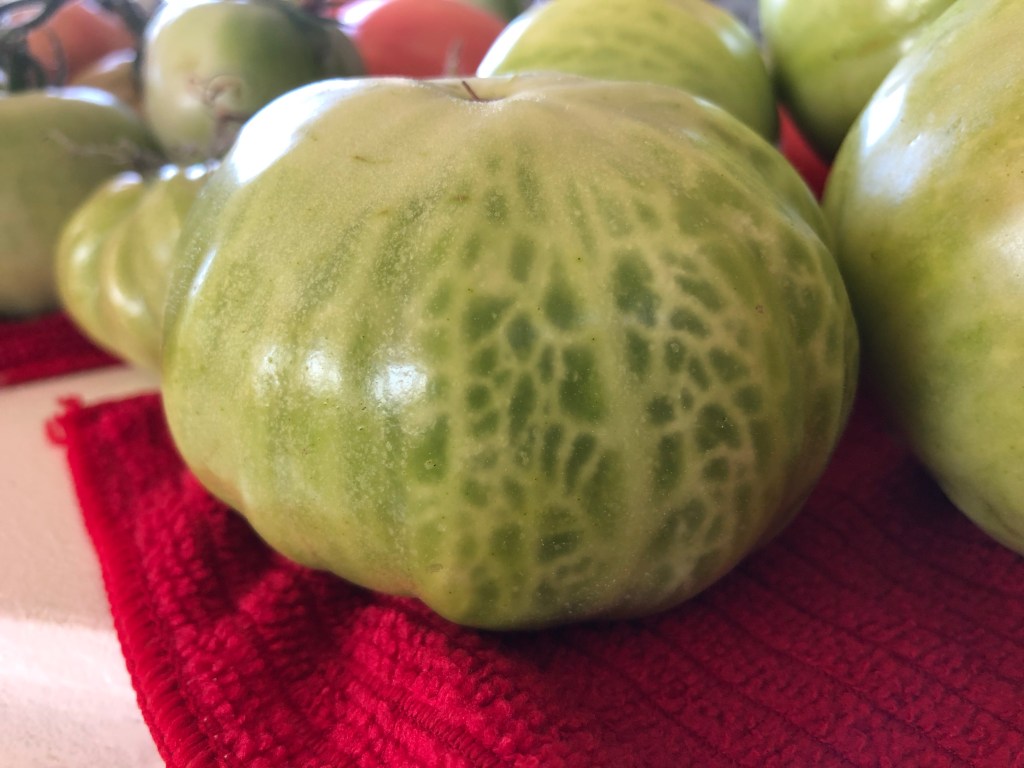
Tomato touched with frost
Advertisements
Advertisements
What about frozen tomatoes?
If your tomatoes froze, I really hope you have a compost pile set up already… because they need to get chucked!
Okay, okay… I know some people may still try to use them, but let’s be honest here… they turn to mush.
So how about if you covered your tomatoes before the first frost and want to know if they are still good?
The photo above is an example of the veined pattern that shows up on tomatoes that have been touched by frost.
If they froze solid, they will turn to mush as soon as they thaw, however if they have just been touched by frost they can still be firm.
The tomatoes touched by frost will not ripen into a nice red; if you want to salvage them, you need to use them ASAP – otherwise they will go bad.
Pinterest has some interesting recipes and I may post some here later as well.
Advertisements
Advertisements
Companion planting
Bugs can be a huge struggle in gardening, which is part of the reason companion planting is a thing.
Other reasons to companion plant include flavour, shade, and even added nutrients!
Planting marigolds with tomatoes helps reduce the pests that like to feed on your tomato plants. The flowers may smell stinky, but they are kind of pretty!
I LOVE (let me reiterate – I LOVE) basil with tomatoes!!!
They grow well together and I love pairing them in the same foods.
Some people swear by the fact that they enhance each other’s flavours when grown together…
My unconventional companion is green beans.
Why green beans?
Advertisements
Advertisements
Beans are a “nitrogen fixer,” which means that they pull nitrogen into the soil and the tomatoes can then “eat” the nitrogen.
Runner beans also act as a natural support for the tomatoes if done correctly.
The downside is the fact that the green beans have large leaves that can block out sunlight, so I keep mine well trimmed.
You have successfully planted, cared for, and grown your own tomatoes!
Here is the fun part.
Your tomatoes are ready to harvest when they are a nice, deep color – whether red, yellow or purple will depend on the variety you are growing.
Their skin should still be glossy and they should be firm.
If you do not plan to eat your tomatoes immediately, either cut them off or break them at the knob above the tomato on the stem; they store better this way.
If you plan to use them right away, you can gently twist the tomato off the stem.
Advertisements
Advertisements
Propagating suckers
Remember earlier when I said to read to the end for my secret on using suckers to make more tomatoes?
Well, here it is!
Suckers are the easiest way to expand your tomato crop – after you have pruned them!
Just like when you plant a tomato as deep as possible to use the hairs on the stem to expand the root system, the suckers can root on their own using those hairs.
You can either place the sucker in water for a week or two to get roots established or you can plant them directly into drenched soil.
They require enough heat and sunlight to do well if you plan to put the suckers directly into soil.
Whichever method you choose, they typically will wilt over and look as though they may have died for a couple days.
That is normal.
Advertisements
Advertisements
Sometimes they may die, but I would have pruned them off in any case… so all the suckers that grow are just more free tomato plants!
Most times, however, the suckers will perk back up in a day or two and start developing roots.
It is important at this stage to keep them borderline “drowned.”
After the first 2-3 weeks, they should be ready to be transplanted.
At one point, I had pruned a sucker off a tomato in my greenhouse and simply chucked it at the base of the plant to decompose… And it ROOTED IN! While it was just laying on top of the soil!
Tomatoes are tough, resilient plants that just don’t give up.
Advertisements
Advertisements
Preserving & Recipes
If you are interested in learning more – including preserving your tomatoes and different recipes, be sure to follow me!
I will also be posting about saving seeds to save you $$$ in the future, problem solving, and more!
Processing…
Success! You're on the list.
Whoops! There was an error and we couldn't process your subscription. Please reload the page and try again.
Some of my favourite ways to preserve tomatoes is by making spaghetti sauce, sun dried tomatoes or this fire roasted salsa recipe!
Advertisements
Advertisements
I often will make a couple of these recipes at the same time; in the photo above, I have a batch of tomato rounds in the dehydrator and the off-cut tops will be used for the fire roasted salsa.
That keeps my sun dried tomatoes in nice rounds, while the flesh left over from cutting the woody centre of the tomato out gets blended into the salsa.
Advertisements
Advertisements
Why is fire roasted salsa better than raw salsa?
Don’t get me wrong – I love a good Pico De Gallo (chunky salsa) on my fried tacos, but fire roasted salsa is much better for preserving because of its thick, even consistency.
Roasting the ingredients before blending them not only brings out the heat in the peppers, but it also enhances the flavour in the tomatoes and reduces the water content (no one wants watery salsa!)
PRO TIP: Using beefsteak tomatoes will also help achieve the desired consistency because they naturally have lower water content than other varieties of tomatoes.
Advertisements
Advertisements
Advertisements
Advertisements
Start by lining a large baking sheet with parchment paper and cover it with a layer of chopped tomatoes and onions, whole garlic cloves, and whole jalapeños and cayenne peppers.
Drizzle it with a bit of olive oil and mix well, then sprinkle a bit of salt to taste.
You don’t want the layer of veggies to be too deep or you won’t get the ideal results of an evenly roasted salsa.
Place the baking sheet on the top rack of a pre-heated oven, set on broil.
Watch your batch to make sure it doesn’t burn and flip once the peppers start to blister and the tomatoes start to brown.
This should only take a few minutes.
Advertisements
Advertisements
Advertisements
Advertisements
Once the other side of the peppers blister as well, remove the baking sheet from the oven and allow to cool.
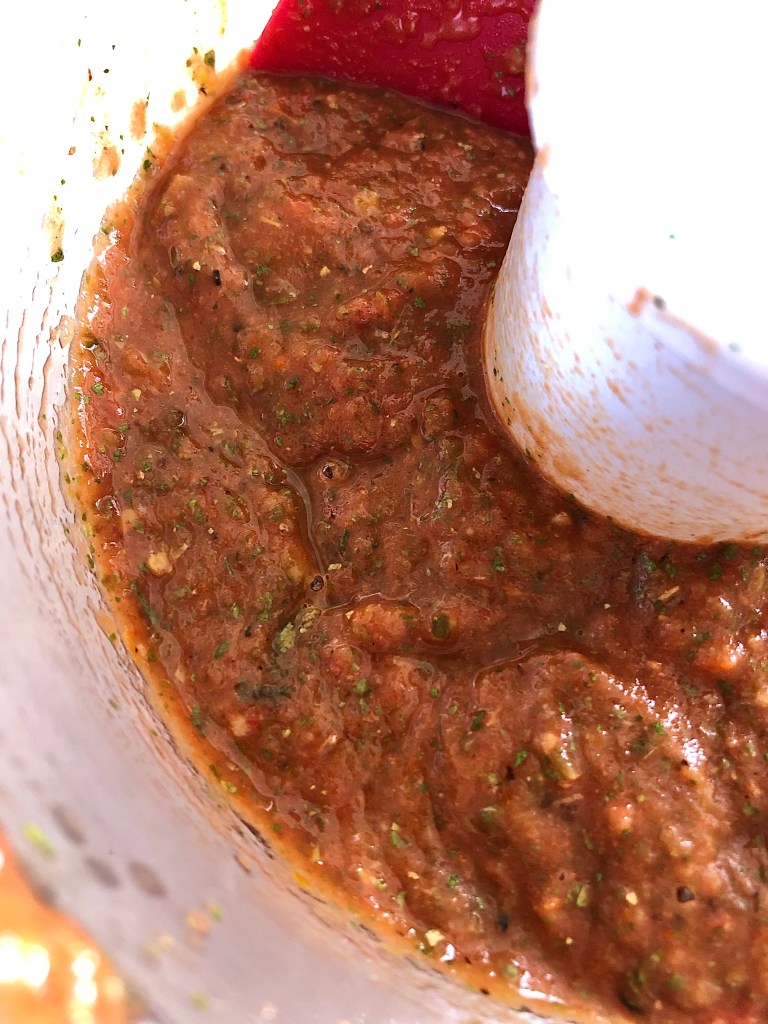
Next, cut the stems off the peppers and add the roasted ingredients to the food processor, along with the cumin, fresh lemon juice, and cilantro.
Blend well and give it a taste test!
The beauty of making your own salsa is that you can decide just how mild or spicy you would like it to be; if it isn’t spicy enough for your taste, just add a bit of cayenne powder to kick it up a notch.
Advertisements
Advertisements
Advertisements
Advertisements
This recipe only makes about a pint, so you will need to roast multiple pans of veggies if you want to can large quantities of fire roasted salsa to use up the bounty from your tomato harvest.
If you just want a jar of fresh, homemade salsa to enjoy you’ll find this is the perfect size batch to whip up quickly!
Start to finish, this recipe only takes 15-20 minutes to make – including the roasting time!
Advertisements
Advertisements
Recipe
2 cups tomato, chopped
1/2 white onion, chopped
3 cloves garlic, whole
3 jalapeños , whole
2 cayenne peppers, whole
2 tablespoons olive oil
1 lemon, juiced
1 tablespoon cilantro dried or 1 cup fresh
1/4 teaspoon cumin
Salt & pepper to taste
Advertisements
Advertisements
Instructions
Drizzle olive oil on tomato, onion, garlic, jalapeño, and cayenne peppers – mix well.
Roast on a lined baking sheet in a pre-heated oven set to “broil” on the top rack.
Flip vegetables when the peppers start to blister.
Remove from oven when second side of peppers blister and allow to cool.
Cut pepper stems off and place all ingredients in food processor.
Blend well.
Add cayenne powder to reach desired spiciness, if it is not hot enough for your taste.
If canning the salsa, place in sanitized jars and process in hot water bath.
Enjoy!
Serving size: 1 pint
Advertisements
Advertisements
Advertisements
Advertisements
Advertisements
Advertisements
Processing…
Success! You're on the list.
Whoops! There was an error and we couldn't process your subscription. Please reload the page and try again.
Fall-time in Alaska has the richest smell – one that is hard to fully describe to someone who has never experienced the amazingly overwhelming combination of a thousand scents…
The ever-present sappy smell of evergreens…
The musky scent of rotting leaves, scattered across the ground in the chill breeze…
Advertisements
Advertisements
But most of all, the rich tang of ripe cranberries wafting through the crisp air.
Of all the mountain smells, ripe cranberry is the scent I miss the most!
I have always loved picking wild berries, so much so that my mom would have an extra task on her “to do” list when I would show up unexpectedly with a bucket of berries before I was old enough to process them myself.
Advertisements
Advertisements
Cranberry meat sauce has been a traditional family recipe since before I was born – and I love it to this day!
We typically would use the sauce when we had fried moose steaks – I mean, how much more Alaskan can it get?!
BUT, living on the prairies is very different than mountain living in many ways.
We lack the wild cranberry plants and I hate buying something I grew up picking, catching or growing (buying salmon is a huge no-no!)
Advertisements
Advertisements
Plate family original cranberry meat sauce recipe
Advertisements
Advertisements
Without cranberries, I realized that rhubarb has a similar amount of tartness and decided to give this recipe a make-over to use my abundance of homegrown rhubarb!
Advertisements
Advertisements
Advertisements
Advertisements
Highbush cranberries have much more water content than lowbush cranberries (did you even know there were other kinds of cranberries than your typical Thanksgiving spread..?) or rhubarb, so I added more water to the mix than the original recipe called for.
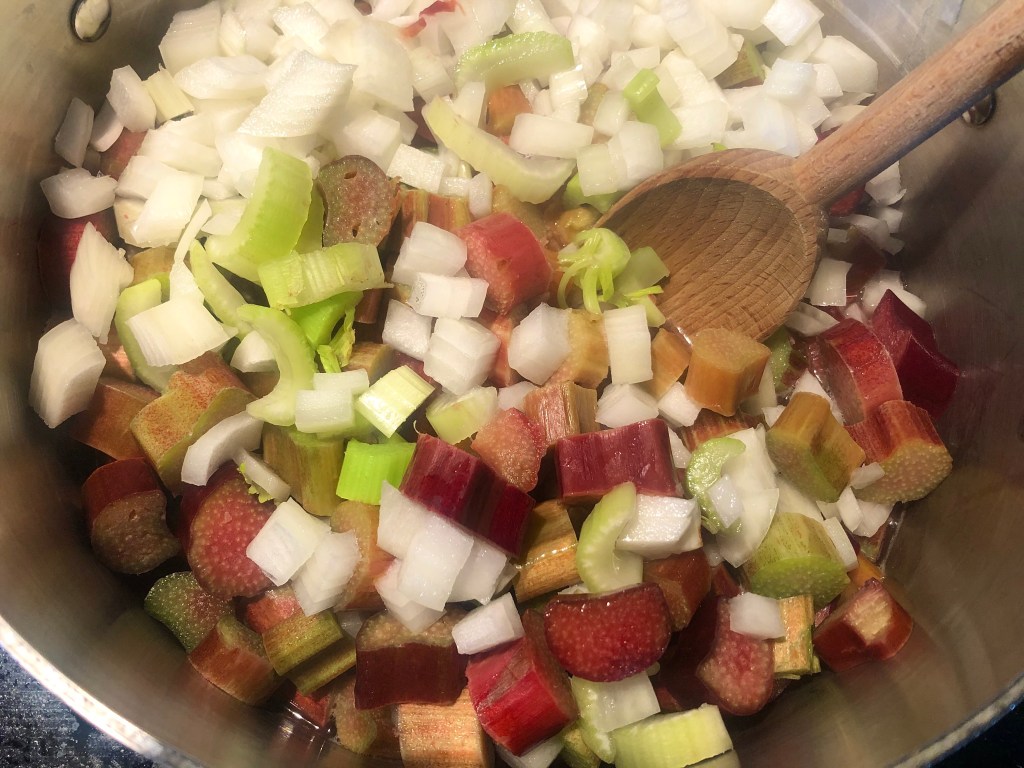
I cooked the rhubarb on low heat while I chopped and added onions and fresh celery.
Next came the vinegar, sugar, salt, pepper, and cloves.
But I didn’t have the allspice the recipe called for on hand!
Advertisements
Advertisements
Oh! Guess what? Allspice can be mimicked by mixture of cloves, cinnamon, and nutmeg – so I simply added the cinnamon and nutmeg to get the proper taste.
I love the flavour profile some garlic adds, so I threw in a couple cloves.
And while I was changing the recipe a bit, why not add a few drops of liquid smoke?
I mean, I was substituting rhubarb for cranberries anyway – may as well go all in with my intuitive cooking style!
Advertisements
Advertisements
Advertisements
Advertisements
Once all the ingredients were combined, I brought the mixture to a low simmer and turned it down so it barely bubbled.
Slow and steady wins the race here!
Trust me! If the mixture burns on the bottom, the entire batch will have a dark, burned taste that will ruin the sauce.
Thick sauces are prone to burn easily (even if stirred regularly) if the heat is too high.
Advertisements
Advertisements
PRO TIP #1: The thicker the bottom of the sauce pan is, the less likely the batch is to burn.
Slowly cooking the sauce down to the right thickness also helps the flavours to blend and enhances the end result.
PRO TIP #2: Place the sauce in a crock pot on low heat to allow it to reduce to the desired consistency.
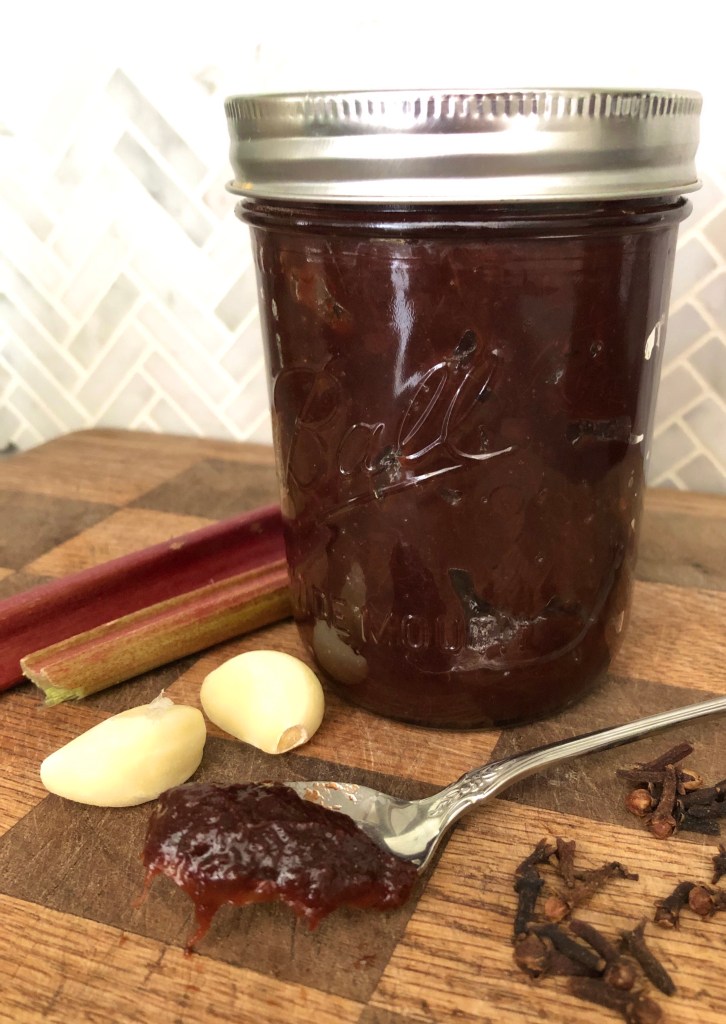
Once it has cooked down to the thickness of applesauce, place the meat sauce in sanitized jars and process with a hot water bath.
This recipe makes about 2 pints.
Advertisements
Advertisements
Rhubarb meat sauce pairs extremely well with wild game, lamb, and other meats with its spiced tartness; it can also be used in wine reduction sauces and baked beans.
Advertisements
Advertisements
Recipe
8 cups rhubarb, chopped
2 stalks celery, chopped
2 cloves garlic, minced
1 cup water
1 onion, chopped
1 1/3 cup white vinegar
2 2/3 cups white sugar
2 teaspoons cloves
1/4 teaspoon cinnamon
1/4 teaspoon nutmeg
2 teaspoons salt
1/2 teaspoon pepper
6 drops liquid smoke
Advertisements
Advertisements
Directions
Combine rhubarb, garlic, celery, onion, and water. Cook until soft.
Add remaining ingredients and bring to a low simmer.
Cook on low heat, making sure not to burn, until mixture has reduced to a consistency similar to apple sauce. (NOTE: this can be done in a crockpot)
Place sauce in sanitized jars and process with water bath.
Serve with wild game, lamb or other meats. Can be used in wine reduction sauces and baked beans as well.
Enjoy!
Advertisements
Advertisements
What recipe brings a “taste of home” to your cooking? Drop a comment below!
Advertisements
Advertisements
Processing…
Success! You're on the list.
Whoops! There was an error and we couldn't process your subscription. Please reload the page and try again.
During the long, cold winter months I tend to binge-watch DIY YouTube gardening videos – everything from how to grow blueberries, to composting, to building a greenhouse!
This past winter I came across the idea of expanding growing space by building an arched trellis using cattle panels.
I was intrigued!
Advertisements
Advertisements
I love mixing “functional” with “decorative accent…” if you follow my blog, you’ve already seen the DIY garden arbor we built this spring for that very combination!
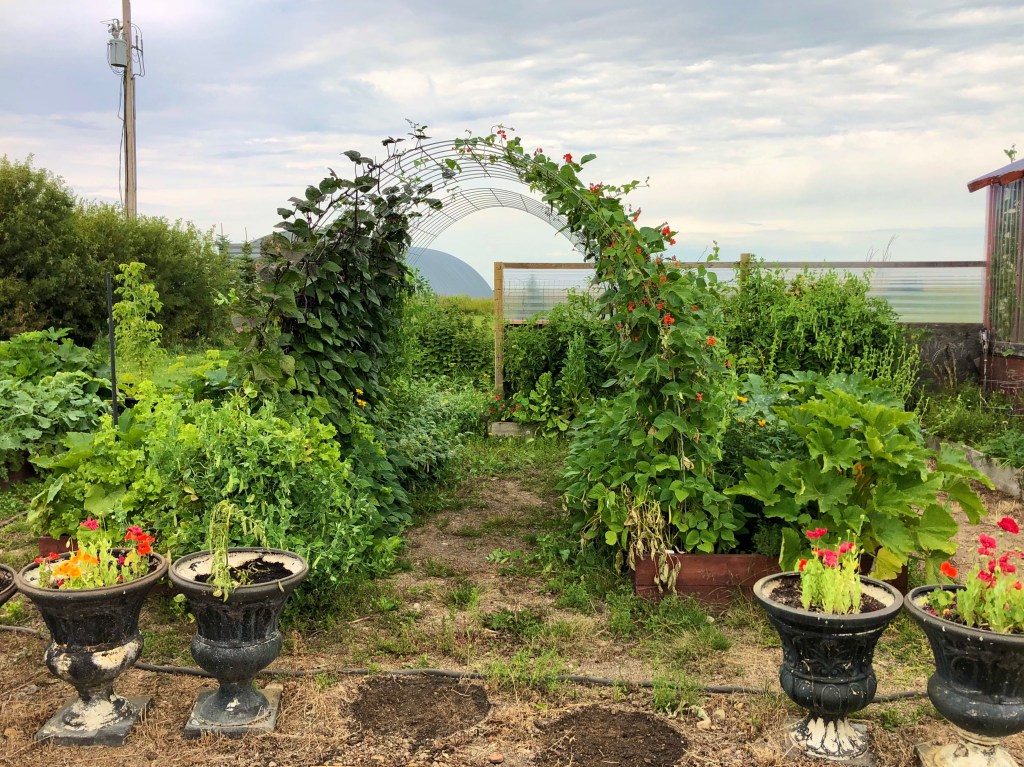
An archway in the middle of my garden, covered with vining foliage and flowers sounded like such an elegant, whimsical idea.
Advertisements
Advertisements
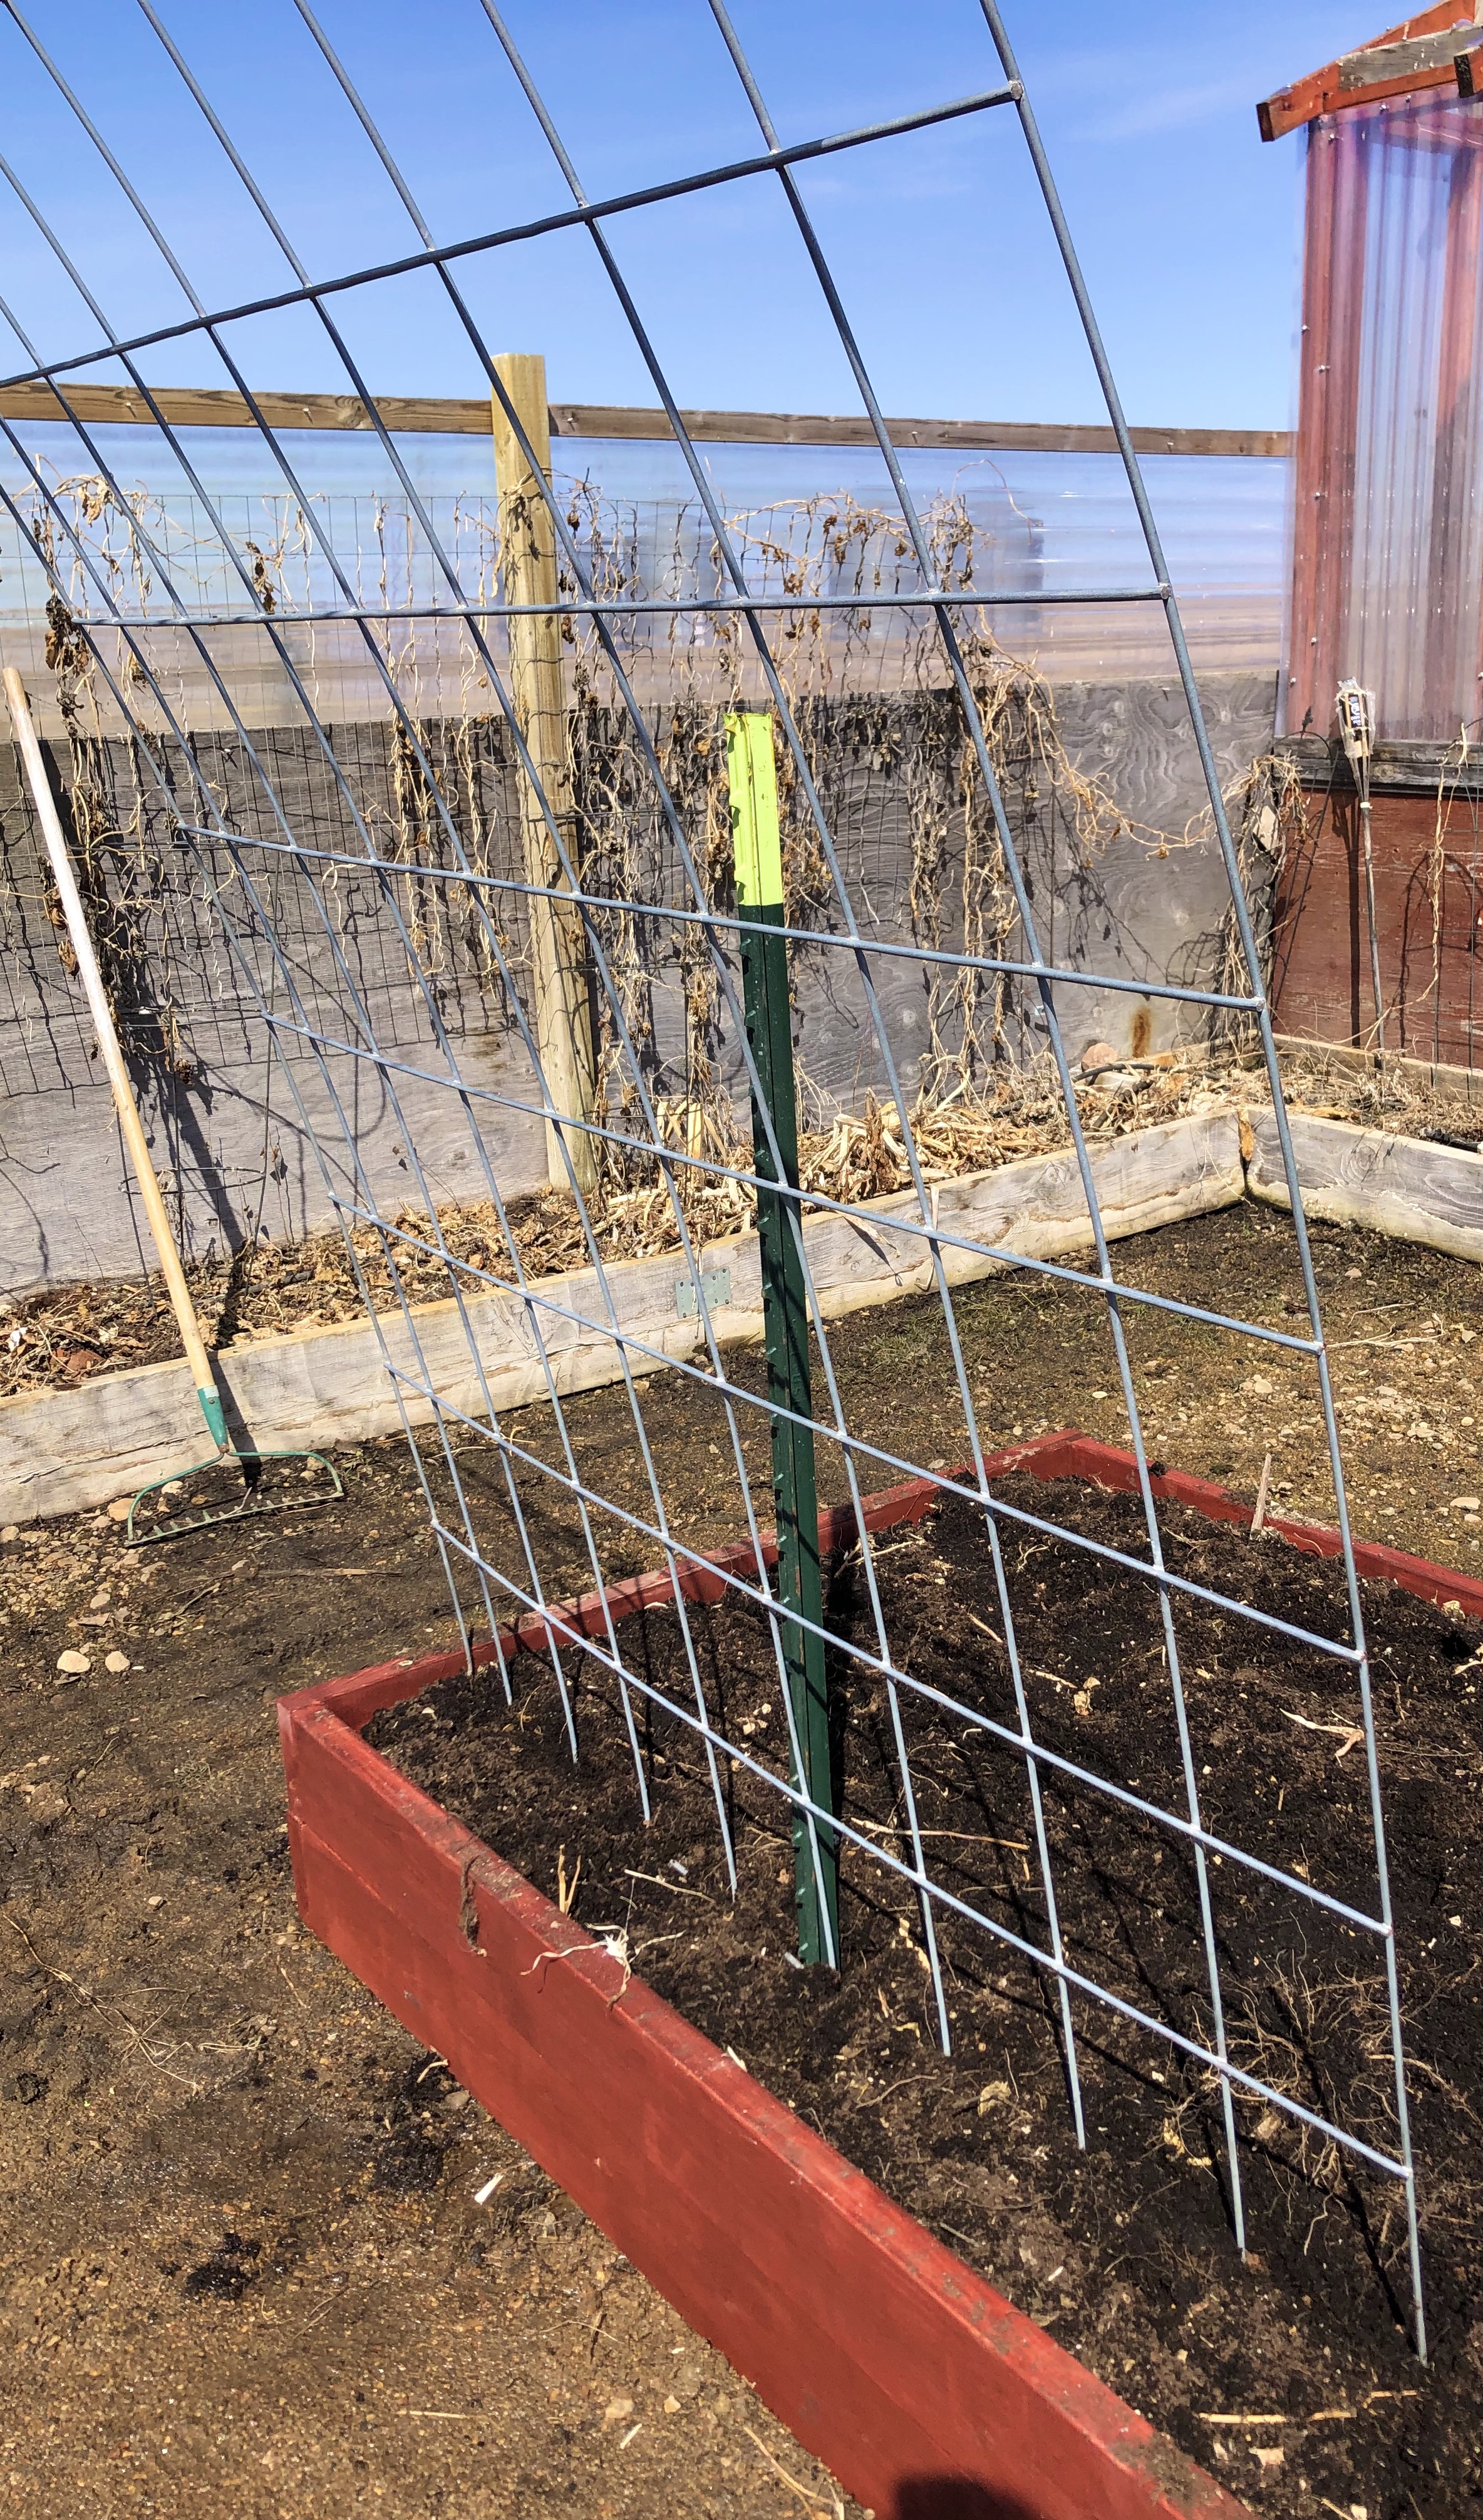
First, we started off by building two matching raised beds as the foundation of our arched garden trellis.
Once they were in place, stained, and filled with a combination of compost and soil, we drove 4 metal t-posts into the ground so they were good and solid.
I wanted to have about 6 inches or so on the inside of the trellis so I could plant bush beans inside the archway and runner beans on the outside to vine upward.
Advertisements
Advertisements
Next, we gently curved the cattle panels into a consistent arch and secured them to the t-posts; in some of the YouTube videos people used zip-ties to secure them, however we found they weren’t sturdy enough and used wire instead.
Advertisements
Advertisements
The cattle panels were about $65 CAD from our local farm supply store, which was more than we had hoped they would cost but decided that it would be worth it in the end.
We added sand between the raised beds to avoid ending up with a muddy walkway when we got a heavy rain.
Advertisements
Advertisements
(The archway seemed nearly invisible as just bare wire)
I planted bush beans inside the archway, as planned, and scarlet runner beans & purple runner beans on the outside of the trellis.
The raised beds were large enough that I had space to plant zucchini, summer squash, patty pan squash, and small rows of lettuce, spinach, kale, & arugula in the part of the beds away from the trellis.
And then the long wait began!
Slowly, I could see progress… vines crept upward inch by inch as I trained them to wind around the wire.
Advertisements
Advertisements
By late July the beans were almost as tall as me – and by mid-August some of the vines had finally grown all the way up and over the trellis!
The whimsical tunnel of lush foliage, covered in flowers and peppered with fresh green beans was everything I had envisioned!
As far as the functional part of this DIY build, the cattle panels gave us an additional 128 square feet of vertical growing space!
Advertisements
Advertisements
And as everyone knows, extra growing space = extra production!
(yes, we live on an acreage where we have plenty of space to grow veggies, but keeping everything as compact as possible makes weeding, watering, and harvesting easier)
Advertisements
Advertisements
Over the last few months, we have had more than enough green beans to eat with every meal if we wanted AND lots left over for canning & pickling.
What innovative garden builds have you done? Drop a comment below!