Scalloped Potatoes

Scalloped potatoes are a rare treat in our home, simply because I get into a rut and end up making the same 5 or 6 meals on repeat.

Who else has been there?

It can be so frustrating trying to break out of that cycle and think up something new and exciting to make for dinner!

And that is where scalloped potatoes come in to save the day!

Advertisements
Advertisements
Advertisements
Advertisements

Yes, they take a little longer to make than those easy meals-on-repeat, but it is so worth it for a fabulous dish that the whole family loves.

I tend to triple or even quadruple this recipe so I can freeze extra trays for an easy side dish with the prep time already out of the way.

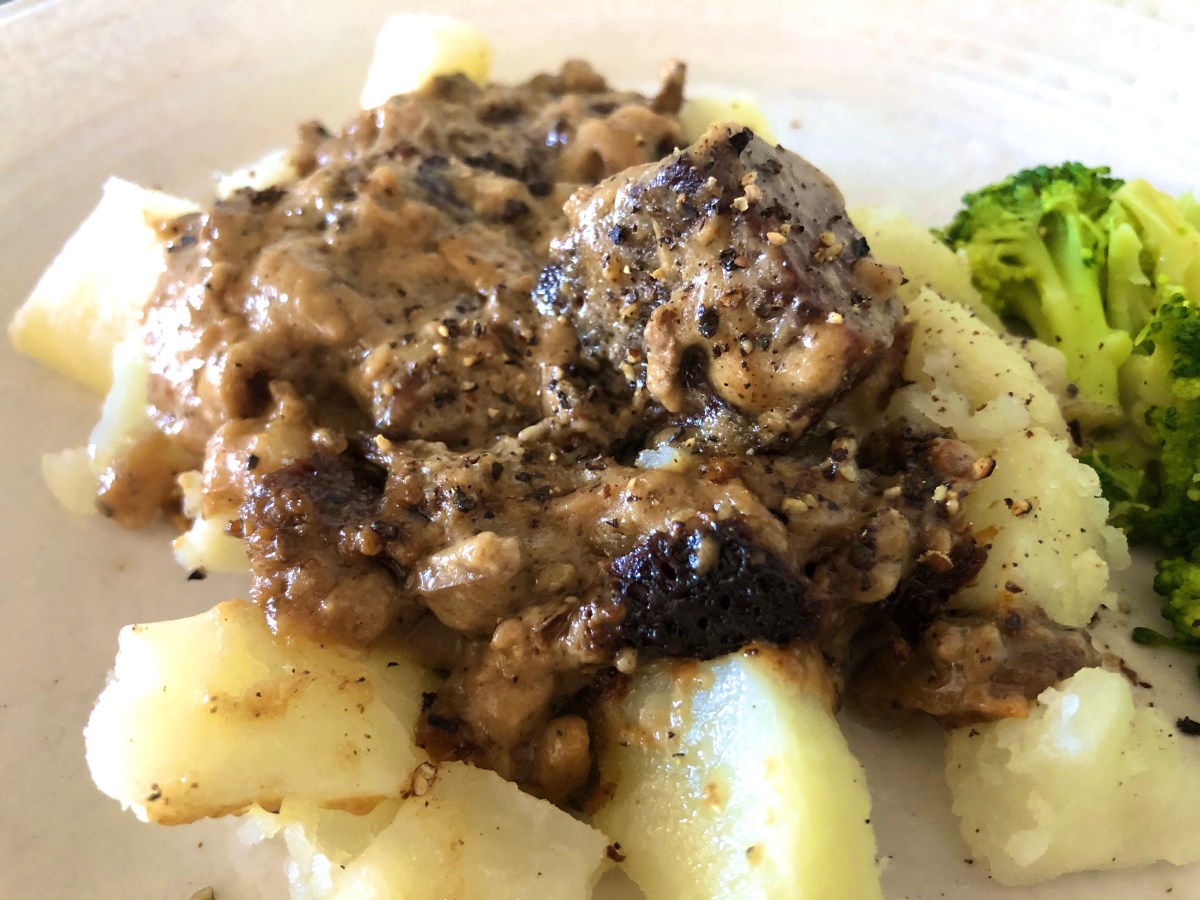
Scalloped potatoes go well with so many meals, but meatloaf has been my go-to dish to serve it with (no, my recipe is not the notorious “MYSTERY” meatloaf!).

Advertisements
Advertisements
Advertisements
Advertisements

So let’s get down to it!

First, chop the onions, mushrooms, and garlic and sauté in butter until soft.

Add salt and pepper to taste.

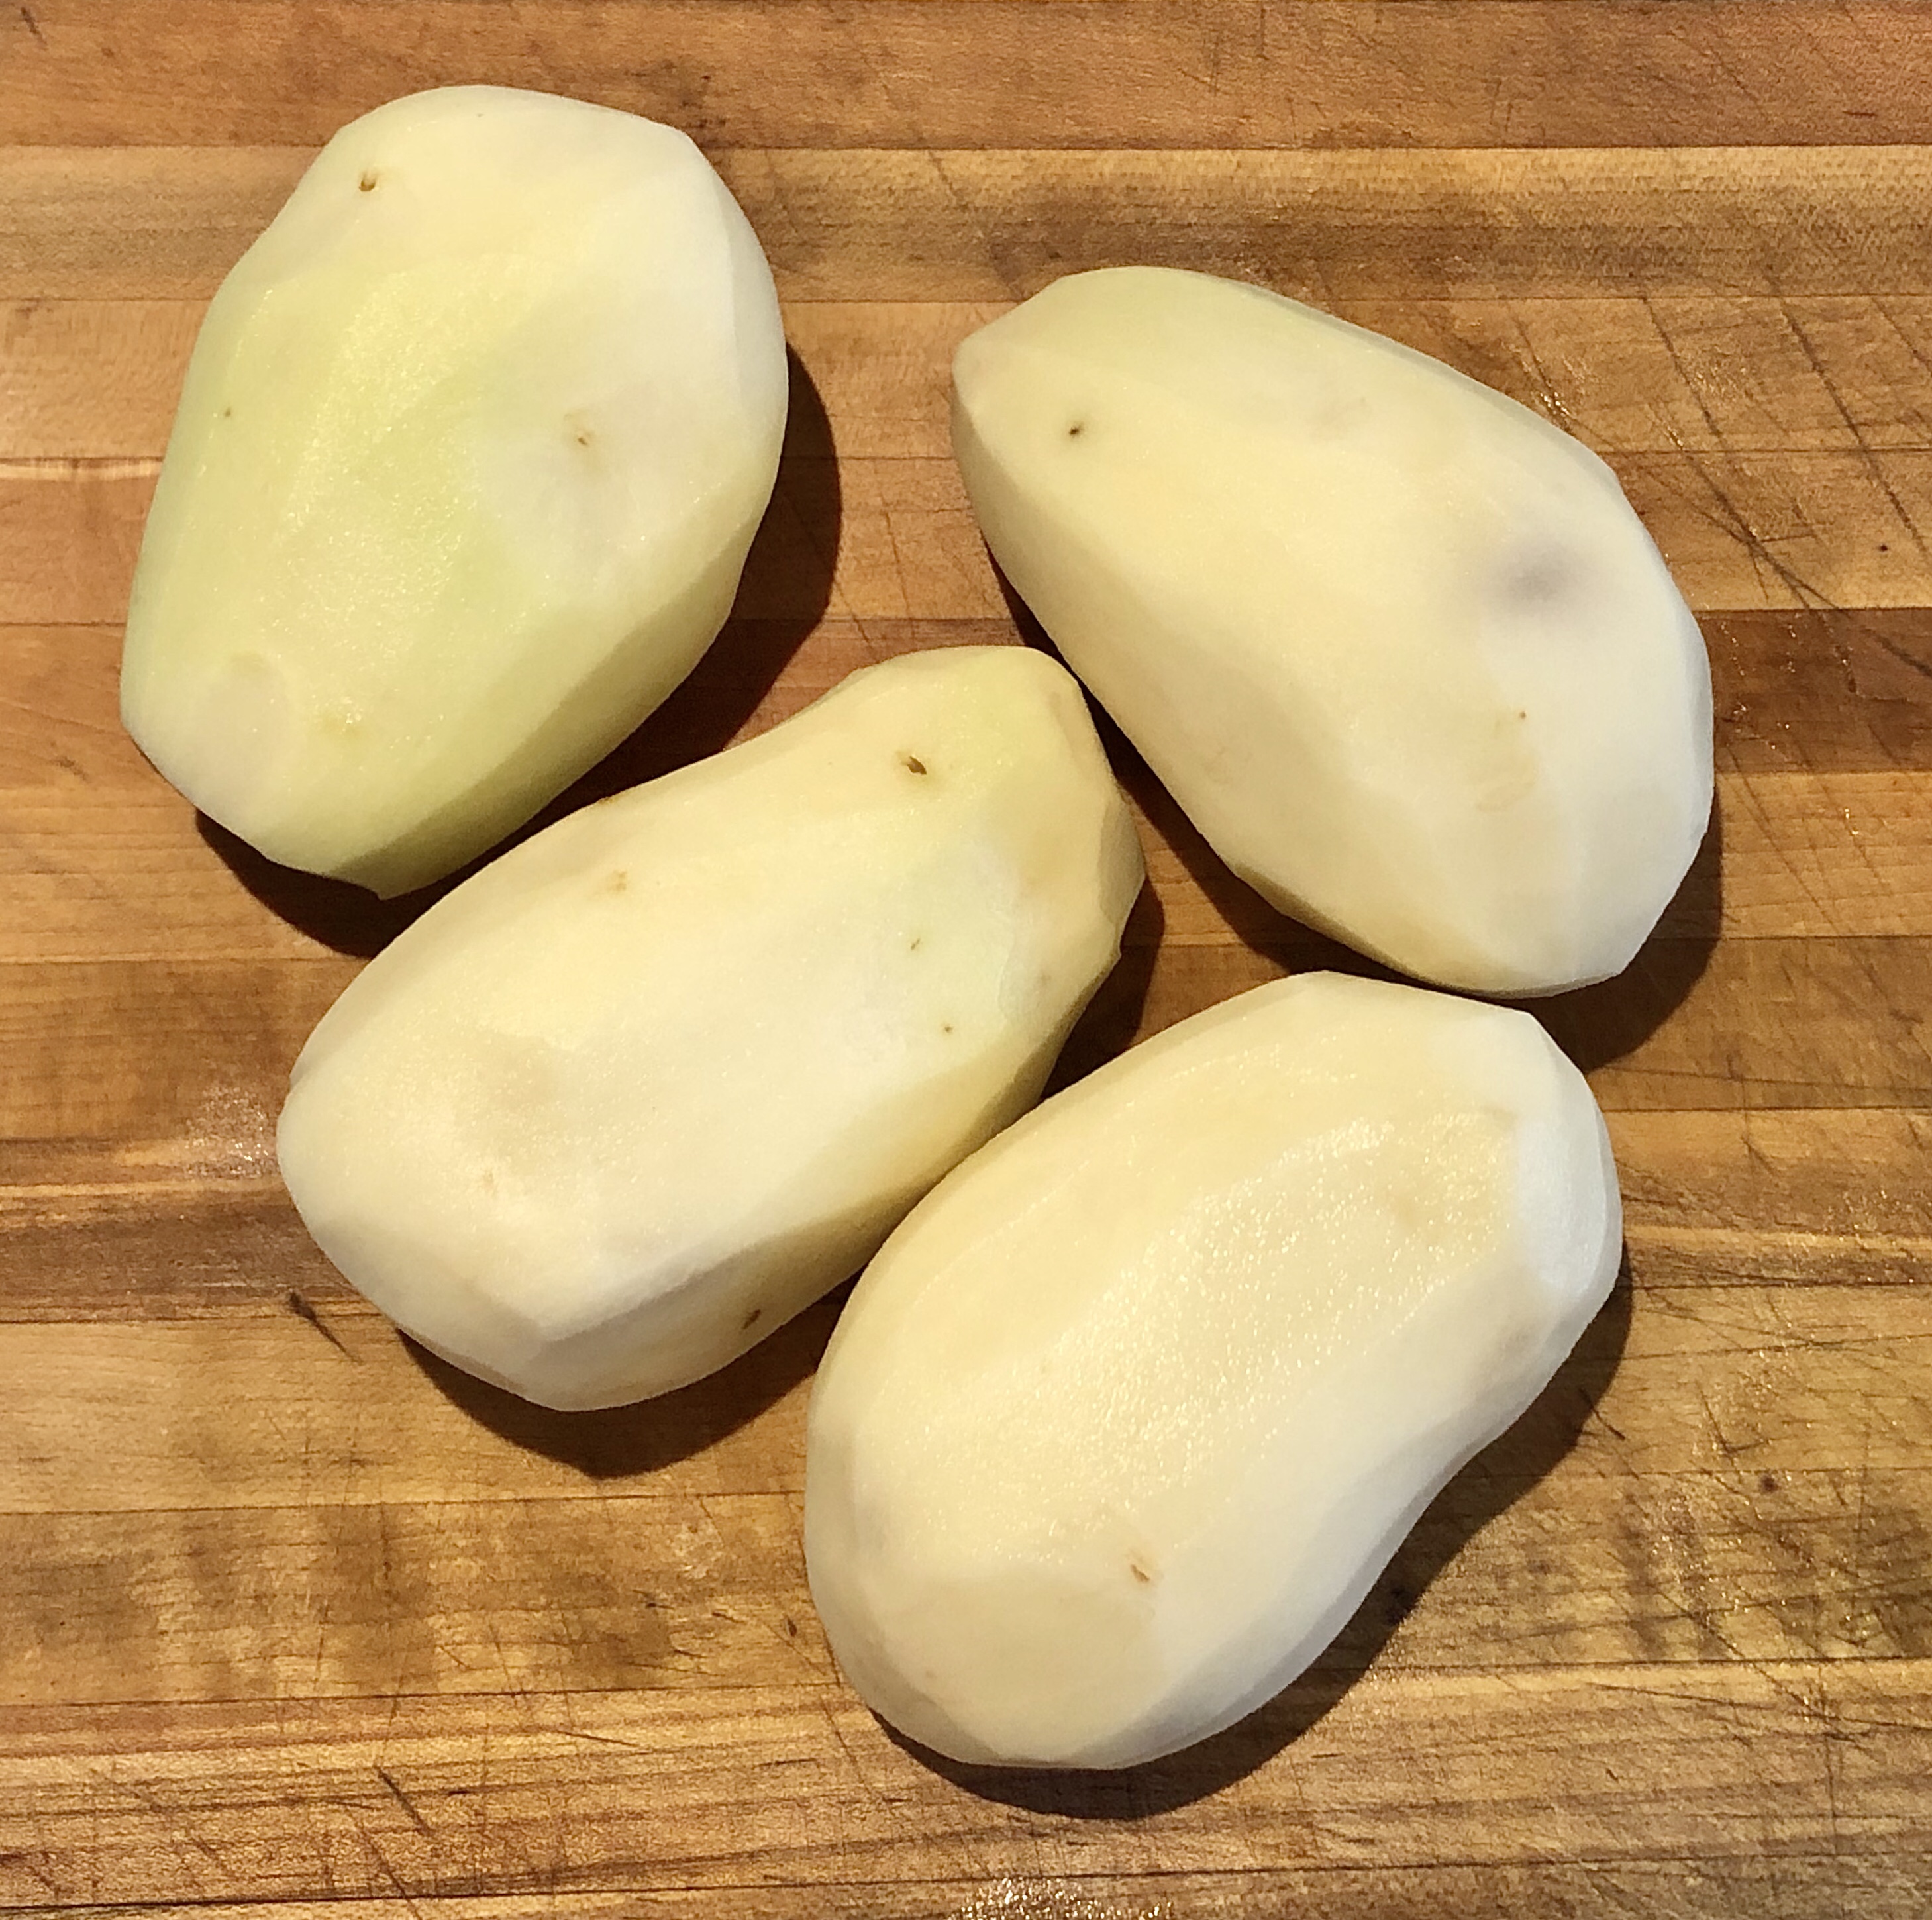
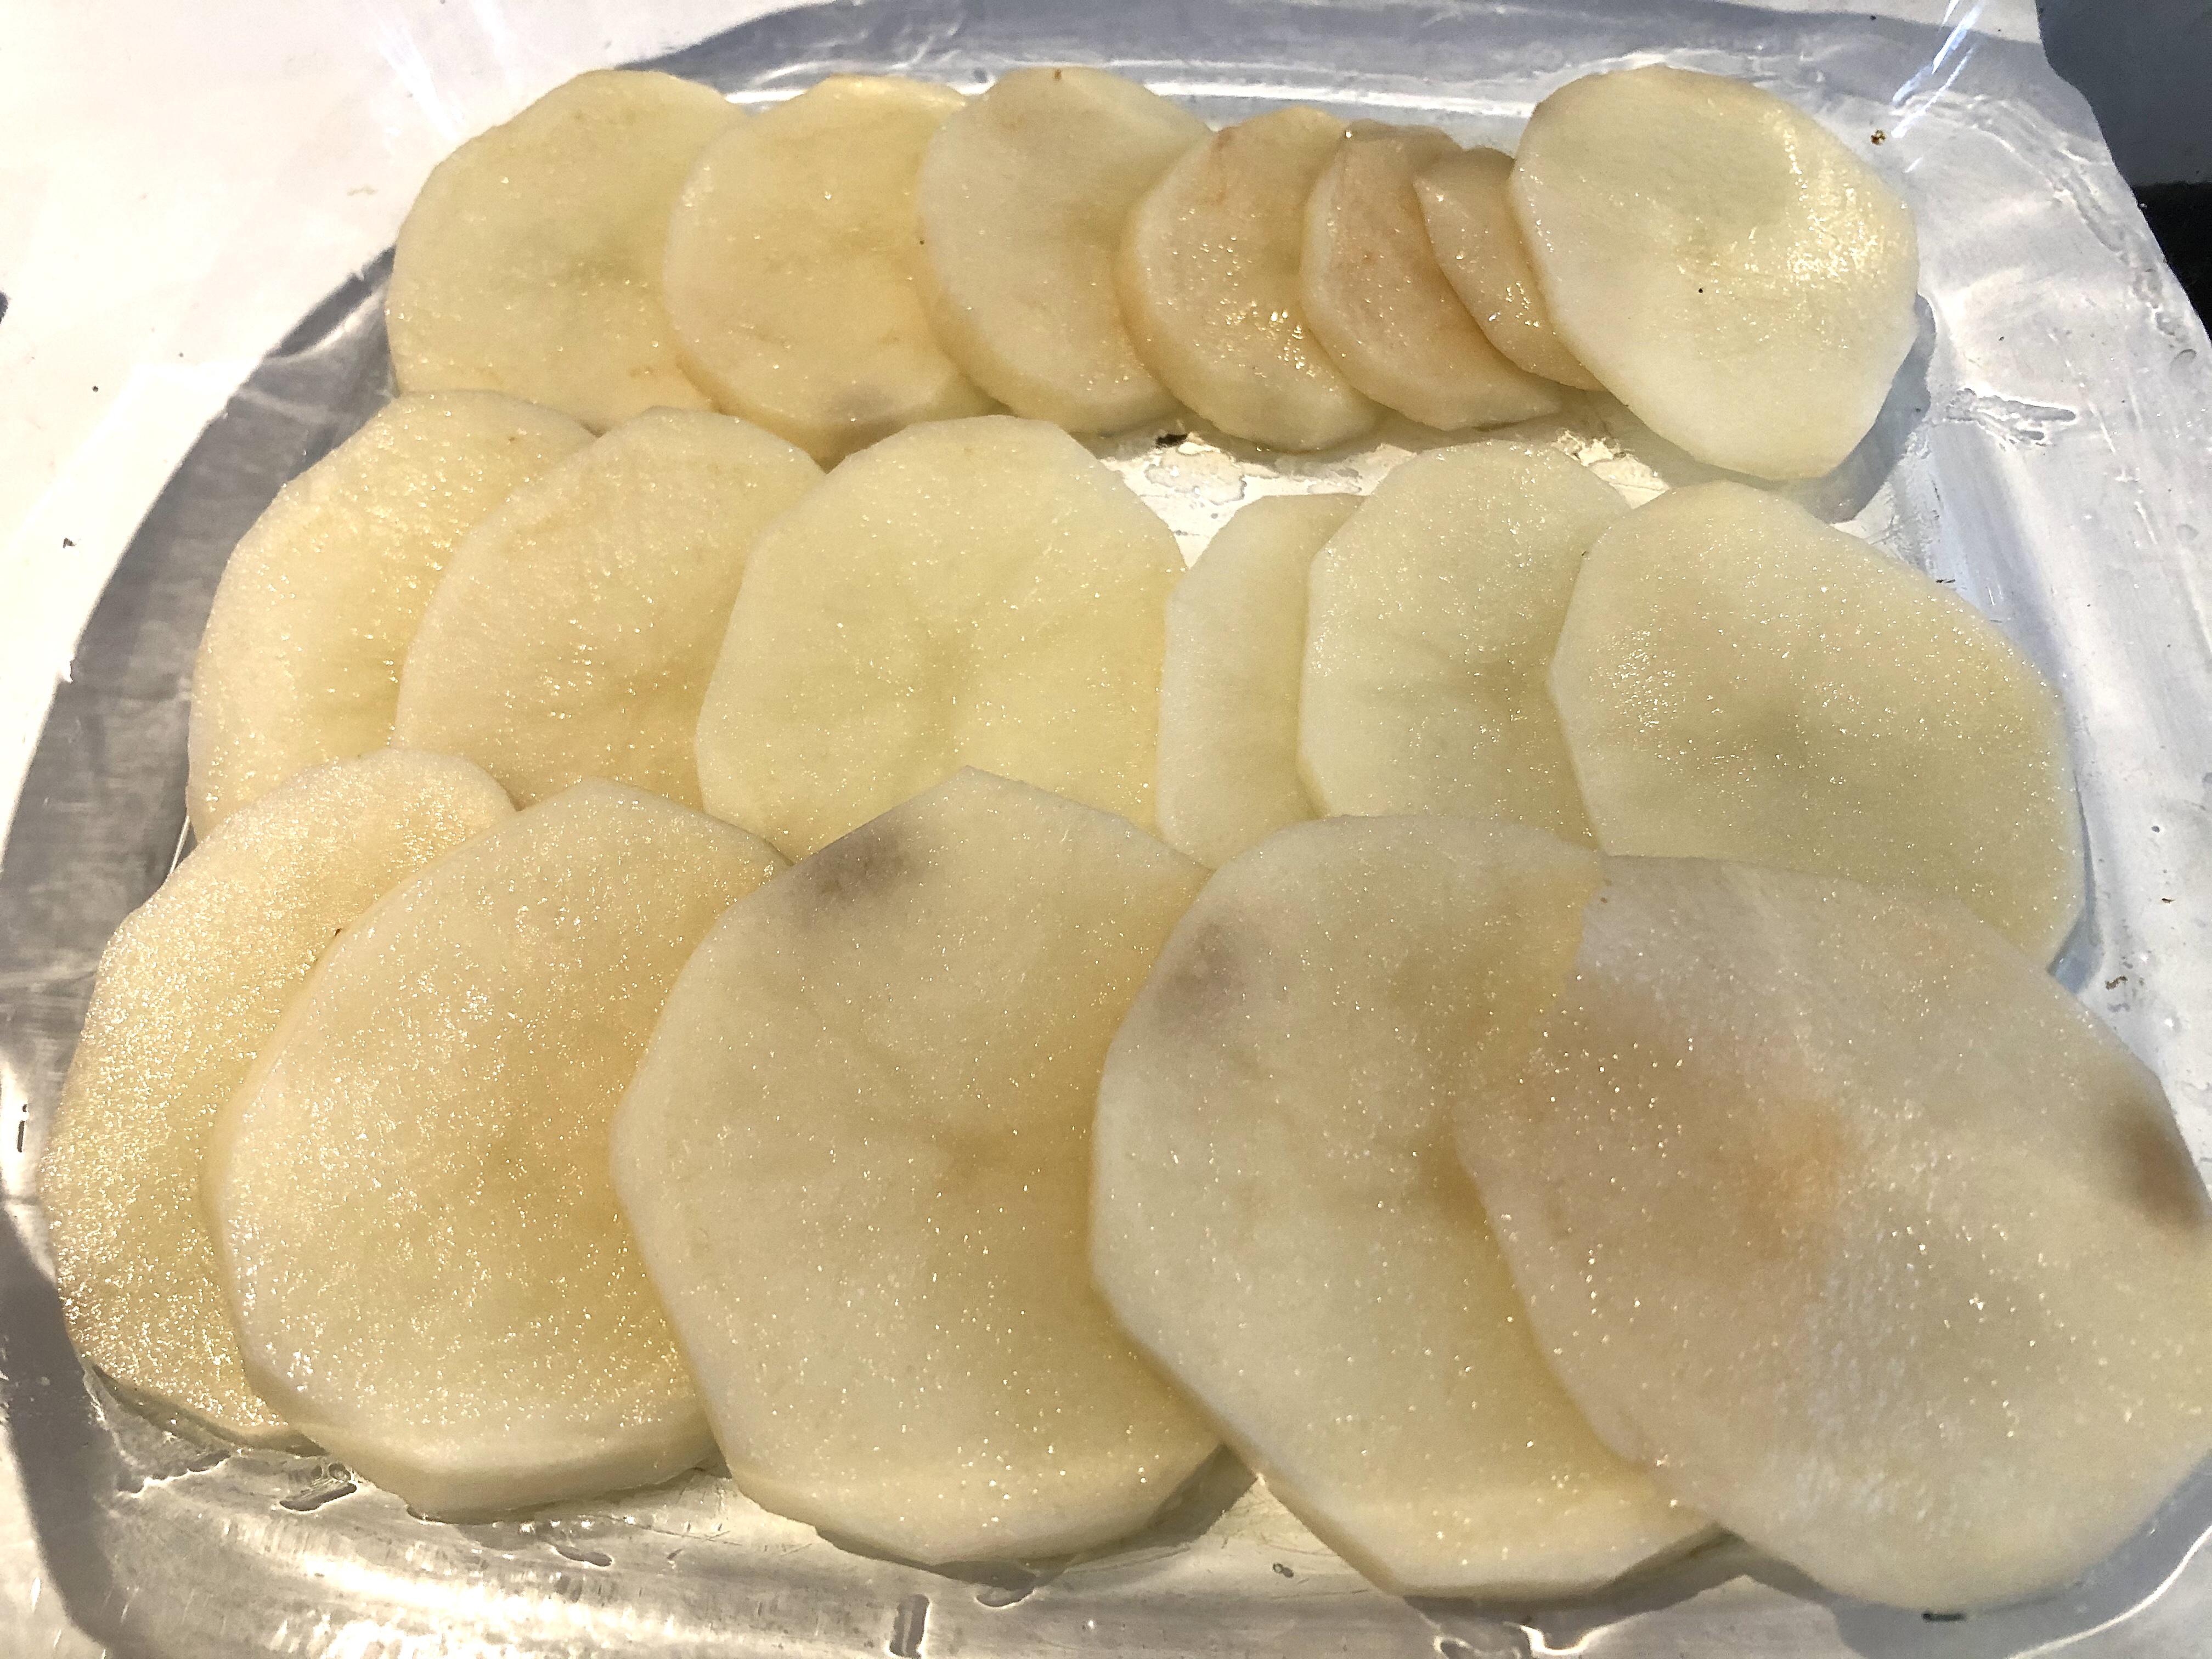
Meanwhile, slice the potatoes into thin rounds of equal thickness.

Advertisements
Advertisements

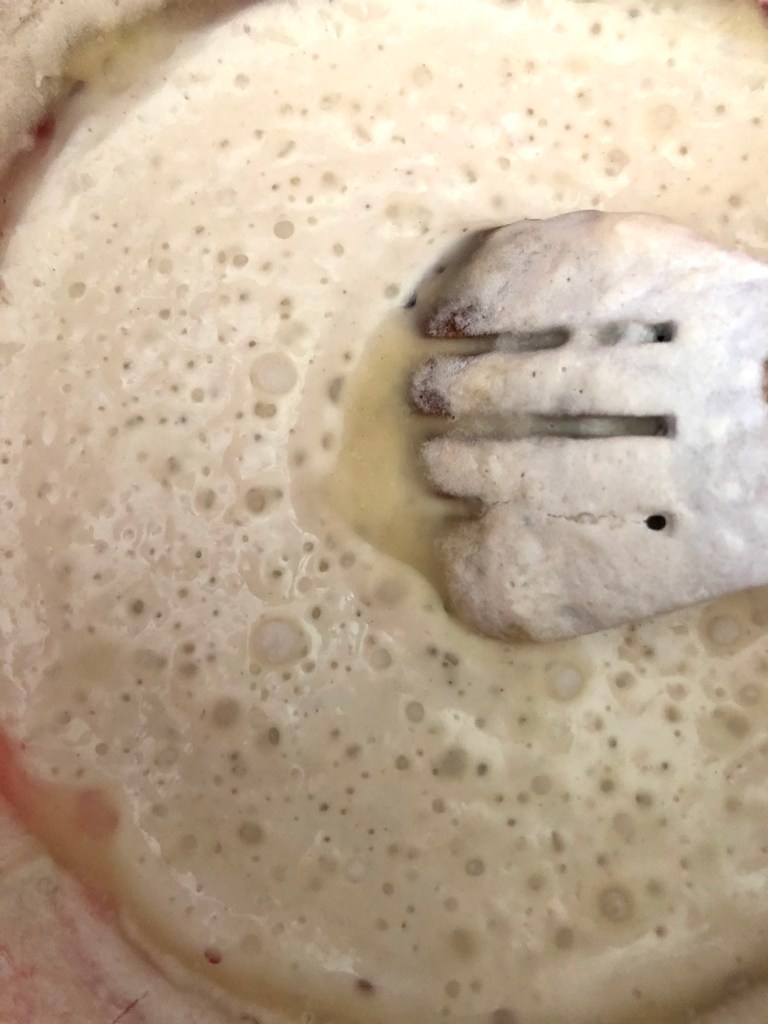
Once the onions are soft and translucent, add the flour to the pot and mix well with the buttery mixture.

Allow it to brown, stirring occasionally so it doesn’t burn.

This step adds so much flavour and is the “secrete” to good sauces and gravy.

(I remember a family friend being impressed that I knew to brown my flour when I was only 14 years old)

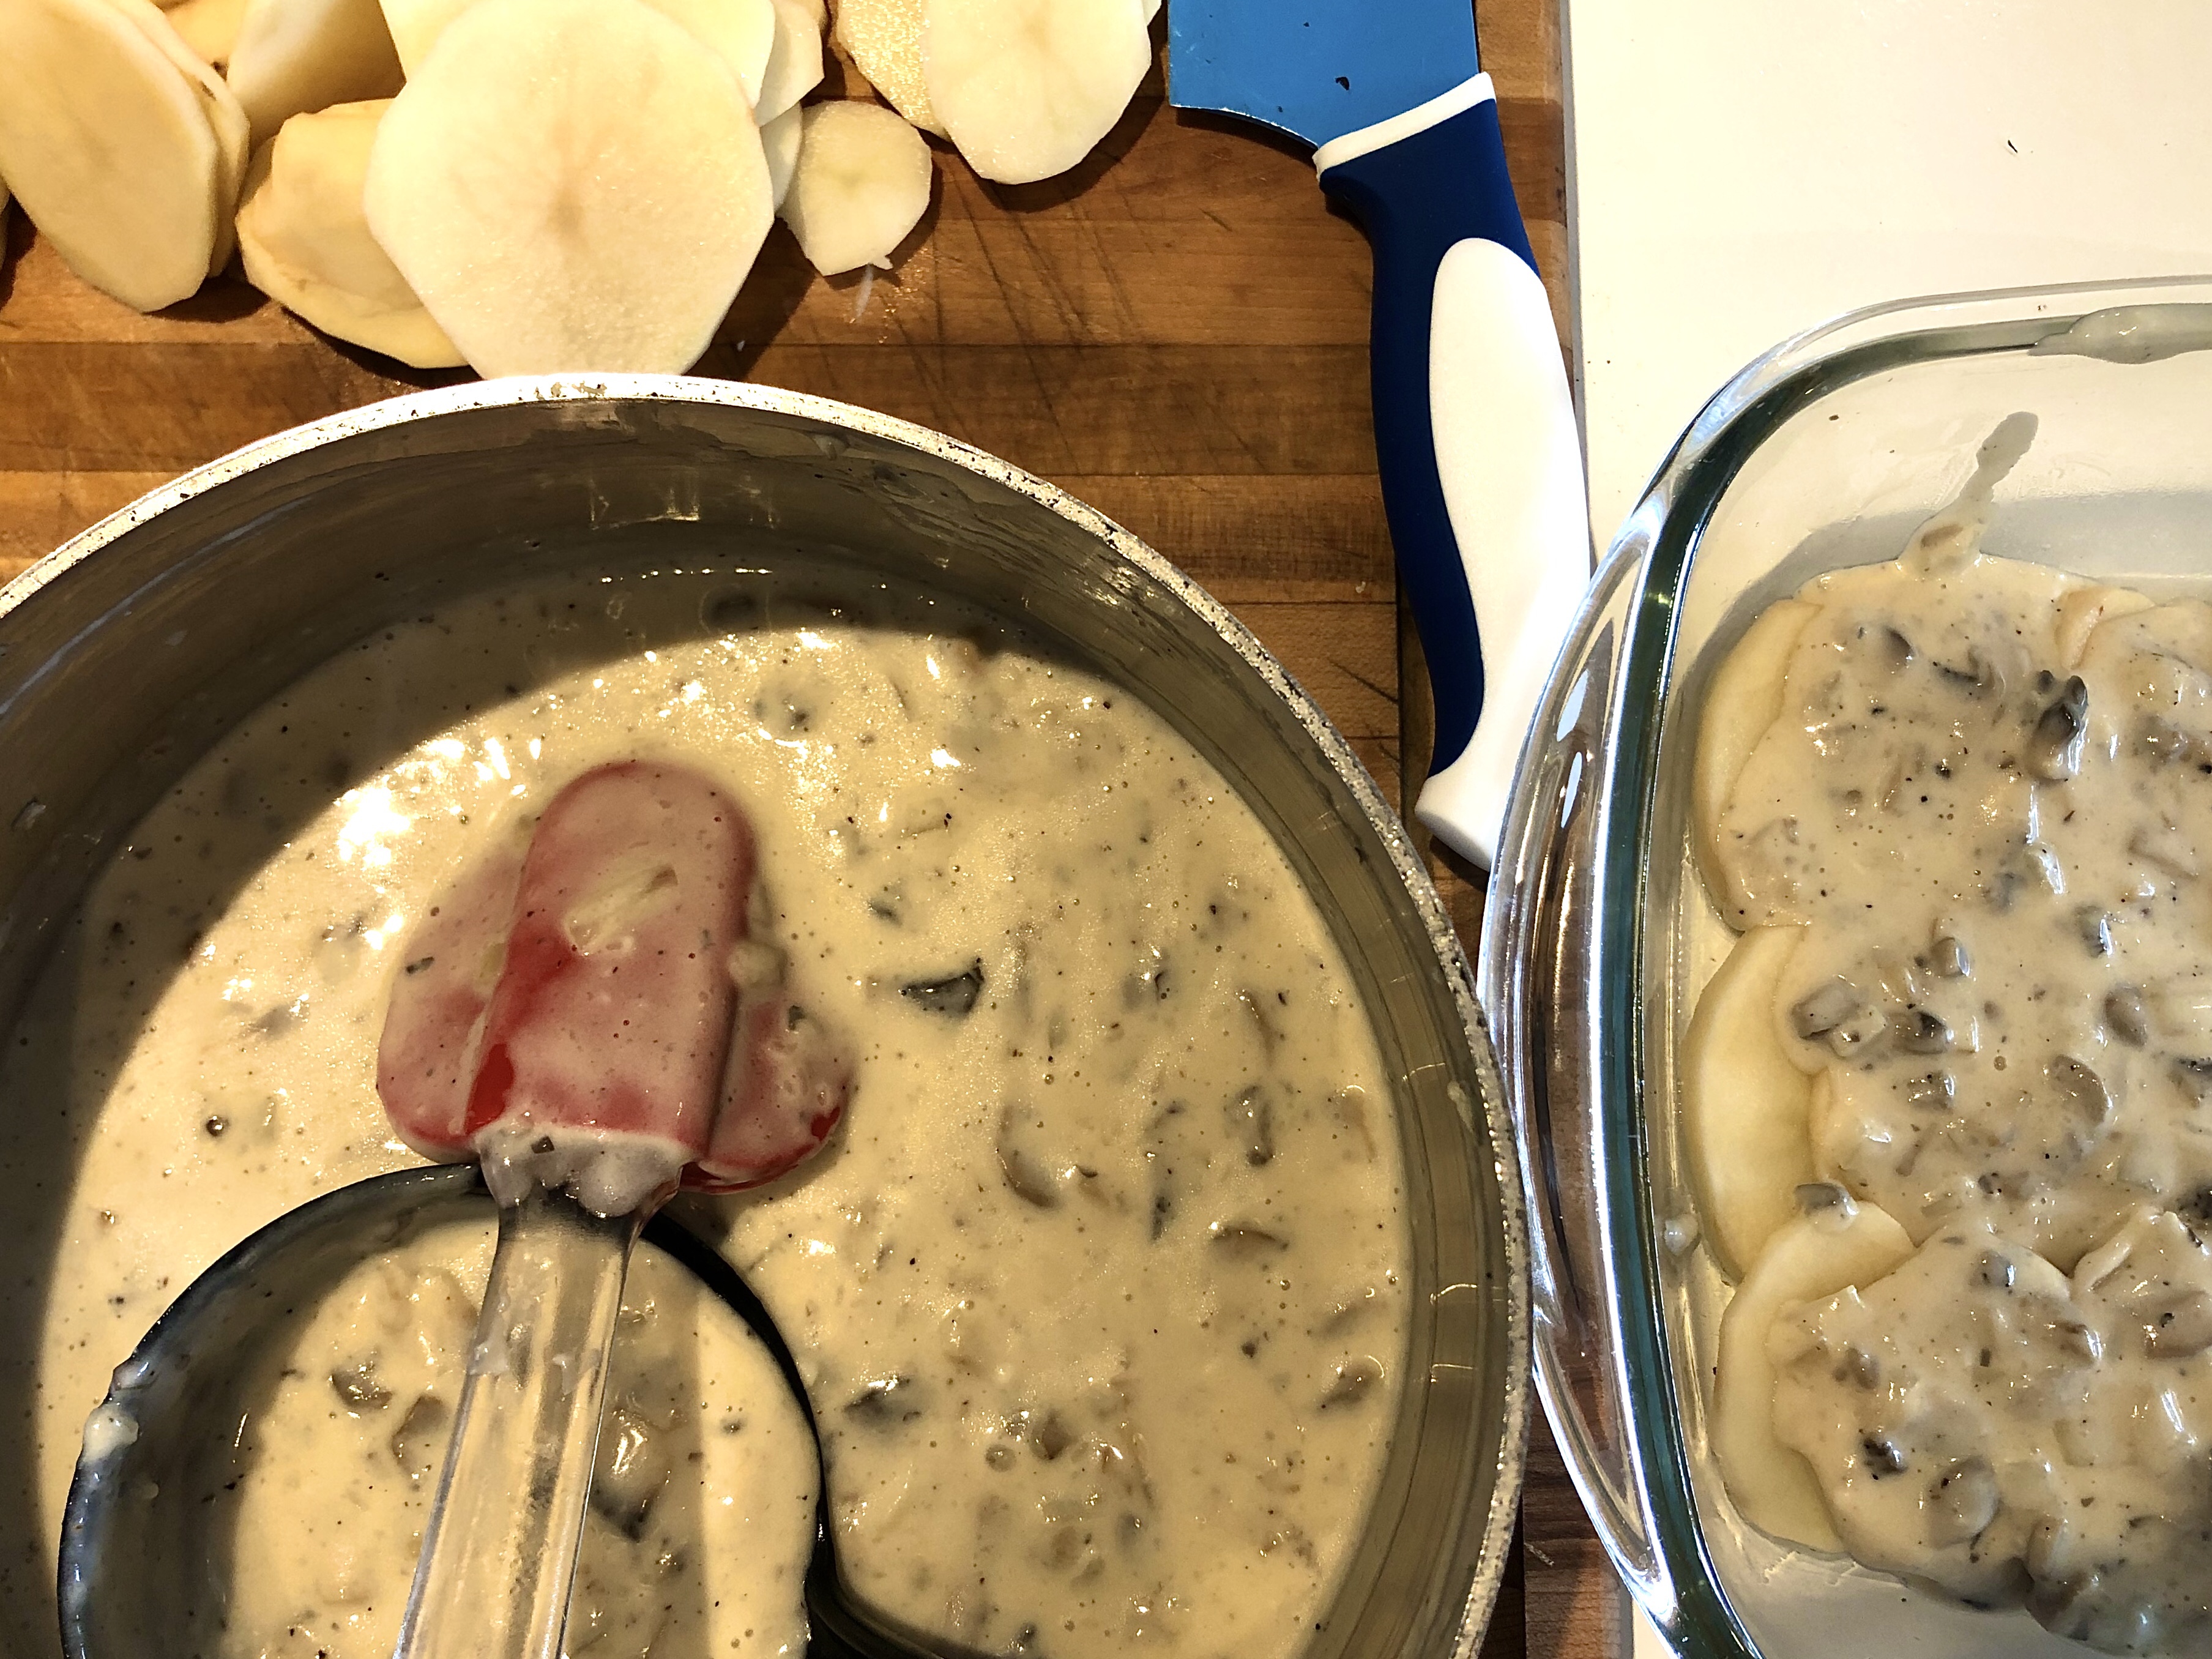
Next, add the cream of mushroom soup and milk, stirring out any lumps.

Bring to a boil and remove from heat.

Advertisements
Advertisements
Advertisements
Advertisements

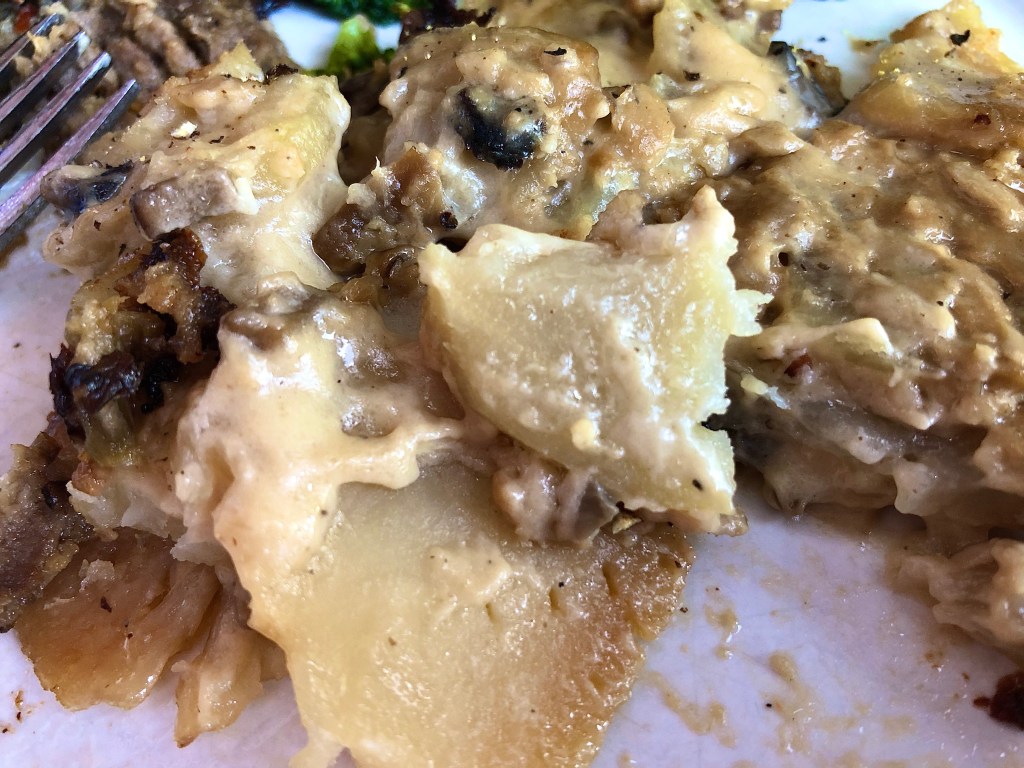
Layer the sliced potatoes in a greased pan and spoon the cream sauce over the potatoes, one layer at a time.

Typically this will take 4-5 layers in a standard 9×9 pan.

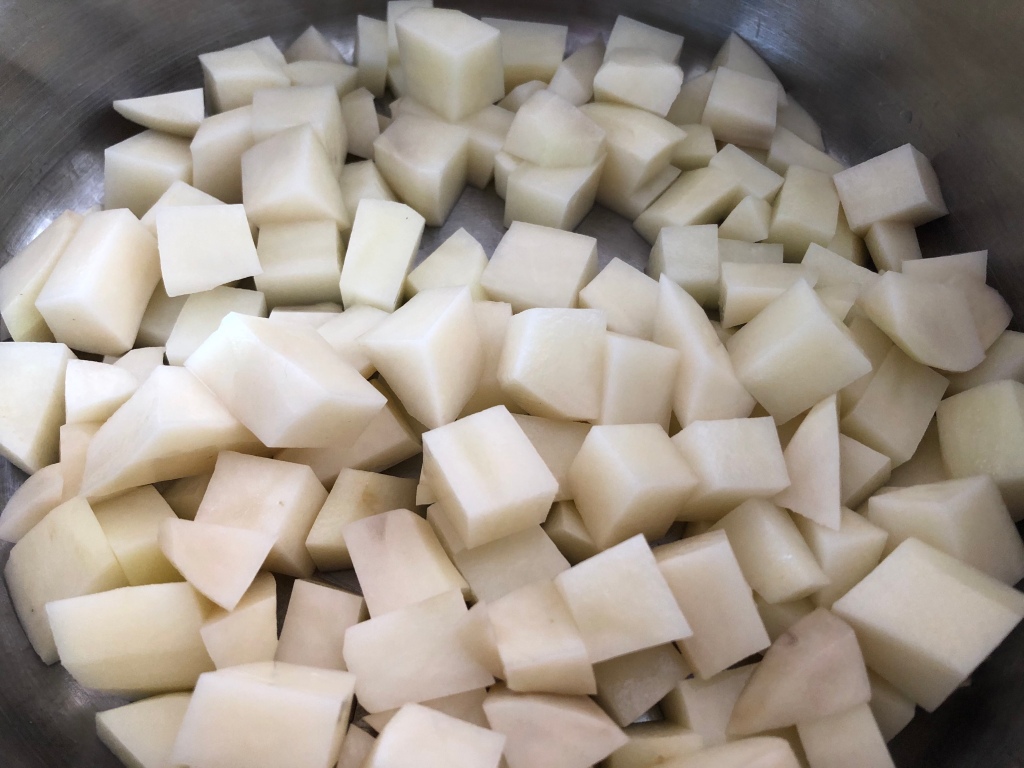
If you want a faster, easier option you can cube the potatoes rather than slice them and simply mix everything together in the baking pan.

I find that I am much faster at cubing potatoes than slicing them and then I can skip the layering step, however it does not get the traditional scalloped potatoes look.

Advertisements
Advertisements
Advertisements
Advertisements

Once you have layered all the ingredients, cover with tin foil and place in the pre-heated oven for an hour at 350º or until fork tender.

Remove the foil and allow to bake for another 5-10 minutes to brown the top.

Serve with your favourite main dish and veggies – and enjoy!

Some optional ingredients you can add are cheese on top, bacon bits mixed into the cream sauce or garnishing with green onions.

Advertisements
Advertisements
Advertisements
Advertisements

Recipe

4 medium potatoes, sliced

2 cups milk

1 large onion, finely chopped

2 cups mushrooms, chopped

3 cloves garlic, minced

3 tablespoons butter

2 tablespoons flour

1 teaspoon salt

1/4 teaspoon pepper

1 can cream of mushroom soup

Advertisements
Advertisements

Optional Ingredients

Cheddar cheese

Bacon bits

Green onions

Advertisements
Advertisements

Instructions

Slice potatoes into thin rounds of even thickness.

Sauté onions, mushrooms, and garlic in a large sauce pan with butter until soft.

Add salt, pepper, and flour and allow to brown before adding the cream of mushroom soup and milk, stirring out any lumps.

Bring to a boil and remove from heat.

Advertisements
Advertisements

Layer potatoes in a 9×9 greased baking pan and cover with sauce, then layer again and cover with sauce.

Repeat until all potatoes have been added and cover with a final layer of sauce.

Cover with tin foil and bake at 350º for 1 hour or until fork tender.

Remove foil and bake for another 5-10 minutes or until golden brown.

Enjoy!

Advertisements
Advertisements
Advertisements

Processing…
Success! You're on the list.
Advertisements
Advertisements
Advertisements
Advertisements

Round Steak and Gravy

Round Steak and Gravy has been a family favourite my whole life.

In fact, this was actually the very first meal I made from start to finish, all by myself at 12 years of age!

It was also our “featured special” for Kid’s Café when we would put on a date night for Mom and Dad, complete with candles and piano music from our recent lessons.

Advertisements
Advertisements
Advertisements
Advertisements

As with so many of my recipes, I have added or changed some of the ingredients over the years.

This recipe is hearty, packed with flavour, and is a “set it and forget it” crockpot champ!

Using cubed round steak, flour and brown the meat on high heat in a pan with oil.

Add salt and pepper as it cooks.

Advertisements
Advertisements

Note: you only want to brown the outside, not thoroughly cook the meat at this point; this helps add flavour while retaining the tenderness.

Once the cubes are golden brown on all sides, add to the crockpot with cream of mushroom soup and turn to low heat.

In the same frying pan, cook the chopped onion, mushrooms, and minced garlic until tender.

Advertisements
Advertisements
Advertisements
Advertisements

Add to the crock pot and mix well.

Leave on low heat for 3-4 hours.

At this point, the meat should be tender and flake apart.

Serve on top of boiled potatoes with a side of greens and you’re set!

Advertisements
Advertisements
Advertisements
Advertisements

Recipe

1 pound round steak, cubed

1/4 cup flour (or as needed to coat meat)

1 can cream of mushroom soup

1/2 large onion, chopped

2 cups mushrooms, chopped

3 cloves garlic, diced

Salt

Pepper

Advertisements
Advertisements

Instructions:

Coat cubed round steak in flour and fry in a pan with oil on high heat until golden brown on all sides.

Sprinkle with salt and pepper.

Place in crock pot with cream of mushroom soup on low heat.

In the same pan, cook onions, mushrooms, and garlic until soft.

Add to crock pot and mix well.

Cook on low for 3-4 hours.

Serve on boiled potatoes.

Enjoy!

(Serves 2)

Advertisements

Processing…
Success! You're on the list.
Advertisements
Advertisements
Advertisements
Advertisements

Chunky Salsa

Homemade salsa is so much better than store-bought and is quick and easy to make.

Whether serving it as a side, garnish or a stand-alone chip dip, chunky salsa is a winner.

Advertisements
Advertisements
Advertisements
Advertisements

Chop the tomatoes, jalapeño, onion, and cilantro finely.

Some people prefer to remove the seeds from the jalapeños, however I enjoy the extra crunch and heat they add.

Mix all ingredients well and sprinkle with salt, pepper, cayenne pepper, and sugar.

Advertisements
Advertisements

Yes, sugar!

I know that seems a little odd for a dish that is supposed to be spicy, but it makes the flavours pop!

Advertisements
Advertisements

Zest 1/4 of a lime and squeeze the lime juice over the salsa.

Serve as a chip dip along side homemade guacamole or pair with chicken fajita taquitos or fried tacos.

Advertisements
Advertisements

Recipe

1 large roma tomato

1/4 red onion

1 large jalapeño

1 bunch of cilantro

1/4 lime zest

1/4 lime juice

Salt

Pepper

Cayenne pepper

1/4 teaspoon sugar

Advertisements
Advertisements

Directions

Finely chop all vegetables and combine.

Zest 1/4 lime, then squeeze the juice into the salsa.

Sprinkle with salt, pepper, and cayenne to taste.

Add sugar and mix well.

Enjoy!

(Serves 2)

Advertisements
Advertisements

Advertisements

Processing…
Success! You're on the list.
Advertisements
Advertisements
Advertisements
Advertisements

Taco Salad

Cinco De Mayo was just last week and I decided a taco salad for lunch seemed like a tasty way to celebrate Mexican inspired cuisine!

I have a special appreciation for authentic Mexican food, but also enjoy our North American version of this style of cooking.

Sure, taco salad has a heavy dressing and even CHIPS – but it is loaded with nutritional veggies that I personally feel balance it all out.

It is like comfort food and health food in perfect harmony.

Advertisements
Advertisements

Slice all your veggies.

When it comes to making a good salad, the thiner the pieces the better; the more flavour you get on your fork in one bite the better the salad will taste!

We have all had that hugely chopped salad where one cucumber piece is an entire bite – or you are left to cut all your own veggies up on your plate.

For the salad mix, I prefer romaine lettuce, cherry tomatoes, bell pepper, cucumber, and red onion.

Advertisements
Advertisements

Some optional ingredients that I have used in the past and quite enjoy are corn, black beans or even sliced black olives.

For the dressing, I add 1 part salsa and 1 part sour cream – finishing it off with lemon zest and freshly squeezed lemon.

Combine all ingredients in a mixing bowl, along with shredded cheddar cheese and taco meat.

Advertisements
Advertisements
Advertisements
Advertisements

Drizzle dressing over the salad and mix well.

Plate and top with crushed corn chips of choice.

I have used anything from plain corn chips, to cheese chips, to jalapeño cheese chips.

The choice is up to you!

Next, add a side of avocado and sprinkle with cilantro.

(Cilantro seems to be a “love it or hate it” herb, so if you hate it, just skip this step. I won’t judge!)

Finish off with some freshly ground pepper.

Advertisements
Advertisements

You can treat this as a main course (like I did for lunch) or serve as a starter salad with Chicken Fajitas or Beef Taquitos.

Advertisements
Advertisements

Recipe

Salad Mix

1/2 head of romaine lettuce, shredded

6-8 cherry tomatoes, halved

1/4 bell pepper, chopped

1/2 English cucumber, chopped

Red onion, sliced thinly, to taste

1/4 cup cheddar cheese, shredded

Optional ingredients: corn, black beans, and sliced black olives.

Advertisements
Advertisements

Dressing

1/4 cup salsa

1/4 cup sour cream

1/4 lemon zest

1/4 lemon, juiced

Advertisements
Advertisements

Topping

Corn chips, crushed, to taste

Cilantro (optional) to taste

1/2 avocado, sliced and split between servings

(serves 2 as starter salad)

Advertisements
Advertisements

Directions

Slice vegetables, add to a mixing bowl with shredded cheddar cheese and taco meat.

Drizzle with salad dressing and mix well.

Plate and top with crushed corn chips, garnish with cilantro, and add a side of sliced avocado.

Enjoy!

Advertisements

Processing…
Success! You're on the list.
Advertisements
Advertisements
Advertisements
Advertisements

Sourdough Starter

With all these sourdough recipes floating around the internet these days, have you ever thought about trying your hand at it?

Initially, I found the prospect of making my own sourdough starter both a daunting idea and a very neat homestead-y concept.

Advertisements
Advertisements

Daunting because it sounded like a lot of work to not only start the sourdough starter, but also continue to feed it throughout its entire “life!”

Homestead-y (I may have made that word up…) because what is more “back to basic living” than using nothing more than water and flour to make bread nice and fluffy?

In any case, it seemed like an interesting skill to master – and guess what? I found it was easier than I thought!

Advertisements
Advertisements

I started by adding 1 cup lukewarm water and 1 cup white flour and mixed well.

There were still lumps of flour, but I didn’t worry about it; I have been making yeast bread since I was 10 or so and lumps at this stage always dissipate.

It takes a number of weeks to achieve a “mature” sourdough starter.

Therefore, patience is definitely a virtue in this case!

Advertisements
Advertisements

While developing this mature starter, you need to remove half the mix and feed the starter with more flour and water daily.

Many people say to throw the removed portion away, but I’m not about to waste that tangy flavour!

In the early stages, your starter will not give you the leavening effect you need to make your bread rise.

BUT it can still add flavour to yeast bread recipes! (Or pancakes… or waffles… or pizza dough…)

You simply need to add all the ingredients the sourdough recipe calls for PLUS yeast, so you get a good rise.

Advertisements
Advertisements

Once you have a mature sourdough starter, you really only need to feed it every few days to maintain it.

When you feed your starter, after removing half the batch, add 1/2 cup water and 1/2 cup flour and mix again.

Advertisements
Advertisements

Within a few hours, you should see bubbles starting to form; this means you have a healthy starter!

It should have a nice tangy smell, as well.

Make sure you put it into a container that is at least twice the size of your starter as it will expand when you feed it and don’t want it all over your counter.

I have my starter covered with a couple layers of cheese cloth.

Advertisements
Advertisements

To use the “throw away” portion from my mature starter, I have placed it in a mixing bowl and added 1/2 cup water and 1/2 cup flour – just like feeding the starter I’m keeping!

Then, I cover it and let it sit overnight or even up to 24 hours.

It should bubble nicely by the next morning and can be used for all kinds of recipes!

Check out my JALAPEÑO SOURDOUGH WAFFLES and HERBED SOURDOUGH PIZZA CRUST and SOURDOUGH ENGLISH MUFFIN and SOURDOUGH BAGEL and SOURDOUGH HAMBURGER BUN recipes!

Think you’re ready to try making your own sourdough starter? Or are you still not convinced it’s worth the work?

Drop a comment below with your thoughts!

Advertisements

Processing…
Success! You're on the list.
Advertisements
Advertisements
Advertisements
Advertisements

Premium Roast Beef

Roast beef is a classic Sunday dinner, its mouth watering aroma wafting through the house.

I am sure many of you have memories of rushing around the kitchen on Sunday morning, trying to eat breakfast and get the roast into the oven before arriving a tad late for church.

But, coming home to the glorious smell filling the house and food ready to dig into made it all worthwhile!

Advertisements
Advertisements

This roast beef recipe is a bit different than I grew up with, but is oh-so-tasty!

The added fragrance of garlic, rosemary, and thyme with the seared roast is wonderful!

Plus, searing the roast in butter adds so much flavour.

It must be my mom’s side coming out in me; butter = flavour!

Advertisements
Advertisements
Strip Loin
Advertisements
Advertisements

Strip Loin is a fabulous cut to use for this recipe.

I buy the huge slabs from Costco and cut them into roasts, freezing 7 or 8 meals worth from one slab.

They kind of end up looking like big steaks and make a meal for 2, at least the size I cut them.

Once thawed, I pre-heat a pan on high heat and add butter, garlic, and rosemary & thyme sprigs.

Next, I sear all sides of the roast until golden brown, spooning the hot garlic butter over the roast.

Oh! And of course salt & pepper are always a must.

Advertisements
Advertisements
Advertisements
Advertisements

Once it is browned on all sides, I place it in the crockpot with white cooking wine and Worcestershire sauce, adding the rosemary and thyme sprigs on top and the garlic on the sides.

Drizzle with butter from the pan.

Now the wait begins… part of the tender, fall-apart-on-your-fork process is a looong, sloooow cook time on low temperatures.

I set the crockpot on low and leave for 4-5 hours.

Advertisements
Advertisements

An hour or so before you plan to serve the roast beef, start on the sides.

I love Loaded Hasselback Potatoes as an easy, yet fancy looking side.

Almond Carrots or Balsamic Brussels Sprouts are tasty veggie options to add.

Plus, you can never go wrong with a salad to start…

Advertisements
Advertisements

Good gravy to finish it all off is a must!

In a sealed container, shake 1/4 cup cold water and 1 tablespoon corn starch until well mixed.

Whisk this mixture into 1 cup of the drippings in a sauce pan.

Bring to a boil and allow gravy to thicken.

Cut and serve the roast with your favourite sides.

Drizzle liberally with gravy.

Enjoy!

Advertisements
Advertisements
Advertisements
Advertisements

Recipe

Strip loin roast

2 tablespoons butter

2 sprigs rosemary

2 sprigs thyme

2 cloves garlic

Salt & pepper

1/2 cup white cooking wine

2 tablespoons Worcestershire sauce

Advertisements
Advertisements

Gravy

1 cup drippings

1/4 cup cold water

1 tablespoon corn starch

Advertisements
Advertisements

Sear roast in pan on high heat with butter, rosemary, thyme, and garlic until all sides are golden brown.

Sprinkle with salt & pepper.

Place into crock pot on low setting for 4-5 hours.

Combine cold water and corn starch, then whisk together with 1 cup drippings in a sauce pan on high heat.

Bring to boil and allow to thicken.

Plate roast beef and drizzle liberally with gravy.

(Serves 2)

Advertisements
Advertisements

Processing…
Success! You're on the list.
Advertisements
Advertisements
Advertisements
Advertisements

Loaded Hasselback Potatoes

Looking for ideas to switch up your meal routine?

This fun way to fancy-up a baked potato is simple and tasty!

Russet potatoes are the best for this recipe because of their consistent size, shape, and great baking qualities.

Lay chopsticks on either side of your potato and slice into thin pieces.

The chopsticks help keep and even amount of potato attached at the bottom.

Slice up some cheddar cheese and jalapeños.

Advertisements
Advertisements

Stuff your potato with the cheese and jalapeños.

Next, melt some butter and add a clove of minced garlic.

Brush potatoes with the butter mix.

Sprinkle with salt and pepper.

Advertisements
Advertisements

Place in the pre-heated oven at 450º and bake for 1 hour or until fork tender.

Advertisements
Advertisements

Once it is finished baking, transfer to a plate.

Add sour cream, shredded cheddar cheese, bacon bits, diced jalapeños, and garnish with green onion.

(CLICK HERE FOR HOW TO GROW AN ENDLESS SUPPLY OF GREEN ONIONS FOR FREE!)

Advertisements
Advertisements
Advertisements
Advertisements

Goes well with Premium Roast Beef, Hamburgers or BBQ Chicken.

Balsamic Brussels Sprouts (CLICK HERE) make a great side!

Enjoy!

(Serves 2)

Advertisements

Processing…
Success! You're on the list.
Advertisements
Advertisements
Advertisements
Advertisements

Balsamic Brussels Sprouts

Who here likes their veggies?

Or do you simply eat them to get your dose of greens like you’re supposed to?

I personally love most veggies, but Brussels Sprouts had never been in my top 10 picks.

With grocery stores having shortages and limited supply on a lot of the vegetables I typically would buy, I ended up substituting Brussels Sprouts so we had at least some greens to go with our meals.

Turns out I like them a lot better when they are home-cooked!

This simple recipe only requires 5 ingredients – including the Brussels Sprouts!

Advertisements
Advertisements

Start by adding butter to a pan on medium heat.

Once it is melted, add the Brussels Sprouts and sauté until they are fork tender.

If they are fresh, this doesn’t take very long; if they are frozen, plan for it to take a few minutes more.

Salt and pepper to taste.

Drizzle with balsamic vinegar, leaving on heat for 1-2 minutes.

You can serve the sprouts whole or cut them in half.

Serve and enjoy!

Advertisements
Advertisements

They pair well with Premium Roast Beef and Loaded Hasselback Potatoes.

Advertisements
Advertisements

Recipe

3 cups Brussels Sprouts

2 tablespoons butter

Salt & pepper to taste

2 tablespoons balsamic vinegar

Sauté Brussels Sprouts with butter on medium heat.

Add salt & pepper to taste.

When they are fork-tender, add balsamic vinegar and leave on heat for another 1-2 minutes.

Fast, easy, and tasty – enjoy!

(Serves 2)

Advertisements

Processing…
Success! You're on the list.
Advertisements
Advertisements
Advertisements
Advertisements

Potato Salad

Can you say “yum” to this side that completes any summertime, sizzling BBQ?

The smell of burgers on the grill, the sound of loved-ones visiting in the background, the feel of warm, evening sunshine on your face…

… for me, these are the sweet memories brought back by this recipe.

I know many people think potato salad is a lot of work and takes soooo much time.

Advertisements
Advertisements

Which is true in the fact that it takes time, but a lot less work than many would think.

I have customized this recipe with all of my favourite ingredients.

As a rule of thumb, I plan for 1 medium sized potato per person and 2 eggs per potato.

Half the eggs get mixed into the potato salad, while the other half are beautiful sliced accents on top.

Advertisements
Advertisements

Start by peeling the potatoes.

Dice them into cube sized pieces.

Add to a pot with cold water and salt.

Pro tip: add your eggs to the pot with the potatoes to reduce dishes and get perfectly cooked eggs!

OR – use the easy-peel Instant Pot method for your eggs (full instructions here)

Bring to boil, then reduce heat to a simmer until potatoes are fork-soft.

This will take about 8-10 minutes.

Advertisements
Advertisements

Next, drain the water and place the eggs in a bowl with ice water until they are fully cooked.

While the eggs cool, add Miracle Whip, mustard, dill, and diced pickles.

I usually add a splash of pickle juice for a bit of extra zip.

Advertisements
Advertisements

Peel the egg, add half of them to the bowl with the potatoes and mash slightly.

If you prefer to chop the eggs rather than mash, go for it! I find using a fork just as easy as cutting them and it makes less mess.

Advertisements
Advertisements

Slice the remaining eggs into rounds.

Scoop the potato salad into your serving dish and top with the sliced eggs.

Sprinkle with paprika.

Chill until fully cooled and enjoy!

Potato salad makes a great side to go with hamburgers fresh off the grill, smothered in toppings, and finished off with homemade sourdough hamburger buns!

Advertisements
Advertisements

Recipe

2 medium sized potatoes, peeled and cubed

4 eggs

1/2 cup Miracle Whip

1 tablespoon mustard

2 large pickles, diced

2-3 sprigs dill, chopped

1 teaspoon salt (added to pot while cooking potatoes)

Paprika, sprinkled to taste

Advertisements
Advertisements

Boil the potatoes and eggs together in salted water until potatoes are fork tender, about 8-10 minutes.

Place eggs in ice water until cool and drain potatoes.

Mix potatoes, Miracle Whip, mustard, pickles, and dill.

Add 2 eggs and mash slightly with a fork.

Transfer potato salad to serving dish.

Slice remaining 2 eggs into rounds and place on top of potato salad.

Sprinkle with paprika.

Chill until completely cool.

Enjoy!

(Serves 2)

Advertisements

Processing…
Success! You're on the list.
Advertisements
Advertisements
Advertisements
Advertisements

Jalapeño Popper Stuffed Chicken Breast

Want to make a fancy meal that isn’t expensive and is even pretty easy to make?

This recipe is bound to impress!

Not only does it taste amazing and look like a gourmet chef created it, but it is also easy to make – and won’t break the bank!

I am a big fan of foods with a bit of heat, so I took the concept of Cordon Bleu and spiced it up a bit. (It has Jalapeños, so yep! It had a bit of kick!)

Advertisements
Advertisements

First, thaw 2 large chicken breasts. If you want to go with fresh cuts, go for it! Frozen tends to be less expensive and lasts longer.

Prep your ingredients: shred your cheese, dice the jalapeños, mince the garlic, and soften the cream cheese.

Combine these ingredients, along with the salt, pepper, and cayenne powder and mix well.

Advertisements
Advertisements
Advertisements
Advertisements

Next, butterfly cut your breasts. This simply means cutting it almost in half between the top and bottom of the breast, but leaving it attached at one side.

Cover with plastic wrap and flatten with a meat tenderizer. Don’t hammer it too thin, though!

Pat the chicken dry with paper towel.

Advertisements
Advertisements

Add the cheese mix and spread evenly on the chicken.

Advertisements
Advertisements

Next, roll it up!

Wrap in plastic…

Advertisements
Advertisements

… and roll it tightly so it looks like the photo above.

Refrigerate for 30 minutes. This will help the roll to hold shape during the cooking process.

If you are in a hurry, you can pop them in the freezer for about 10 minutes, instead.

To coat it and give it a nice crunchy finish with a golden color, dredge in flour. I used to skip this step and go straight to the beaten eggs, however flour helps the egg adhere to the chicken.

Once floured, cover well in egg, then dredge in the Panko crumbs.

Advertisements
Advertisements
Advertisements
Advertisements

Add to a pre-heated pan with canola oil on high heat.

Rotate the rolls so they brown evenly on all sides.

You are not trying to cook them thoroughly at this point, so don’t worry about that. You are simply getting that golden finish.

Advertisements
Advertisements

Place on a baking sheet and put in the oven for 20 minutes at 350º or until the internal temperature reaches 165º

Slice into rounds and serve on rice. (CLICK HERE FOR THE ROSEMARY RICE RECIPE)

Add a side of some balsamic Brussels sprouts and you are set!

Advertisements
Advertisements

Recipe

2 large chicken breasts, thawed

1 large jalapeño, diced

1/2 cup cheddar cheese, shredded

1/4 cup cream cheese

1 clove garlic, minced

1/4 teaspoon salt

1/4 teaspoon pepper

1/4 teaspoon cayenne pepper

Refrigerate for 30 minutes.

Advertisements
Advertisements

Breading

Flour

Beaten egg

Panko mix

Advertisements
Advertisements

Directions

Butterfly cut the chicken breasts and flatten with a meat tenderizer.

Mix cream cheese, cheddar cheese, jalapeños, garlic, salt, pepper, and cayenne pepper.

Spread cheese mix evenly on the chicken.

Roll tightly, using plastic wrap, and refrigerate for 30 minutes.

Remove plastic wrap and add rolls to a pre-heated pan with oil on high heat.

Sear the sides evenly until golden brown.

Place in oven at 350º for 20 minutes or until interior temperature reaches 165º

Slice into rounds and serve on rice.

Enjoy!

Advertisements
Advertisements

Advertisements

Processing…
Success! You're on the list.
Advertisements
Advertisements
Advertisements
Advertisements